
What does “Inappropriate Activity Detected” Mean in Elden Ring?
If you get the “Inappropriate Activity Detected, Unable to Start in Online Mode” error message, there could be multiple reasons why. The main reason that has got players worried is that FromSoftware has potentially flagged them for a ban. In case you have used a mod or a cheat while you are connected to the internet (or even while you are offline), there’s a chance that you could get banned.
Now, this isn’t confirmed yet – we will find out as soon as there’s chatter about a ban wave. But just to be safe, make sure to disable mods before going online. It isn’t guaranteed that using cheats while being offline will help you avoid a ban, but it’s worth a try. If you’ve received this message at launch, it’s could be a sign that the game has detected something wrong.
What if you are not using any mods or cheats?
While some players are using mods to be able to pause the game or remove the framerate cap of 60FPS, most are not using anything to change their game/character stats. But what if the player they have summoned into their world is using cheats? Can you get kicked from the boss fight in online mode in this situation? Well, there could be a chance of this happening, but there’s no official word from FromSoftware about this, yet.
How to Fix Inappropriate Activity Detected in Elden Ring?
Based on comments on Reddit, some players have got this error even when they have newly installed the game. For others, this message constantly kept appearing every time they reloaded the game after it crashed.
To potentially fix this error message, try the following:
- Close Steam, restart it, and load up Elden Ring to see if it still comes up.
- Go to your computer’s Windows Settings > Time and Language > Language > Administrative Language Settings > Change System Locale > Tick “Beta: Use Unicode UTF-8 for worldwide language support” and click on OK. After this, restart your PC.
- If at all it’s VPN-related, load up the game with VPN disabled and see if the error comes up.
-
Repair EAC (Easy Anti Cheat)
- Launch Steam and find the game in your Library.
- Right-click on the game’s name.
- Click on Properties.
- Select Local Files.
- Browse Local Files and find the EasyAntiCheat folder.
- Next, double click EasyAntiCheat_Setup.
- Choose Elden Ring.
- Repair Service from there.
- You can also uninstall Easy Anti Cheat and reinstall it.
- Update and/or uninstall Epic Launcher (for some reason, this seems to work for a few players)
-
Verify Steam Game Files Integrity
- Open the Steam client.
- Find Elden Ring in the Library.
- Right-click on the name and click on Properties.
- On the left side, there’s a Local Files tab that you need to click on.
- Click on Verify Integrity of Game Files.
- After the verification process is done, load up the game again and see if it still crashes midway or at startup.
- Check if Elden Ring servers are down. Some players are getting kicked because of a server disconnection as well.
- It could be a bug if you are not using any mods or cheats, so simply hit OK on the pop-up and try connecting again.
- Last but not the least, send a Support Ticket to the devs for assistance.
That’s basically everything you can try to potentially fix this error. For more on Elden Ring, be sure to check out our guides section.
Other monitors have the wrong aspect ratio
Image used with permission by copyright holder
When this happens, other monitors will have a puzzling aspect ratio, often only using a tiny part of the screen as if your PC thinks the other monitor has an extra-large 21:9 aspect ratio — or possibly zooming in too far. Typically, this is caused by a resolution or settings issue that can be resolved.
Review your resolution settings: Go through our resolution section above, and make sure that your resolution settings match each monitor you are using. Use recommended or screen-fitting options where possible.
Switch cables: If you have the option, try a different cable standard, like switching from DisplayPort to HDMI or vice-versa. When doing this, make sure the cables you are using support your current resolution — older cables may not support UHD/4K resolutions, which could cause this aspect ratio issue.
Are you using a TV as a second monitor?: If so, go into your TV settings and look for options to turn off the Overscan or Underscan setting. This may also be called a Relax mode. You may also want to make sure there are no Aspect Ratio modes accidentally enabled. Consult your TV manual for more information.
Check your display orientation: This isn’t as common, but the issue may be the monitor’s orientation. In Windows, go to the Display section and look for Display Orientation. Try switching the orientation to something like Portrait, then switch it back to Landscape and see if this helps.
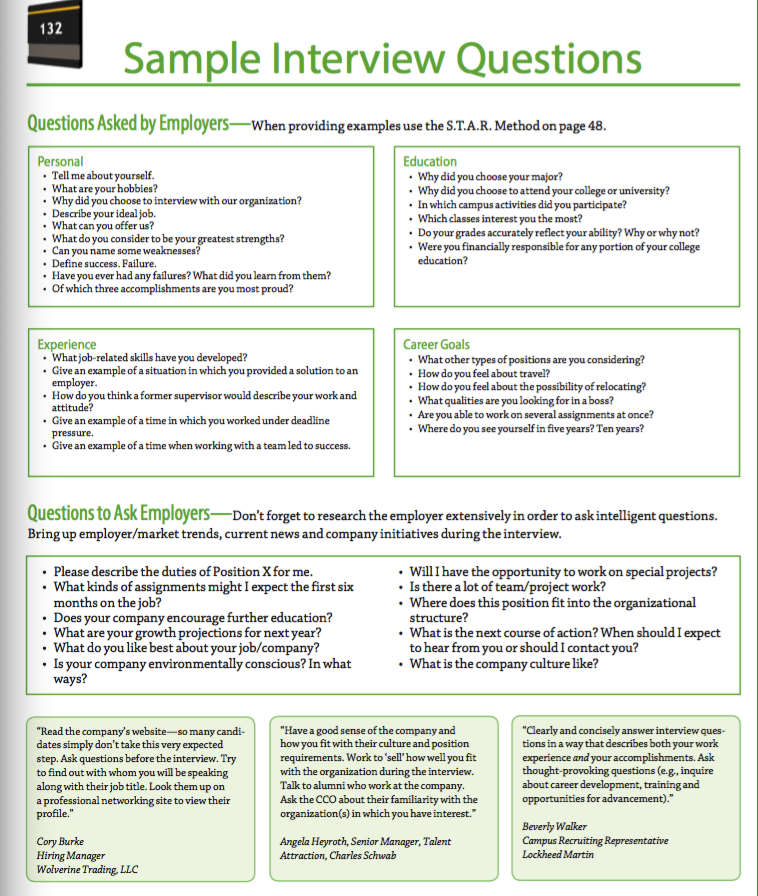
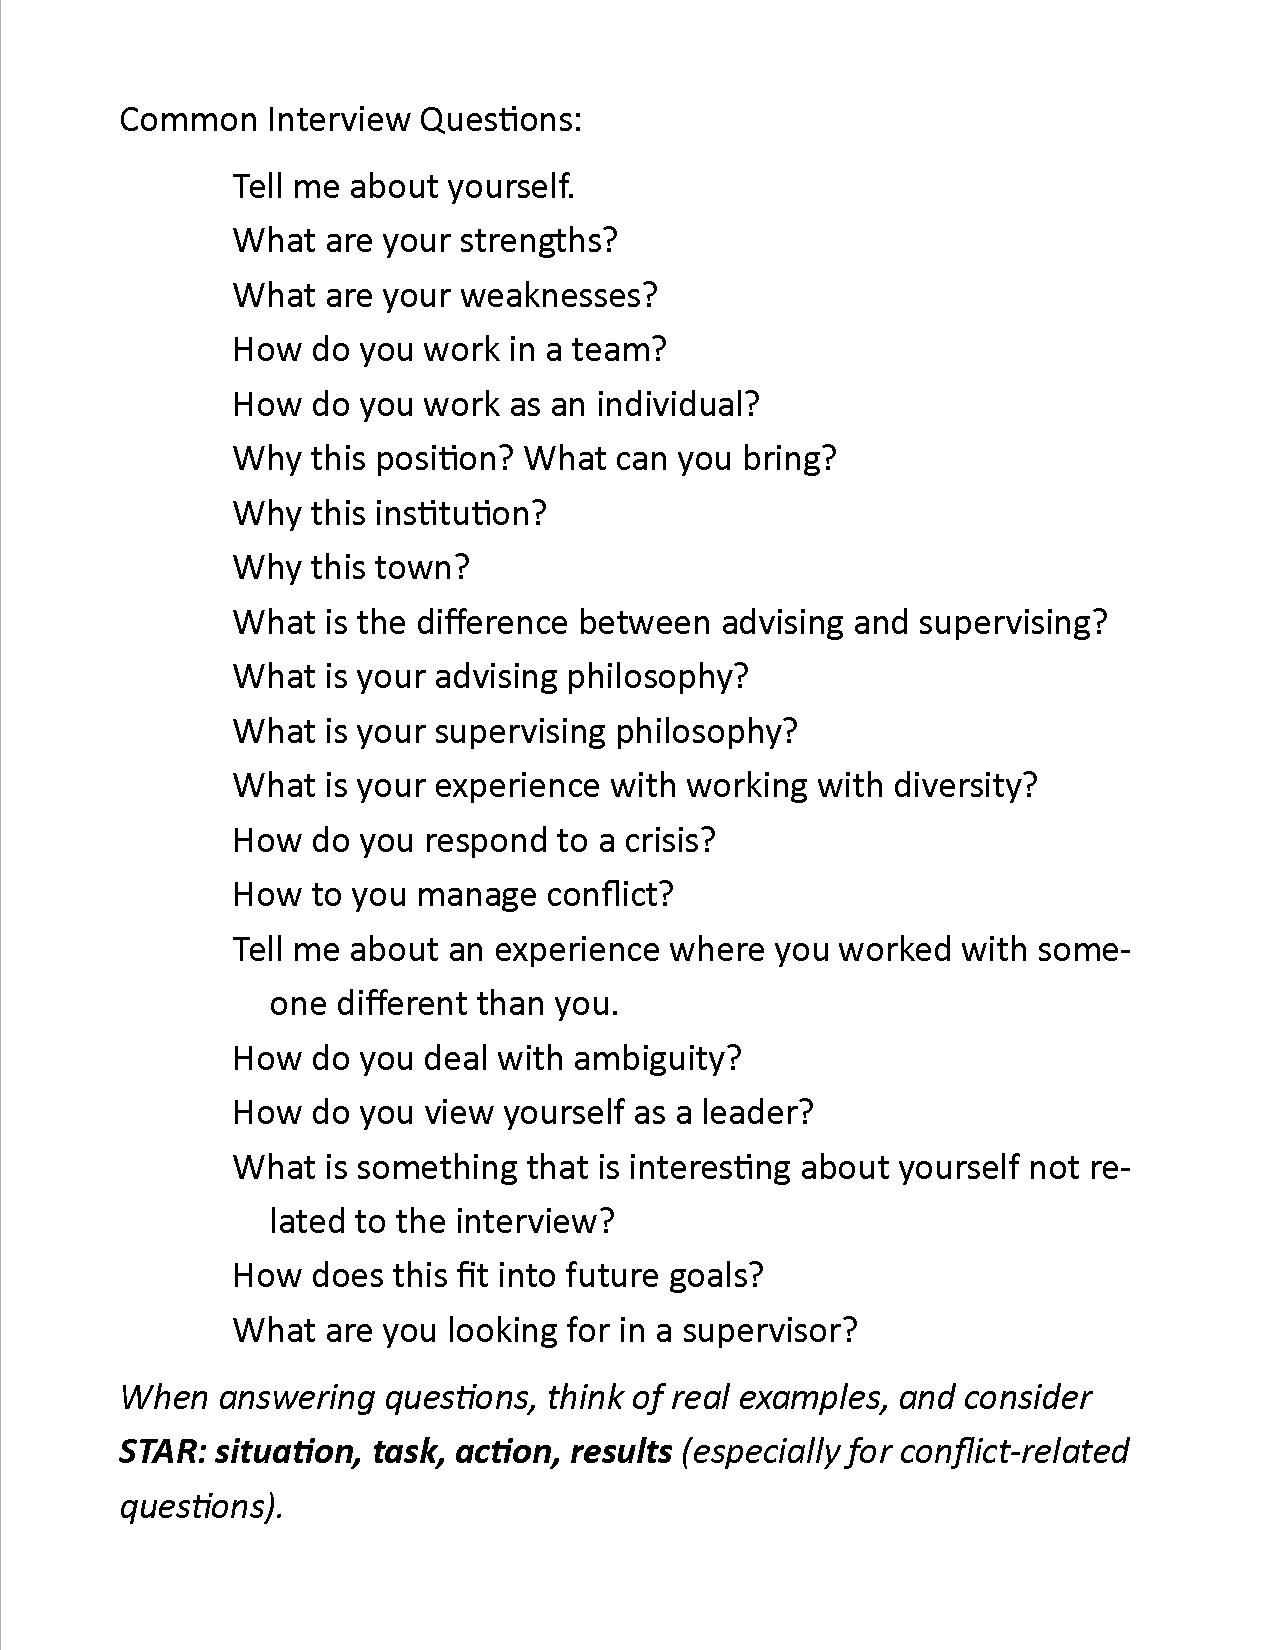
Additional Interview Preparation Tips
And we’re finally here!
If you managed to get to this point, you definitely deserve a high-five!
Now, before we wrap up the article, let’s go through a couple of essential tips on acing your interview…
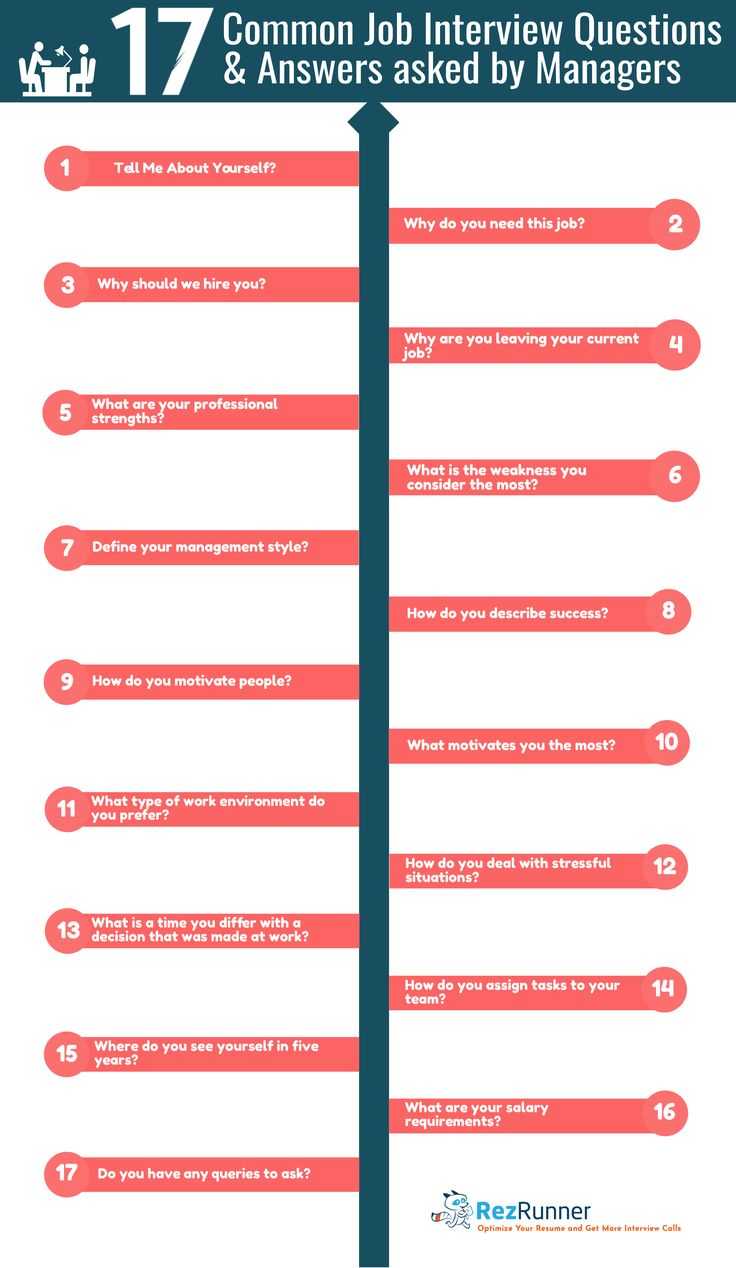
- Make sure you’re prepared to answer all the common job interview questions. Wherever you’re applying, you’ll likely be asked several of these questions.
- Think of the answers you’ll give for the situational interview questions (whichever ones apply to you). I.e. gap in your work experience, why were you fired, etc.
- Understand how to answer behavioral job interview questions. If you know how the STAR method works, this shouldn’t be difficult at all.
- Follow basic interview etiquette. Make eye-contact with the interviewer, but polite, and so on.
And finally, good luck on the interview! You got this!
Suggested readings:
- How to Make a Resume & Land That Job
- How to Make a Cover Letter
- How to Ace a Video Interview
- Thank You Email After Interview
- Phone Interview Questions & Tips
Установка Aion Rainmeter
Перед установкой Aion Rainmeter убедитесь в наличии на вашем компьютере последней версии программы Rainmeter. Вы можете загрузить ее с официального сайта Rainmeter.
После успешной установки Rainmeter перейдите на DeviantArt, где можно найти различные темы и скины. Введите «Aion Rainmeter» в поле поиска для быстрого доступа к теме. Выберите подходящий вариант и скачайте его на ваш компьютер.
По завершении загрузки откройте файл с расширением .rmskin (используя Rainmeter) или дважды щелкните по нему. Rainmeter автоматически запустит процесс установки темы.
После завершения установки откройте Rainmeter и выберите новую тему Aion из списка доступных скинов. Щелкните на ней, чтобы применить тему к вашему рабочему столу.
Вы также можете настроить и настроить Aion Rainmeter, щелкнув правой кнопкой мыши на скине и выбрав соответствующие опции в контекстном меню.
Клавиши управления:
Клавиша
Действие
ЛКМ
Перемещение скина
ПКМ
Открыть контекстное меню
Ctrl + ЛКМ
Изменение размера скина
Shift + ПКМ
Скрыть скин
Теперь, когда вы установили и настроили Aion Rainmeter, ваш рабочий стол станет более стильным и функциональным. Наслаждайтесь новым видом вашего рабочего пространства!
8.2. Exceptions
Even if a statement or expression is syntactically correct, it may cause an
error when an attempt is made to execute it. Errors detected during execution
are called exceptions and are not unconditionally fatal: you will soon learn
how to handle them in Python programs. Most exceptions are not handled by
programs, however, and result in error messages as shown here:
>>> 10 * (1)
Traceback (most recent call last):
  File "<stdin>", line 1, in <module>
ZeroDivisionError: division by zero
>>> 4 + spam*3
Traceback (most recent call last):
  File "<stdin>", line 1, in <module>
NameError: name 'spam' is not defined
>>> '2' + 2
Traceback (most recent call last):
  File "<stdin>", line 1, in <module>
TypeError: can only concatenate str (not "int") to str
The last line of the error message indicates what happened. Exceptions come in
different types, and the type is printed as part of the message: the types in
the example are , and .
The string printed as the exception type is the name of the built-in exception
that occurred. This is true for all built-in exceptions, but need not be true
for user-defined exceptions (although it is a useful convention). Standard
exception names are built-in identifiers (not reserved keywords).
The rest of the line provides detail based on the type of exception and what
caused it.
The preceding part of the error message shows the context where the exception
occurred, in the form of a stack traceback. In general it contains a stack
traceback listing source lines; however, it will not display lines read from
standard input.
Color on one monitor is incorrect compared to the others
HP
This can be an issue for designers and artists who find that one of the monitors in their setup has messed-up color saturation or poor color accuracy in general.
Step 1: Unfortunately, there isn’t always an easy fix. If color accuracy and similar factors are important to you, the best way to guarantee them is to get two of the same monitor models. You may need to replace the poor-performance monitor with a copy of your primary monitor with stronger color accuracy.
Step 2: If replacement isn’t an option, you can work to calibrate the poor-performing monitor to fix color issues and get it working properly. Bring up the same image on both monitors, and adjust the settings until they match. If you need serious color accuracy, we suggest consulting our guide on calibrating your monitor and taking a close look at the colorimeter section.
Wrong or differing resolutions
Image used with permission by copyright holder
If you add a new, higher-resolution monitor to your system and find that it’s not displaying correctly, it might be borrowing settings from an older display, or simply trying to match your primary monitor.
Step 1: Right-click your desktop and select the Display Settings option on the resulting pop-up menu.
Step 2: The Settings app opens with the Display panel loaded by default. Click on the secondary display shown in the diagram.
Step 3: With your secondary screen highlighted, scroll down to Scale and Layout and click the drop-down menu located under Display Resolution.
Step 4: Select a screen resolution that works best for you. Windows designates one of these resolutions as “recommended” based on the display’s hardware.
If this didn’t work, make sure your monitor and graphics card can run at your chosen resolution. If you’re still running into problems, try updating your graphics drivers.


Note: You can use two monitors of different sizes, refresh rates, and resolutions as long as they have the required connections. However, they will still be limited by their individual specifications. If one monitor has a significantly lower resolution than the other, that’s not going to change, and some things may naturally look different. We suggest not overclocking specs like refresh rate when in a dual-monitor setup. GPUs may already struggle juggling two monitors, you don’t want to make things any hard for them.
Managing Rainmeter Skins
The Manage window is where you start to get into the functionalities of the program. It features the following tabs.
1. Skins
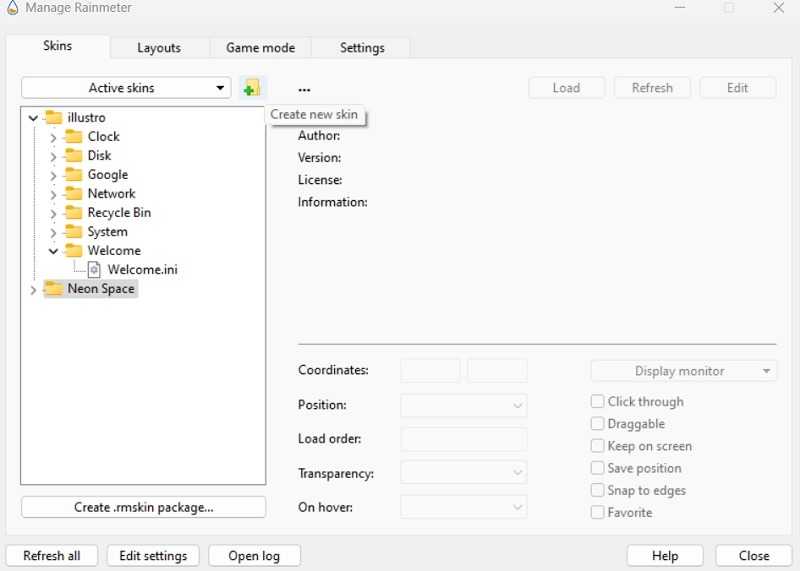
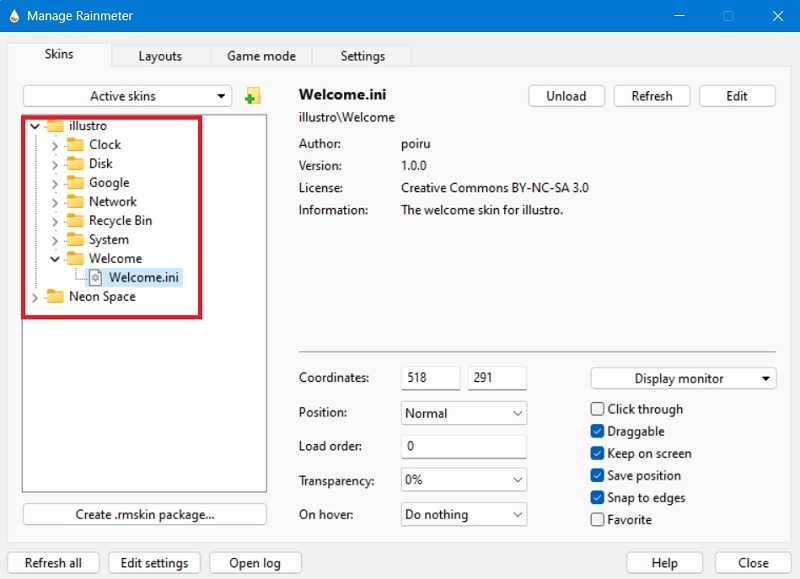
The «Skins» tab displays the list of skins Rainmeter has in its directory, whether you’ve installed them through a .RMSKIN file (like most skins) or manually placed them in Rainmeter’s skins directory.
- In the following example, there are two active skins, Illustro, (installed as default), and Neon Space. Illustro offers various counters, monitors, and even a nifty little Google search function to give a slight idea of what Rainmeter is capable of.
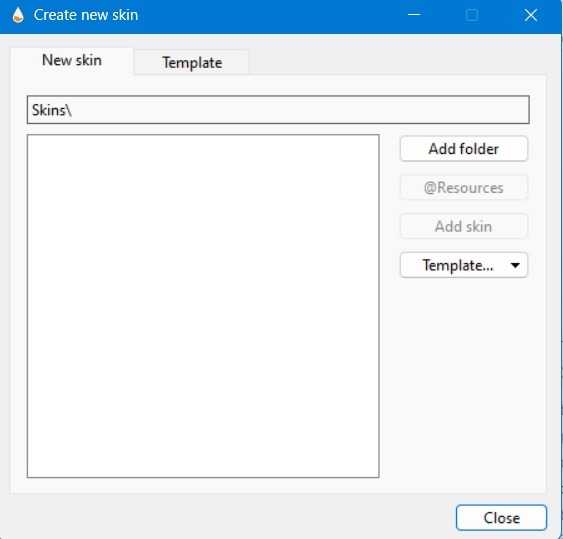
- To find the skin directory, click on the tiny folder button next to «Active skins» called «Create new skin.» It will open a new window.

- You can search for the skins saved to the existing directory, if there are any, and add new templates and a new folder.
- Remember that Rainmeter skins range in functionality from basic widgets to what could be considered full applications. In this tab, you can easily manage your active skins, as well as refresh them to account for edits or changes.
2. Layouts
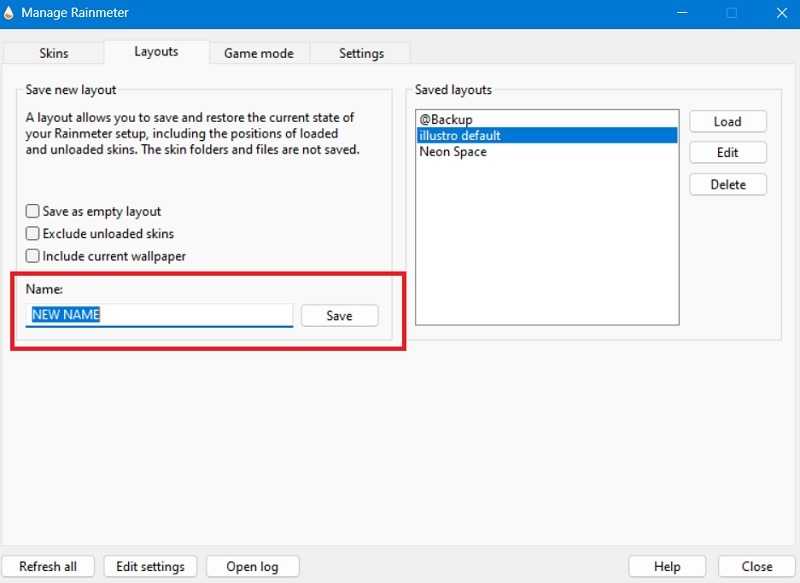
«Layouts» saves and manages certain layouts for your skins. Using «Layouts,» you can save your favorite Rainmeter setup for the next time you reset your computer or relaunch Rainmeter. This setup is important if you want Rainmeter to become a big part of your daily desktop usage.
- The default layout is the one you see whenever you open the program. In this example, Neon Space is being saved as a new layout.
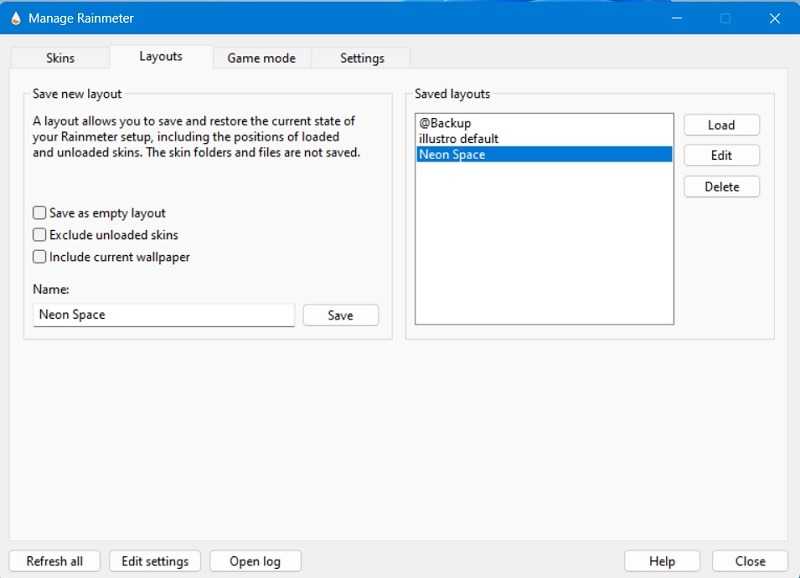
- If you want to replace the default Illustro, give it a new name as shown below, and click «Save,» then edit the layout.
FYI: check out all the ways to use the built-in Game Bar on your Windows PC.
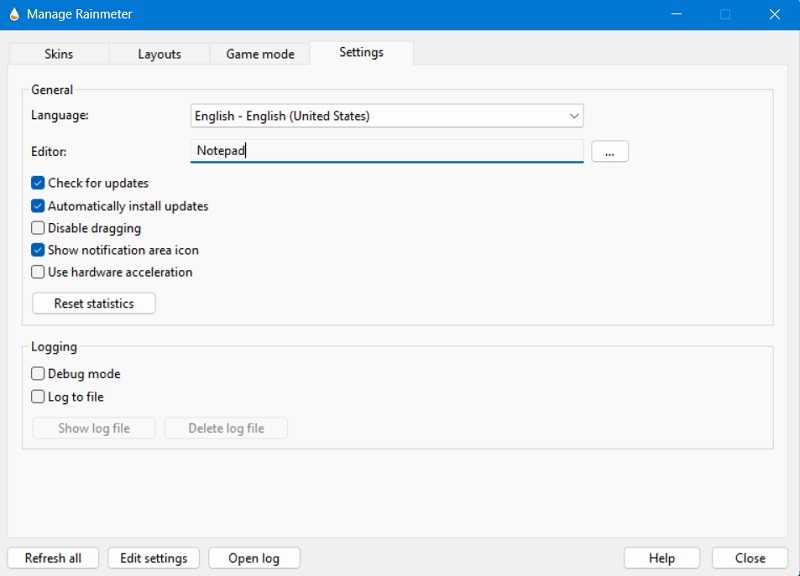
4. Settings
«Settings» gives you access to basic settings, such as update options, language settings and which application should launch when you’re editing certain skins. For most people, there’s no reason to change any of this, but if you’d like all of your skins to stay in one place, check «Disable dragging,» in case someone else uses your computer, or you have concerns about accidentally changing things.
Tip: check out our list of lovely Windows screensavers, and choose your favorite!
Ignoring Files
How can I configure ignored files?
By default, yadm is configured to
when displaying a status. This does not prevent you from adding untracked files.
However, if you would like to prevent some files from being added accidentally,
you can configure them to be ignored.
If you add a file to your directory (or subdirectories) you
can have those patterns ignored by yadm. This works exactly like it does for
Git. Be sure to add these files to your repo, so they can be synced
along with your other configurations.
Another option is to add patterns to
.
If you use this file, be sure to add your patterns above any
line, as all lines below this can be overwritten by yadm
when encrypting data.
Aion Rainmeter: настройка и улучшение интерфейса игры
Изменение внешнего вида
Для того чтобы настроить интерфейс игры Aion через Rainmeter, необходимо скачать и установить данный софт на свой компьютер. После этого можно приступать к изменению внешнего вида. Rainmeter позволяет использовать различные скины и темы, которые полностью изменят внешний вид игры и добавят большой функционал. При выборе скина или темы, нужно учитывать совместимость с операционной системой и актуальность.
Добавление полезных виджетов
В Rainmeter существуют множество виджетов, которые позволяет получить полезную информацию напрямую на рабочий стол. Среди виджетов можно добавить часы, календарь, погоду, мониторинг работы системы, а также многие другие. Данный функционал позволяет получать актуальную информацию без необходимости выхода из игры.
Настройка прозрачности и положения окон
Rainmeter позволяет настраивать положение окон на рабочем столе и их прозрачность. Данный функционал позволяет создавать удобные и функциональные элементы интерфейса для управления игрой. Также возможно расположение нескольких окон игры и использование их одновременно, что повышает удобство игры и производительность.
- Рекомендуется использовать скины и темы с учетом совместимости и актуальности
- Добавление полезных виджетов может позволить получить дополнительную информацию напрямую в игре
- Настройка прозрачности и расположения окон помогает создавать функциональные элементы интерфейса для управления игрой
Note
— Do not put MIGI below 2.4. versions. 2.3. does not withstand a large number of add-ons, and even lower in general darkness.
— You can not run MIGI with administrator rights, otherwise the cheat will not be injected.
— It is not recommended to install addons like » m_ «, only » p_ «.
— When downloading various add-ons, check them, sometimes it happens that the author leaves a choice, for example, several models, and they lie along some incomprehensible path, or even an archive. This should alert, for example, they downloaded a replacement for awp, but there is no models folder. So, perhaps, the author left a choice, and you need to transfer the models folder with the model to this folder, where it does not exist.
p_
Only similar folders should be in the » p_ » folder.
— MIGI 2.4. the last one released at the moment, but it came out earlier than when the CS: GO update with the KSS Knife came out, so it will happen when taking this knife through the skin changer, for example. Do not use this knife with a model changer.
MIGI: https://github.com/ZooLSmith/MIGI3
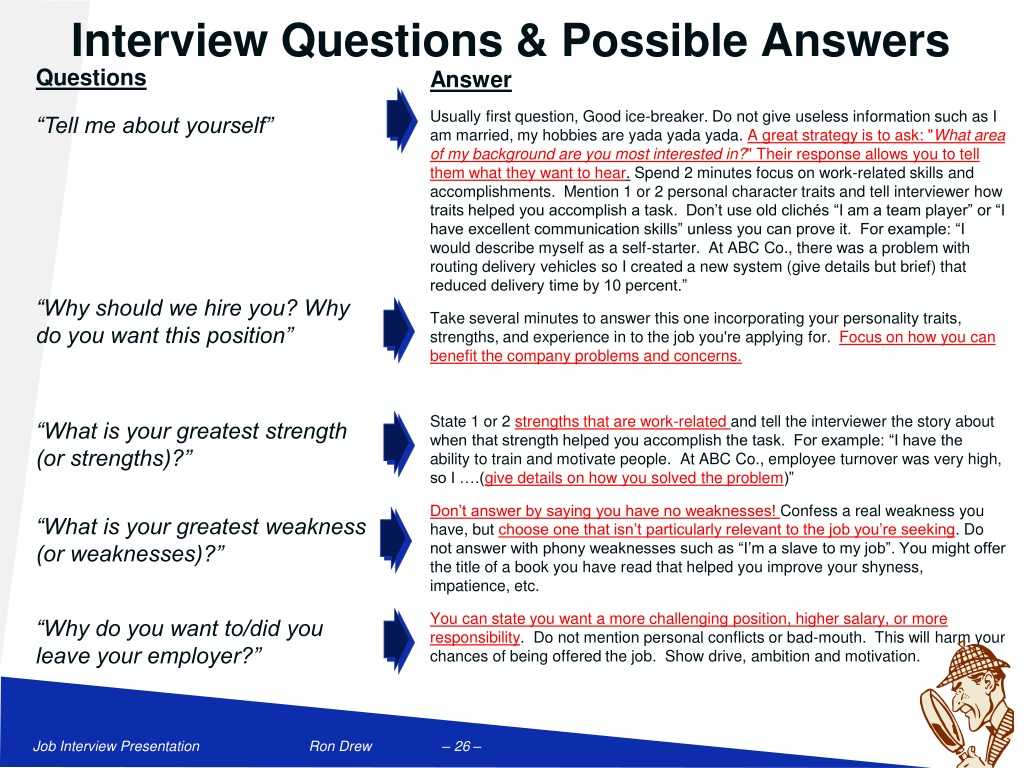
How to Answer 14 Most Common Job Interview Questions [+ Sample Answers]
All of these questions are used to learn more about you, both as a person and a professional.
You might have heard the popular idea that there’s no right or wrong answers for job interview questions.
Well, while that might be true, there ARE a set of rules you need to follow when answering these questions.

If you understand what, exactly, the interviewer is looking for with each question, you’ll be able to give the right answer (and rock that interview!)
In this section, we’re going to go through 14 of the most common job interview questions and answers. We’re going to explain what the HR manager wants to see in you, as well as give you sample answers you could use.
Преимущества настройки погоды в Rainmeter
Одним из главных преимуществ настройки погоды в Rainmeter является удобство. Вам не нужно каждый раз открывать браузер и искать информацию о погоде. Все данные будут отображаться на рабочем столе, в удобном для вас месте. Это сэкономит ваше время и упростит доступ к актуальной информации о погоде.
Кроме того, настройка погоды в Rainmeter позволяет получить дополнительную информацию о погодных условиях. Вы можете узнать не только температуру и состояние погоды, но также и уровень влажности, скорость ветра, прогноз на несколько дней и другие детали. Это очень полезно, особенно если вы планируете активности на открытом воздухе.
Еще одним преимуществом настройки погоды в Rainmeter является возможность выбора внешнего вида виджета. Вы можете настроить его цвет, шрифт, размер и другие параметры, чтобы виджет идеально сочетался с вашим рабочим столом. Это позволит сделать ваше рабочее пространство более стильным и удобным в использовании.
Кроме того, настройка погоды в Rainmeter может быть полезна редакторам и блогерам. Вы можете использовать информацию о погоде в качестве контента для своих публикаций. Это добавит интерес и полезность вашим материалам.
В целом, настройка погоды в Rainmeter является полезной и удобной функцией, которая позволяет всегда быть в курсе текущих погодных условий. Благодаря Rainmeter вы сможете создать индивидуальные виджеты, которые будут отображать информацию о погоде так, как вам нравится. Это сделает ваш рабочий стол более информативным и удобным в использовании.


Настройка основных параметров
Настройка основных параметров в Aion Rainmeter может быть важным шагом для удобства использования интерфейса игры. В этом разделе мы рассмотрим несколько базовых параметров, которые вы можете настроить.
Размер и расположение интерфейса
Aion Rainmeter позволяет настроить размер и расположение интерфейса игры. Вы можете изменять размеры и расширять или сокращать интерфейс в зависимости от ваших потребностей. Также вы можете перемещать элементы интерфейса по экрану для удобства использования.
Цветовая схема и прозрачность
Вы можете выбрать цветовую схему для интерфейса в Aion Rainmeter. Это может быть полезно, если вы хотите настроить интерфейс на определенные цвета, соответствующие вашему предпочтению. Вы также можете настроить прозрачность интерфейса для того, чтобы сделать его более прозрачным или менее видимым.
Размер шрифта
Вы можете настроить размер шрифта для элементов интерфейса в Aion Rainmeter. Это может быть полезно, если вы испытываете проблемы с чтением мелкого текста, и хотите увеличить размер шрифта для лучшей читаемости.
Это только некоторые базовые параметры, которые можно настроить в Aion Rainmeter. Рекомендуется экспериментировать с эти параметрами, чтобы получить наилучший результат для вашей игры.
Скачивание и установка Aion Rainmeter
Для работы с программой Aion Rainmeter сначала необходимо скачать и установить ее на ваш компьютер. В этом разделе мы рассмотрим процесс скачивания и установки Aion Rainmeter.
2. На главной странице сайта найдите раздел «Скачать» или «Download». Нажмите на ссылку или кнопку, чтобы начать загрузку программы.
3. После завершения загрузки откройте загруженный файл с расширением .exe и запустите его.
4. В появившемся окне установщика Aion Rainmeter следуйте инструкциям по установке. Обычно вам будет предложено принять условия лицензионного соглашения и выбрать путь установки программы на вашем компьютере.
5. По завершении установки Aion Rainmeter на ваш компьютер, запустите программу.
Теперь у вас установлена и готова к использованию программа Aion Rainmeter. В следующих разделах мы рассмотрим, как настроить и использовать функциональные возможности Aion Rainmeter для оформления рабочего стола.
Изменение скинов и тем оформления
Выбор скина для Aion Rainmeter
Для изменения скина в Aion Rainmeter необходимо открыть главное меню приложения, нажав ПКМ на любом из компонентов, и выбрать пункт «Скин». В открывшемся окне выберите интересующий вас скин, а затем подтвердите выбор.
Изменение темы оформления
Для изменения темы оформления в Aion Rainmeter необходимо выбрать пункт «Настройки» в главном меню приложения. В открывшемся окне выберите вкладку «Темы» и выберите нужную вам тему из списка. Если нужной темы в списке нет, то можно установить новую тему, нажав на кнопку «Добавить тему» и указав путь к файлу темы на вашем компьютере.
Использование пользовательских скинов и тем
Если в списке предустановленных скинов и тем вы не нашли подходящего варианта, то вы можете скачать и установить скин или тему, найденные в интернете. Для этого нажмите на кнопку «Опции» в главном меню приложения и выберите «Скины» или «Темы», в зависимости от того, что вы хотите изменить. Затем нажмите на кнопку «Добавить новый скин» или «Добавить новую тему» и укажите путь к файлу скачанного скина или темы на вашем компьютере.
Важно отметить, что использование пользовательских скинов и тем может привести к увеличению нагрузки на систему, а также к возможным ошибкам и несоответствиям с настройками приложения. Также необходимо убедиться, что скачанные файлы не содержат вирусы и другие вредоносные программы
Сохранение и экспорт настроек
При настройке интерфейса Aion Rainmeter вы можете потратить много времени на создание идеального вида для себя. Хранение резервных копий ваших настроек может быть очень полезно, если вы решите переустановить ОС или перенести игру на другой компьютер.
Чтобы сохранить свои текущие настройки, вам нужно найти папку с настройками Aion Rainmeter и скопировать ее целиком. По умолчанию, папка с настройками находится в папке «Документы» или «Мои документы». Для экспорта настроек вы можете заархивировать папку или сохранить ее на внешний носитель, такой как флеш-накопитель или в облако.
Чтобы импортировать свои сохраненные настройки в другом компьютере, вы должны восстановить папку с настройками. Затем нажмите правой кнопкой мыши на рабочем столе, выберите «Aion Rainmeter» и нажмите на «Менеджер скинов». Затем перейдите на вкладку «Настройки» и выберите «Загрузить настройки». Затем выберите файл настроек, который вы экспортировали. Все ваши настройки будут применены в Aion Rainmeter.
Настраивайте свой интерфейс в Aion Rainmeter по своему вкусу и не забудьте сохранять копии своих настроек. Это поможет вам быстро восстановить их в будущем и продолжать наслаждаться уникальным видом вашего интерфейса.
Настройка оформления интерфейса
При настройке оформления интерфейса в Aion Rainmeter важно учитывать свои предпочтения и уровень комфорта. Для этого можно воспользоваться различными функциями и настройками, которые предлагает плагин
Вот несколько ключевых элементов, которые можно настроить в интерфейсе Aion Rainmeter:
- Скины (Skins): Aion Rainmeter предлагает различные скины, которые определяют внешний вид и расположение элементов интерфейса. Вы можете выбрать скин, который наиболее удобен для вас и соответствует вашим предпочтениям. Для этого вам понадобится изучить доступные скины и установить их через настройки плагина.
- Темы (Themes): Программа также предоставляет возможность настроить тему интерфейса. Темы определяют цвета и стили элементов интерфейса. Вы можете выбрать тему, которая соответствует вашему вкусу и создает комфортные условия для работы.
- Размеры элементов: Вы можете настроить размеры отдельных элементов интерфейса, таких как виджеты и панели. Это может помочь оптимизировать использование пространства экрана и создать рабочее пространство, которое наиболее удобно для вас.
- Расположение элементов: Aion Rainmeter позволяет настроить расположение элементов интерфейса. Вы можете перемещать виджеты и панели в нужные вам места на экране, а также изменять порядок их отображения. Это может быть полезно для создания оптимального рабочего пространства.
- Прозрачность: Вы можете настроить прозрачность элементов интерфейса, чтобы создать более эстетически приятный вид и уменьшить нагрузку на глаза. Это может быть особенно полезным, если вы работаете на рабочем столе с ярким фоном.
В целом, настройка оформления интерфейса в Aion Rainmeter — это индивидуальный процесс, который зависит от ваших предпочтений. Экспериментируйте с различными настройками и находите оптимальное сочетание, которое будет наиболее комфортным для вас.
Additional monitors suddenly stop working
Image used with permission by copyright holder
In this case, you have been using a multi-monitor setup for a while now and everything has been working fine — but suddenly your other monitors just stop working altogether. Fortunately, this can usually be fixed.
Check your connections: Cover the basics, and make sure your other monitor is still properly connected and that cables haven’t come loose since you last booted up.
Give Windows a reminder: Sometimes Windows stumbles a little and sort of loses track of your additional monitors. Give it a refresh by pressing the Windows Logo + Ctrl + Shift + B keys. Hold them all down for a second and let go. See if this helps bring your other monitor back to life.
Restart everything: Shut down Windows and all your monitors. Then, turn everything on and boot up again. This can often fix your issue.
If necessary, roll back driver updates: If your display driver recently updated, it could be causing the issue. Go to Device Manager, select Display Adapters, and select your display adapter to see more. Go to Properties, look at the Driver tab, and choose Roll Back Driver.
General Questions[]
- Should I reroll?
- Who Should I re-roll for?
No one.
- Are there any tier lists?
No. Unless you meant this.
- Are there any recipes to get <Insert unit here>?
No. Find out how to better manipulate your chance by understanding how crafting numbers work in Workshop. If you meant AGS units, then do Research.
- What do I do with this thing I got from the in-game mail?
Check Announcements KR if you’re playing the Korean server.
- Do these story choices matter?
Not critically, but you can see different events and opinions of your characters. You can always go back and view the story scenes via the archive.


- Does /insert current event have one chapter only?
Game updates every week with new content. If there is at least >2 weeks for the event, there will probably be new chapter/stuff for it. Start reading Announcements KR.
- Is chapter 11 the final chapter of the game?
Game updates every week with new content.
- How come insert-skin/unit-here does not have L2D/broken/whatever feature?
Because they just don’t. The only things that are guaranteed for units/skins are base CG and voice-lines. Everything else are extras that the unit/skin may or may not get. Small devteam, count your blessings when you get them.
- How often do skins/unit get L2D?
Very infrequently. Newly released skin RARELY get an L2D feature. Skins/Units chosen for the infrequent L2Ds might as well be random.
LO have always had a small devteam, they have to properly allocate their resources on other things.
Game displaying on the wrong monitor
Image used with permission by copyright holder
It’s not uncommon for games to display on your second monitor rather than your first, which isn’t ideal if you have a primary display for gaming and a secondary for everything else. Fortunately, there are some quick and easy ways to fix it.
- Use in-game settings: The easiest way is often to just tell the game to display on your primary monitor. Some games have the option of selecting a display in their settings menu, so check there first before adjusting anything else.
- Check your display outputs: If you find that this isn’t the first time a game or application has displayed on the wrong monitor, you might want to check your inputs. Is your secondary display plugged into the primary display output on your graphics card? Try swapping them around to see if that fixes things.
- Make it your primary display: Press Windows Key + I to open the Settings menu, then navigate to System > Display. Select the monitor you want your games to appear on, and select the box next to Make this my primary display.
- Only use one monitor: If the above doesn’t work, in Display settings, select the display you want to game on. From the Monitor Settings (Windows 11) or Multiple Displays (Windows 10) drop-down, select Show only on 1 or Show only on 2 as appropriate. You will need to turn this back off once you’ve finished gaming, but it is a surefire way to get your game working on the right display.
Duplicate or extended images
Image used with permission by copyright holder
There are a few different ways to display content on two screens, but Duplicate is often the default. If your second display merely copies the desktop rather than extends it, here’s how to change that view.
Step 1: Press the Windows + P keys to load the Project menu.
Step 2: Select the Extend option. You can do this by using your mouse, going up or down with the arrow keys and pressing Enter, or by pressing the Windows + P keys to cycle through options.
Alternatively, you can take the long route:
Step 1: Right-click your desktop and select the Display Settings option on the resulting pop-up menu.
Step 2: The Settings app opens with the Display panel loaded by default. Select your secondary monitor shown in the diagram.
Step 3: With your second screen highlighted, scroll down to Multiple Displays and select Extend Desktop to This Display on the drop-down menu.
Step 4: Go back up to the diagram and use your mouse to drag your second monitor to the left or right of your primary screen.
These same processes can be used to change to duplicate if you’d prefer it that way.
Настройка виджетов и панелей
После установки Aion Rainmeter на ваш компьютер, вы можете приступить к настройке виджетов и панелей по вашему вкусу. Вот некоторые основные шаги, которые помогут вам настроить их:
- Откройте Aion Rainmeter, щелкнув правой кнопкой мыши на рабочем столе и выбрав «Настройки Rainmeter».
- В окне настройки выберите раздел «Скины» и найдите список доступных скинов.
- Выберите скин, который вам нравится, и нажмите на кнопку «Применить».
- Для настройки виджетов и панелей щелкните правой кнопкой мыши на выбранном скине и выберите «Редактировать скин».
- Откроется текстовый файл, содержащий настройки скина. Найдите секцию, отвечающую за виджет или панель, которую вы хотите настроить.
- Внесите необходимые изменения, например, изменив цвет, размер или положение виджета или панели.
- Сохраните файл и закройте его.
- Вернитесь в окно настройки Aion Rainmeter и нажмите «Обновить» или «Применить», чтобы увидеть изменения на рабочем столе.
Теперь вы можете продолжить настройку других виджетов и панелей в Aion Rainmeter, следуя тем же шагам. Помните, что вы всегда можете изменить настройки виджетов и панелей в любое время, чтобы создать идеальный рабочий стол. Удачи!
What Causes “This Player Is Outside Your Team’s Skill Range And Cannot Be Invited” In Valorant Premier
There are restrictions once you enroll your team: You’ll be limited to only inviting other players that would not cause your team to change Divisions.
If inviting a player would cause your team to change Divisions, the Team Owner will see an error message when attempting to invite: “This player is outside your team’s skill range and cannot be invited.”
If above is not the cause of error “This player is outside your team’s skill range and cannot be invited” in Valorant Premier then below can be:
- Unverified phone numbers: Players who have not verified their phone number in the Valorant client may trigger this error.
- Inactive Two-Factor Authentication (2FA): The error may occur if team members have not enabled 2FA for their Riot accounts and confirmed their email addresses.
- Outdated rank information: If team members haven’t played a competitive game since the last update, their ranks may be outdated, leading to the error.
Подготовка перед установкой
Перед установкой Aion Rainmeter вам необходимо выполнить некоторые подготовительные шаги:
- Убедитесь, что на вашем компьютере установлена последняя версия программы Rainmeter. Rainmeter является основным инструментом для работы с Aion Rainmeter и требуется для его функционирования.
- Скачайте Aion Rainmeter с официального сайта разработчика или проверенного источника. Обязательно загрузите последнюю версию плагина, чтобы быть уверенным в его совместимости с вашей системой.
- Проверьте требования к системе, указанные на сайте Aion Rainmeter. Удостоверьтесь, что ваш компьютер соответствует указанным системным требованиям.
- Создайте резервную копию вашей текущей Rainmeter конфигурации, если у вас есть настроенные скины или панели, которые вы хотите сохранить. Это поможет избежать потери важных настроек в процессе установки.
- Закройте все запущенные программы и приложения на вашем компьютере. Это предотвратит возможные проблемы с установкой или работой Aion Rainmeter.
После того как вы выполните все эти шаги, вы будете готовы к установке и настройке Aion Rainmeter на своем компьютере.