

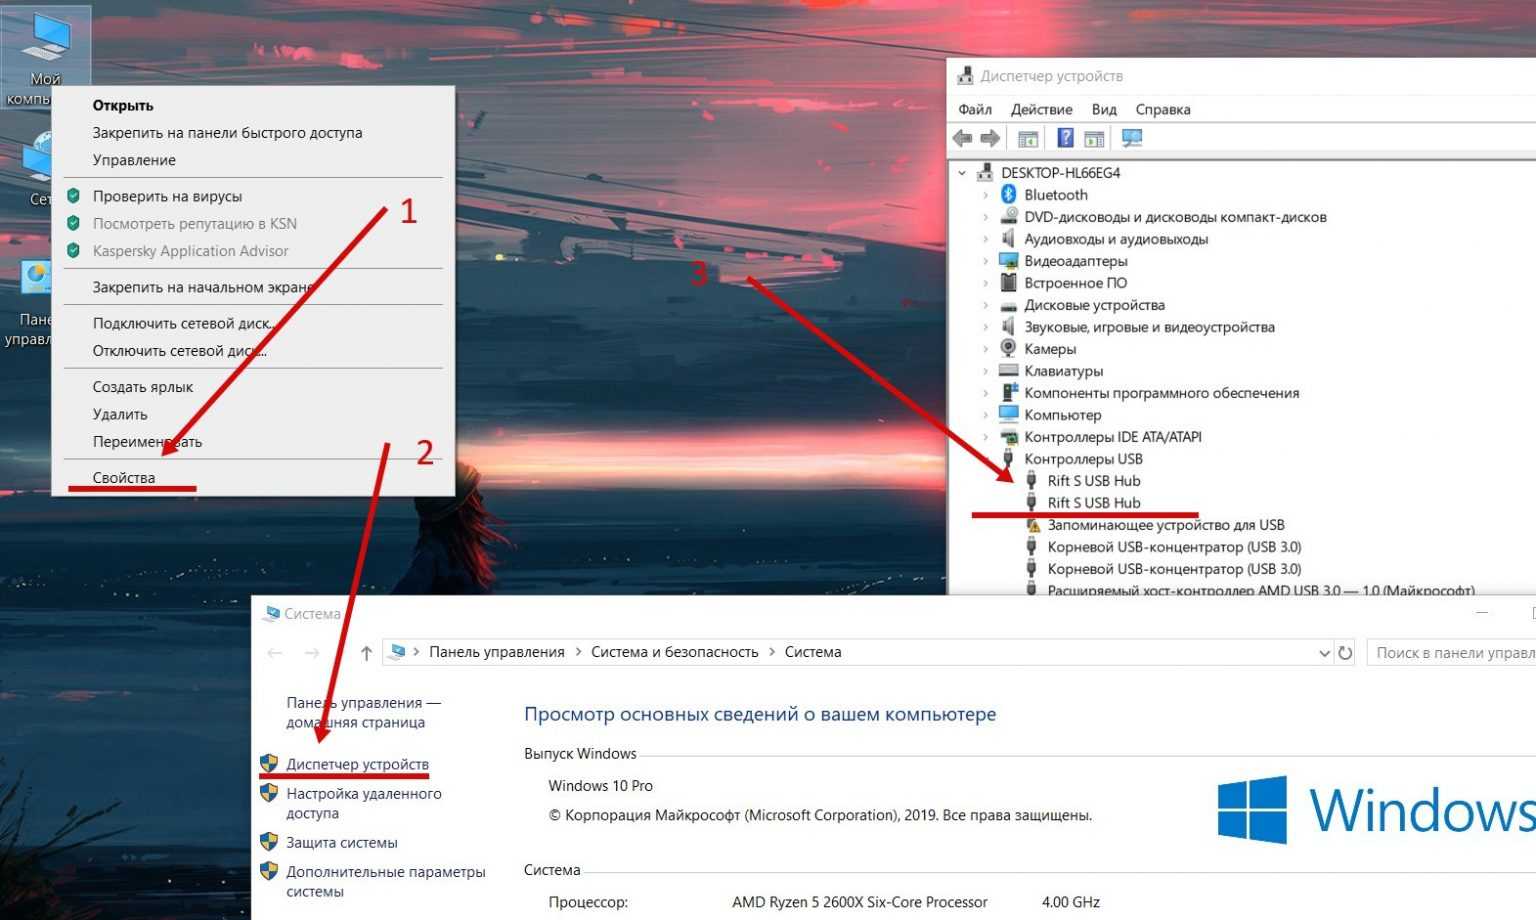
Poor image quality on wired Oculus Link
Poor image quality on a wired Oculus Link setup is normally caused by a low bitrate, which means that your PC is compressing the image before sending it over the cable to your Oculus Quest. So long as you’re using a cable with USB 3 or greater data speed transfer rates, Quest Link software should default to a high-quality image.
Lower-quality or slow cables with lower transfer speeds could cause the Quest Link software to downgrade the image quality. If swapping the cable out for a better one isn’t an option, you could always try to adjust the bitrate that Quest Link sends through the cable.
In order to adjust the bitrate, you’ll need to use the Oculus Debug Tool. It’s not as scary as it sounds, I promise. Here are a few easy steps to follow:
- Open up File Explorer in Windows and navigate to **C:\Program Files\Oculus\Support\oculus-diagnostics**.
- Open up OculusDebugTool in this folder.
(Image credit: Source: Android Central)
- Under the Oculus Link section, select Disabled next to Encode Dynamic Bitrate.
- Change Encode Bitrate (Mbps) to 250.
(Image credit: Source: Android Central)
- Close the Oculus Debut Tool.
- Unplug your Oculus Quest and Plug it back in to restart the Oculus Link.
Your image quality should be significantly better than it was before. Meta suggests setting the bitrate no higher than 250Mbps, although the maximum number supported is 500Mbps. You can try experimenting with values between 250-500 to see if you notice a quality change, although it’s likely that you’ll affect performance beyond 350Mbps.
Как настроить Oculus Debug Tool
Вот пошаговое руководство о том, как настроить Oculus Debug Tool:
- Откройте Oculus Debug Tool. Если у вас установлен Oculus Rift, то программа должна быть уже установлена на вашем компьютере.
- Запустите Oculus Debug Tool из папки с установленным программным обеспечением Oculus Rift, или найдите его через меню «Пуск».
- После запуска приложение отобразит основное окно с различными настройками.
- Настройки производительности: В разделе «Performance» вы найдете несколько ползунков, которые позволяют управлять производительностью. Некоторые из этих настроек включают режим «Asynchronous Spacewarp» и «Always-on Reprojection», которые позволяют сгладить кадры и повысить производительность системы.
- Настройки отображения: В разделе «Display» вы можете настроить различные параметры отображения, такие как разрешение, частота обновления, предельный и минимальный кадровый режим и др.
- Отображение FPS: Если вы хотите видеть отображение текущего FPS (количество кадров в секунду) в вашем приложении Oculus, включите опцию «Visible HUD».
- Дополнительные настройки: Oculus Debug Tool также предлагает некоторые дополнительные настройки, такие как включение отладочной информации, настройка звука и прочие опции. Эти настройки могут быть полезными при поиске и устранении проблем.
- После завершения настройки инструмента, закройте приложение и запустите ваше приложение Oculus для того, чтобы изменения вступили в силу.
Вот и все! Теперь вы знаете, как настроить Oculus Debug Tool и воспользоваться всеми его возможностями для улучшения работы вашего устройства Oculus Rift.
Установка сторонних приложений на Oculus Quest 2
Этот шаг нужен вам, если вы хотите ставить приложения из альтернативных магазинов типа СайдКвеста. Изначально этот пункт шел раньше, чем пункт про Virtual Desktop, так как, его нужно было патчить с помощью Сайдквеста, но, теперь это уже не нужно. Однако, в Сайдквесте ведь не только тот патч был, но и есть другие интересные штуки, так что, в любом случае оно может вам пригодиться..
Итак, что нужно сделать.
- Сначала, залогинившись на сайте Oculus вашим ФБ акаунтом, регистрируем свою организацию, вот тут. Придумайте какое-то уникальное название, примите правила использования и нажмите «Готово».
- Скачайте СайдКвест и установите его на свой ПК.
-
В мобильном приложении Oculus выберете ваш шлем в настройках и активируйте в нем «режим разработчика»:
- После этого перезагружаем шлем долгим нажатием клавиши включения.
- При запущенном СайдКвесте подключите шлем к ПК с помощью кабеля, после этого дайте внутри шлема разрешение на подключение к ПК (там будет два запроса!).
-
Если всё верно, то в левом верхнем углу Сайдквеста вы увидите зеленую иконку:
- Теперь вы можете ставить всё, что есть в магазине Сайдквеста на ваш шлем.
- При первом запуске приложений в шлеме вам сообщат, что они из неизвестных источников и нужно будет дать согласие на их работу.
-
Найти установленные приложения можно тут:
- Удалять эти приложения можно прямо со шлема, нажав на три точки рядом с их названием.
Там еще есть шаг с установкой Oculus ADB Drivers, но, как я понимаю, теперь СайдКвест ставит их сам, т.к. у меня заработало без них, да и ТиТ в видео о них тоже не говорит. Да, снова гайд от ТиТ VR, вы ж не думали, что я буду свои записывать)
Бонус: работа SideQuest по беспроводу
После того, как вы настроили SideQuest по проводу, можете проделать вот это:
Если кратко: логинимся в SideQuest в шлеме, подключаем кабелем к ПК и в приложении жмем кнопку беспроводного коннекта. После этого шлем должен переподключиться и работать по вайфаю. Минус данного метода — всегда нужно держать SideQuest запущенным на ПК, иначе всю эту настройку делать по новой.
Setting Up Oculus Quest for Side-loading
To unlock the full potential of your Oculus Quest headset, you need to enable developer mode and side-loading. Side-loading is just transferring files between two devices—in this case, your PC and Oculus Quest. You’ll be able to add apps and games from sources other than the Oculus Store, open up streaming options, and the ability to play some PC VR games on the Oculus Quest without having to use a wire or Oculus Link.
Get started in the Oculus App for your mobile device.
Install the Oculus app on your mobile device from Apple Store or Google Play
Open the app and sign in with your Facebook Account, or create a new Facebook account to use for Oculus (it’s required for social features and party options in some games).
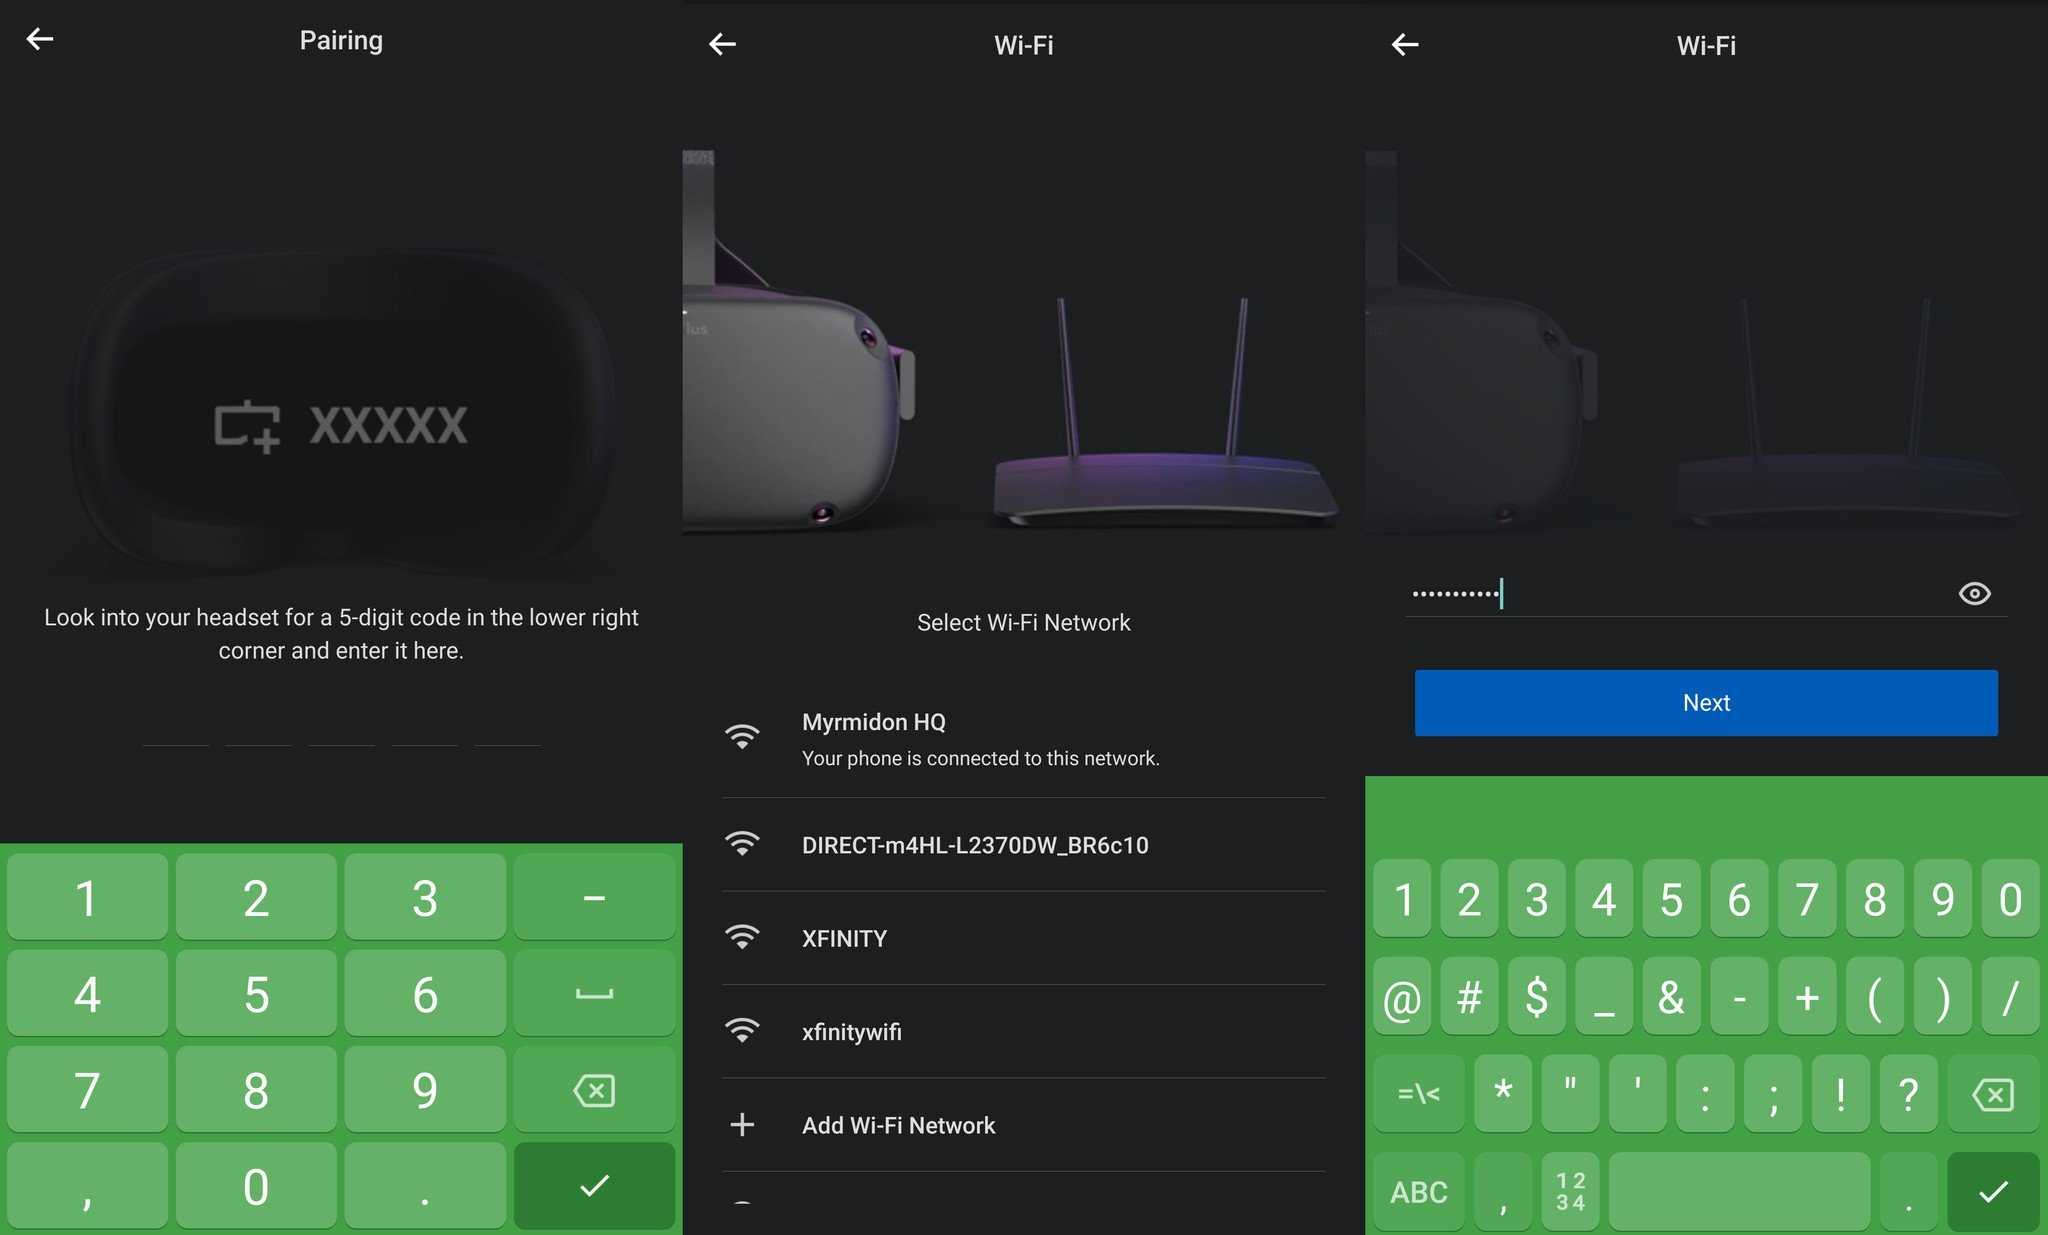
Add your Oculus Quest headset and start Pairing while on a WiFi network
- Choose “Settings” in the bottom bar of the Oculus app
- tap on “Pair New Device”
- choose “Oculus Quest”
Become a developer
To gain access to sideloading and altering files on the Quest you’ll first need to enable developer mode. This will allow Side Loading apps and other features.
Sign up as a developer at by registering an account on the Oculus Developer Dashboard via this link.
Choose anything you want for company name–I used the title of my blog and Facebook page, TechTipsVR. After you’ve registered continue in the Oculus app on your mobile device.
Activate Developer Mode on Quest using the Oculus App on Mobile
- In the “Settings” menu tap on “More Settings”
- Tap “Developer Mode”
- Tap or make sure the toggle to enable Developer Mode has been activated
- Reboot the Oculus Quest
Connecting the Quest to your PC
Connect the Quest to your PC with a USB cable. My computer doesn’t have a USB C port, so I had to use another cable. Luckily, the cable for my phone (OnePlus 3T) is USB C on one end and USB A on the other. I even managed to plug the USB A in correctly on the first try. =)
You’ll also need to download and install the ADB drivers for Oculus from Oculus ADB Drivers | Developer Center | Oculus.
Equipment Needed: USB C port, or USB type C to type A cable.
If you don’t have a USB C port or a USB type A to type C cable, these Aceyoon cables on Amazon have right angle, L shape like the Oculus Quest charging cable. (Amazon Affiliate links) US: https://amzn.to/360Mwe4 UK: https://amzn.to/2MtNesS
If you plan to use Oculus Link, then perhaps this 3 meter Anker cable (Amazon Affiliate link) that was recommended by Oculus before they released their own High Speed Fiber Optic cable.
Enhancing the VR Experience with Oculus Debug Tool
The Oculus Debug Tool is a powerful tool used to enhance the VR experience. It provides developers with the ability to inspect and debug VR applications. The tool also includes a number of features that can be used to improve the quality of the VR experience.
The Oculus Debug Tool is a Windows application that can be used to debug VR applications that are running on the Oculus Rift. It can be used to inspect the state of the VR application, and to debug issues that may be causing problems with the VR experience.
The Oculus Debug Tool includes a number of features that can be used to improve the quality of the VR experience. These features include the ability to:
-Adjust the field of view-Adjust the lens distance-Adjust the IPD-Enable or disable the distortion correction-Enable or disable ASW
The field of view can be adjusted to change the size of the virtual world. The lens distance can be adjusted to change the distance between the user and the virtual world. The IPD can be adjusted to change the distance between the user’s eyes. The distortion correction can be enabled or disabled to correct for distortions caused by the lenses in the Oculus Rift. ASW can be enabled or disabled to enable or disable asynchronous spacewarp.
The Oculus Debug Tool can be used to inspect the state of the VR application. The tool includes a number of windows that can be used to inspect the various aspects of the VR application. These windows include the following:
-The Scene window shows a view of the virtual world-The Console window shows the output from the VR application-The Network window shows the network traffic between the VR application and the Oculus Rift-The Stats window shows performance statistics for the VR application
Author
Sophia Williams
Meet Sophia Williams, a 25-year-old blogger who is passionate about sharing her life tips and experiences to help others lead happier and more fulfilling life. With a degree in psychology and a love for personal development, Sophia Williams is constantly exploring ways to improve her own life and is dedicated to sharing her findings with her readers. When she’s not writing, you can find her practicing yoga, exploring new cities, and spending time with her cat, Luna.
View all posts


Oculus Debug Tool Link Sharpening
Oculus Debug Tool Link Sharpening is a feature in the Oculus Debug Tool that allows developers to adjust the sharpness of their virtual reality experiences. The feature allows developers to adjust the amount of image sharpening applied to their virtual reality content, which can greatly enhance the overall visual quality of their experiences.
Sharpening is an important aspect of image processing, as it enhances the perceived clarity and detail of an image. In virtual reality, it is especially important, as the increased field of view and immersive nature of the medium can make even small visual distortions noticeable. The Oculus Debug Tool Link Sharpening feature allows developers to adjust the sharpness of their content in real-time, giving them more control over the visual quality of their experiences.
By adjusting the sharpening level, developers can fine-tune the overall visual quality of their experiences to best match the capabilities of the headset and the PC being used. For example, if a high-end PC and headset are being used, the sharpening level can be set to a higher value for improved visual quality. On the other hand, if a lower-end PC is being used, the sharpening level can be set to a lower value to maintain stability and performance.
The Most Important Frequently Asked Questions:
-
1. Go to Settings on your Oculus Quest 2.2. Select the Devices tab.3. Select the Oculus Quest 2 from the list of devices.4. Select the Enable Developer Mode toggle.5. Once enabled, you will need to approve your computer on the Oculus Quest 2 when prompted.
-
The Oculus Quest 2 has a safety feature that prevents users from enabling developer mode. This prevents people from accidentally damaging their devices or voiding their warranty.
-
There are a few different ways to enable developer mode on Oculus Quest 2. The easiest way is to go into the Settings menu and select the “Developer Mode” option. You can also enable developer mode by using the Oculus Debug Tool.
-
There are a few things you need to develop for Oculus Quest 2. Firstly, you need a computer that meets the minimum system requirements for Oculus Quest 2 development. Secondly, you need to download and install the Oculus Quest 2 SDK. Once you have done that, you can start developing for Oculus Quest 2.
-
What are the benefits of enabling developer mode on Oculus Quest 2?
There are a few benefits to enabling developer mode on Oculus Quest 2:It allows developers to test their apps on the device before releasing them to the public. This helps ensure that the app is stable and works as intended.It allows developers to sideload apps onto the device, which means they can install apps unavailable through the Oculus Store. This can be useful for testing beta versions of apps or using apps that are not yet available in your country.It gives developers access to the device’s system files, which can be used to troubleshoot or customize the device.
Процесс установки
Включить Air Link на ПК
Каждый раз, когда вы хотите использовать Air Link, вам нужно сначала включить его в приложении Oculus для ПК.
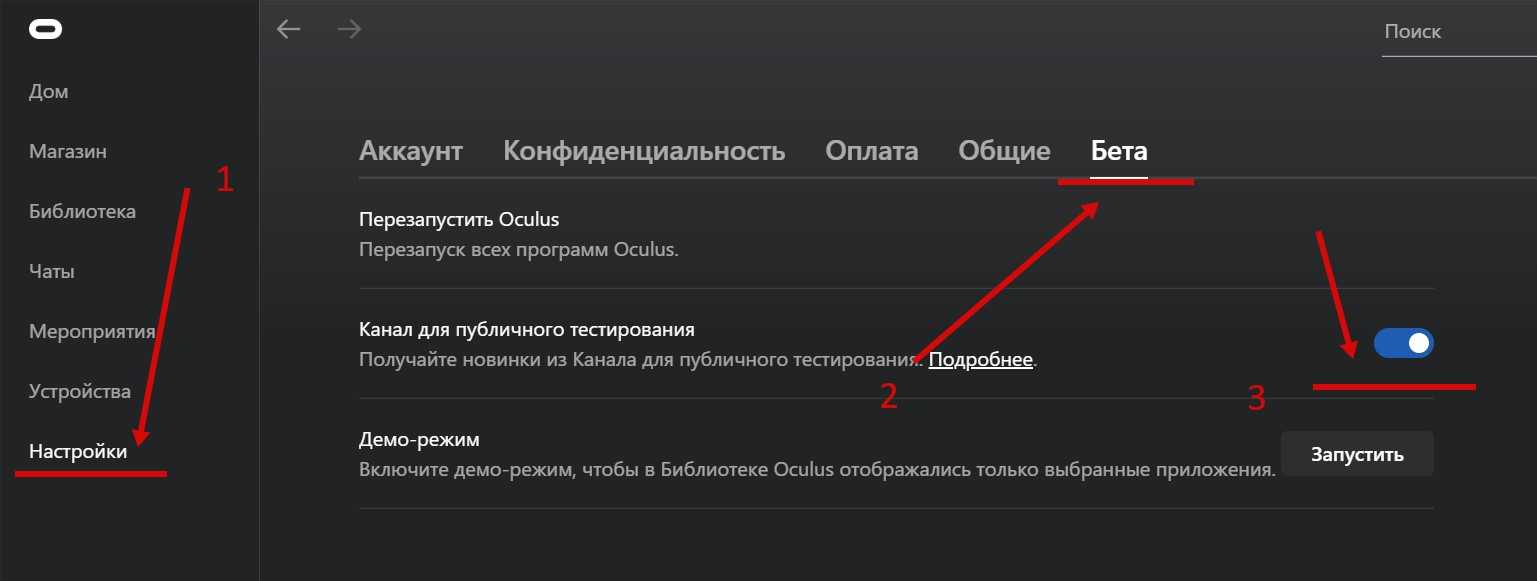
Зайдите в Настройки, затем перейдите на вкладку Бета. Внизу вы должны увидеть переключатель Air Link внизу. Включение этого параметра переключит приложение на использование беспроводной связи Air Link вместо обычного проводного соединения. Этот переключатель автоматически выключится через 24 часа, поэтому, если между игровыми сессиями прошло 24 часа или больше, вам придется снова включить его.
Включить Air Link в Quest
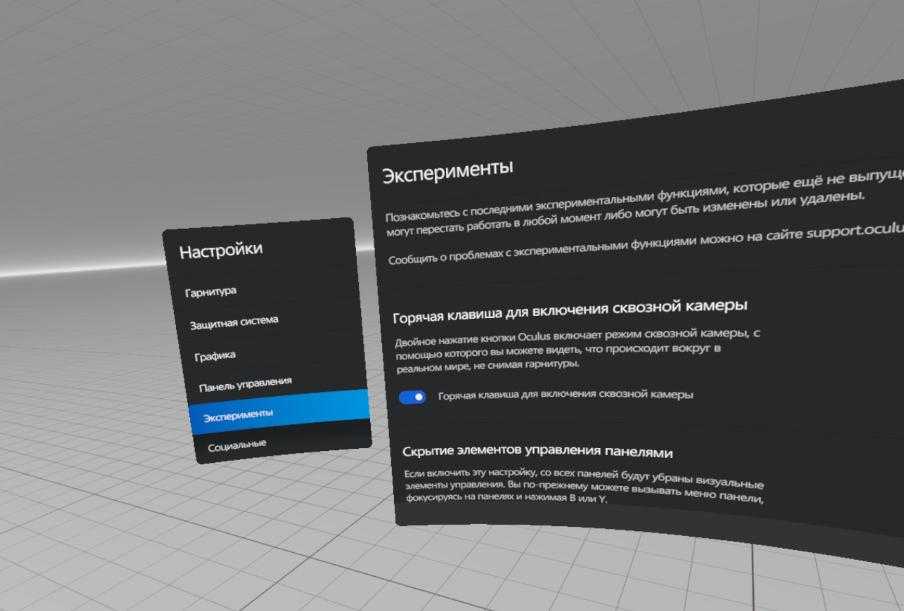
Вам также нужно будет включить Air Link в Quest, поскольку эта функция все еще экспериментальная и еще не находится в официальном полном выпуске. Для этого перейдите в меню «Настройки» своего Квеста, а затем перейдите в «Экспериментальные функции». На этой вкладке у вас должна быть возможность включить Air Link. Если у вас нет такой возможности, попробуйте перезапустить гарнитуру еще раз. Все еще не там? Тогда Facebook, возможно, еще не включил Air Link на вашем устройстве, даже если у вас установлена версия 28. Вам нужно подождать немного времени и снова проверить.
При включении вы можете увидеть диалоговое окно с предупреждением об оборудовании и настройках, необходимых для оптимальной работы с Air Link. Если вы прочитали и выполнили все, что указано выше, вы должны быть готовы выполнить все требования, перечисленные ниже. Выберите Продолжить.
Запуск Air Link
Вы можете запустить Air Link из меню быстрых действий в настройках Квеста. Просто убедитесь, что Air Link все еще включен в настройках приложения Oculus для ПК (опять же, он автоматически выключится через 24 часа) и что ваш Quest подключен к той же сети. Если вы впервые используете Air Link, вам будет предложено подключить Quest к компьютеру. Откроется список всех компьютеров в той же сети, что и ваш Quest, на которых запущено приложение Oculus PC версии 28 и для которых включена настройка Air Link в бета-версии, как описано выше. Выберите свой компьютер, и вы должны быть подключены и готовы к работе.
После запуска процесс использования Air Link для игры в компьютерные VR-игры должен быть точно таким же, как при исходном использовании гарнитуры ПК VR или проводном соединении Oculus Link.
Настройки инструмента отладки
Проблемы с производительностью? Если вы уверены, что ваша сеть работает нормально, вы можете попробовать другие способы исправления. Пользователи Reddit отметили, что параметр в Oculus Debug Tool для Oculus Link может повлиять на задержку и производительность Air Link (хотя рассматриваемый параметр предназначен только для проводных подключений).
Если вы настроили битрейт Oculus Link в инструменте отладки, вам нужно будет установить его обратно на 0, чтобы получить надлежащую производительность Air Link. Инструмент отладки Oculus находится в папке Program Files \ Oculus \ Support \ oculus-diagnostics \.
После открытия инструмента отладки найдите параметр «Битрейт кодирования (Мбит/с)» в разделе Oculus Link — убедитесь, что он установлен на 0, прежде чем использовать Air Link для оптимальной производительности.
Регулировка битрейта
В Oculus Dash также есть новая настройка, которая позволяет регулировать битрейт Oculus Link при использовании Air Link, что может улучшить производительность.
Эту настройку можно найти на панели Air Link в Oculus Dash, и она позволит вам выбрать динамический или статический битрейт.
Битрейт — это объем данных, передаваемых через Air Link в ваш Quest — более высокий битрейт означает более высокое качество, но может увеличить задержку и вызвать заикание.
Этот параметр необходимо настраивать в индивидуальном порядке — верхний предел вашего битрейта будет определяться характеристиками вашего ПК и тем, сколько он может обрабатывать.
Динамический битрейт автоматически выбирает то, что лучше всего, в зависимости от того, как ваше оборудование работает в любой момент времени — если вы не знаете, что делаете, и не хотите ни с чем связываться, используйте эту опцию. Статический битрейт позволит вам установить постоянный уровень качества, но может повлиять на производительность. Если вам нужен статический битрейт, поиграйте с ползунком, чтобы найти параметр, обеспечивающий наилучшее качество без ущерба для производительности. Если вы подниметесь слишком высоко и Air Link зависнет, настройка автоматически изменится на обратную в течение 10 секунд.
Источник
Why do We Use the Oculus Debug Tool in our Game
Oculus Debug Tool is a tool that allows us to connect to the Quest 2 computer system, which will help us to understand what’s happening in the game world. This tool can help us to feel the game, to feel the player’s hand, and to see the player’s body. We hope that this guide will allow you to use the Oculus Debug Tool so that we can better understand how Quest 2 works.
The Oculus Debug Tool is important because it helps us to understand what’s happening in the game world. It helps us to feel the game, to feel the player’s hand, and to see the player’s body. We hope that this guide will allow you to use it so that we can better understand how Quest 2 works.
Conclusion
Oculus is the best tray tool for managing virtual objects. It is easy to use and can help get the most out of virtual objects. Users can control how many copies of each thing you have, how many users can own at the same time, and even how many objects are in the Trays.
— Read More —
Watch Movies on Oculus Quest
Air Link Resolution & Quest 2 Quality Settings
Google Earth VR on Oculus Quest 2
Skyrim VR on Oculus Quest 2
Find Beat Saber Custom Levels
Fix 6: Check for Oculus Debug Tools
The Oculus Debug Tool (ODT) packed in the Oculus install file is an advanced tool that enables you to check and configure your game’s performance or debugging settings. So when things go wrong with Oculus software or Air Link, you could simply check on the ODT to see whether some of the settings aren’t right. Here’s how:
- Press Windows + E keys to open the File Explorer. Copy and paste the following path into the address bar, then hit Enter.C:\Program Files\Oculus\Support\oculus-diagnostics
- Double-click the OculusDebug Tool.
- Under the category Oculus Link, check if the Enode Dynamic Bitrate Enode is in “Default” status. If not, click on the option and select Default from the drop-down menu.Go on to check if the parameter of Encode Bitrate (Mbps) is “0”. If not, change it to .
Move on to the last fix if this one doesn’t work for you.
Stuttering on wired Oculus Link
If your Quest Link experience has become stuttery or jumpy, you can try a few things. First off, make sure your room has adequate light for the Meta Quest to track. Those cameras need light to see the environment around them, and insufficient light will cause tracking issues.

![[fixed] oculus air link not working on windows - driver easy](https://vvk-yar.ru/wp-content/uploads/5/3/5/5354c60336398b370ee70298c10425f1.jpeg)

![Fix oculus air link not working, not connecting to pc [steps] – techs magic](https://vvk-yar.ru/wp-content/uploads/b/2/d/b2da7c27d2857aef5ca8a18ef30f20d5.jpeg)
![(9 fixes) oculus air link laggy / stuttering [2023 guide] – smarthomeowl](https://vvk-yar.ru/wp-content/uploads/3/f/3/3f303faf5a2e40e648e52c8d02b1c274.jpeg)
If you’re not using an official Quest Link cable, it’s entirely possible that the cable you’re using can’t provide enough bandwidth for a consistent experience. If you’ve adjusted the bitrate manually as in the steps above, go back and set Encode Dynamic Bitrate to enabled. This will allow the Quest Link software to automatically adjust the image quality based on available bandwidth, delivering a more consistent experience.
If you haven’t adjusted the bitrate before, you might need to lower the refresh rate of the Oculus Link signal on the Meta Quest 2 or Quest Pro. The original Oculus Quest only supports one refresh rate (72Hz), so this step only applies to Oculus Quest 2 and Quest Pro. To do that, follow these steps:
- On your PC, open the Oculus software.
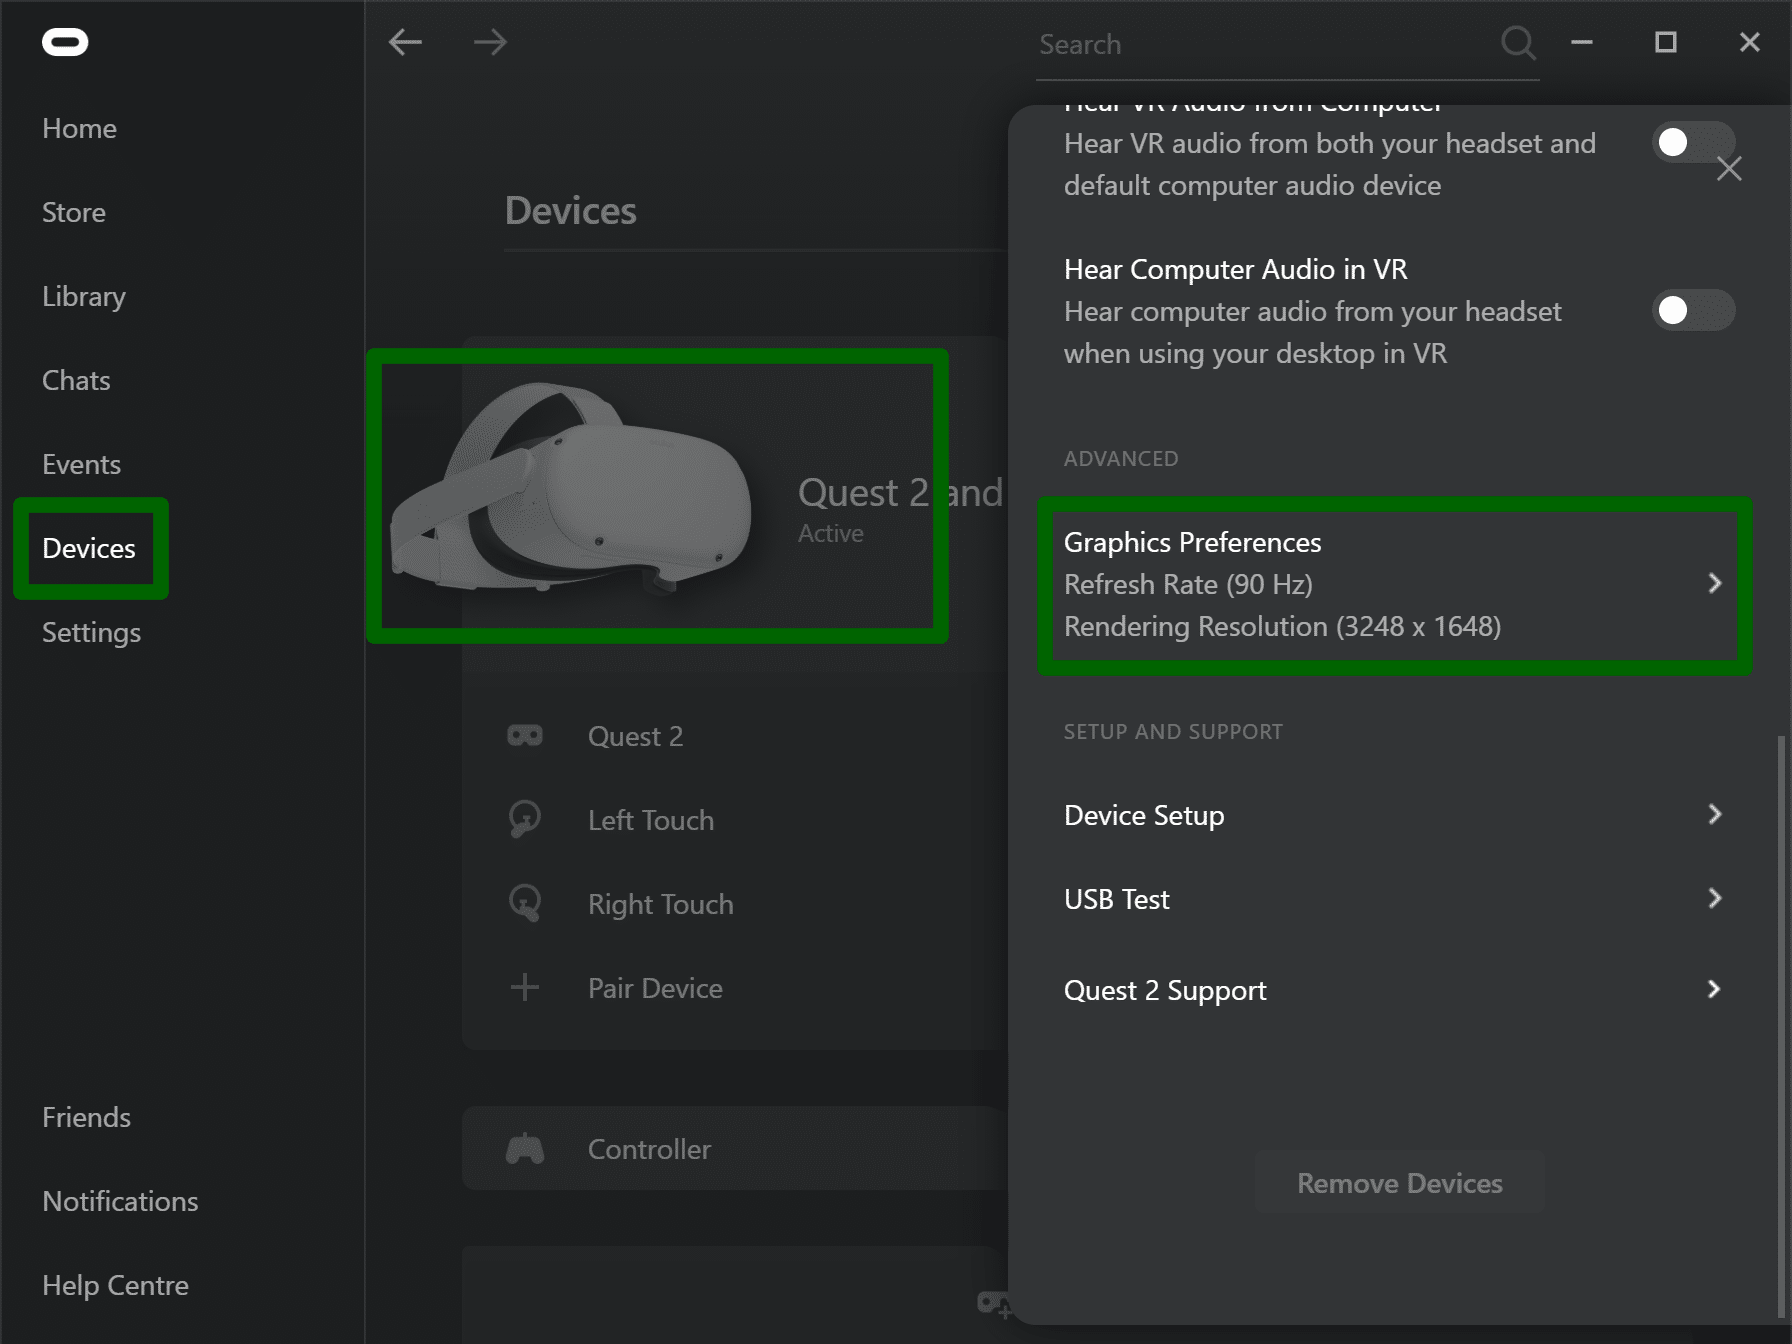
- Select Devices on the left side, then select Meta Quest 2 or Quest Pro from the list of connected devices.
(Image credit: Source: Android Central)
- On the menu that pops up on the right side, select Graphics Preferences.
- Select 72Hz to bring the refresh rate down to its lowest possible setting.
(Image credit: Source: Android Central)
- If you’re still experiencing issues, uncheck automatic resolution and scale the resolution lower than 1.0x.
- A lower resolution will deliver a softer image, but will improve performance.
If you’re still having trouble with stuttering, try updating your motherboard and display drivers. Otherwise, your PC may not be powerful enough to play PC VR games without performance issues.
How To Use The Oculus Debug Tool
If the image now gains somewhat in sharpness, the most observant will notice that the compression effect remains present.
The cause of this stems from Facebook’s limitation on bandwidth. By default, this would be around 150 Mbps. Fortunately, this limitation can be removed via the Oculus Debug Tool.
The tool is located in the Oculus application installation folder on PC, by default:
A must-have for hackers, the Oculus Debug Tool once made it possible to modify the graphics preferences mentioned in the previous paragraph before they officially appear in the application.
You guessed it, the part that interests us concerns “Encode Bitrate (Mbps)”.
This setting is the most important because it will drastically reduce the degradation of the image caused by the compression. But then again, the value is going to depend on the power of your PC.
At 250 Mbps, the difference is seen considerably thanks to a much clearer picture. If the experience remains smooth, without stuttering, you will be able to increase up to 300/350 Mpbs. Even if it is possible to go up to 500 Mbps, the difference will be imperceptible and you will gain in latency.
For the values to be fully taken into account, the Oculus application must be restarted for each modification. To facilitate the task, a shortcut is accessible by clicking on “Restart Oculus Service” in the Service menu.
- Right-click Oculus Runtime Service.
- Click Restart. It will likely take a moment to finish
So that’s how you can Increase the OCULUS LINK Image Quality Of PCVR on your Oculus QUEST 2
If you have any problems then comment down below, we will reply as fast as lightning. Until then Stay Strong VR Army
Suggested:How to Play Steam VR Games on Oculus Quest Wirelessly Using Virtual Desktop
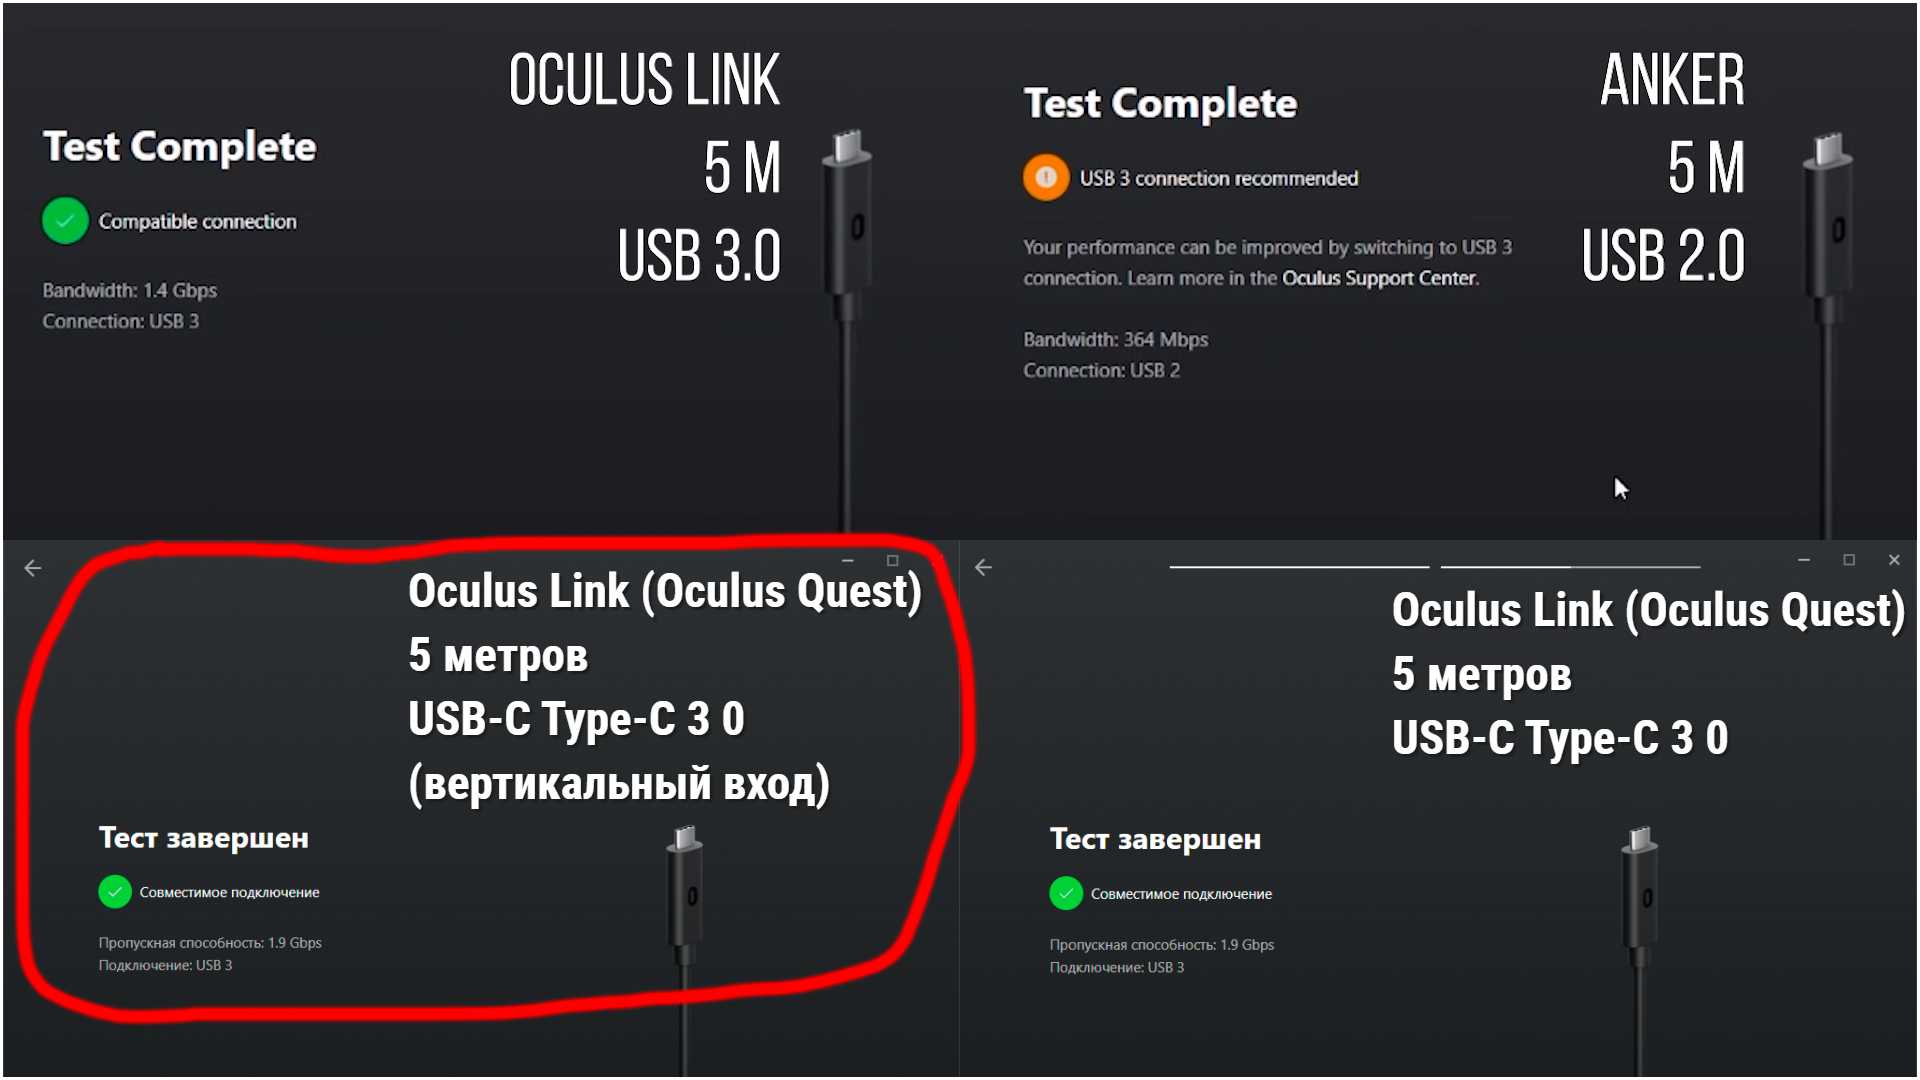
USB 3.0 Is Vital
Link will work over USB 2.0, but only at 72 Hz refresh rate, and trying to increase the bitrate results in stuttering. USB 2.0 also has higher latency.
USB 3.0 unlocks the 80 Hz & 90 Hz modes for Quest 2 and lets you boost the bitrate to reduce compression artifacts. How well USB 3.0 mode works depends on your motherboard and your specific cable.
Facebook sells an official 5 meter cable for $79. It’s fiber optic, making it thin & light, but you can find much cheaper 3rd party alternatives on sites like Amazon.
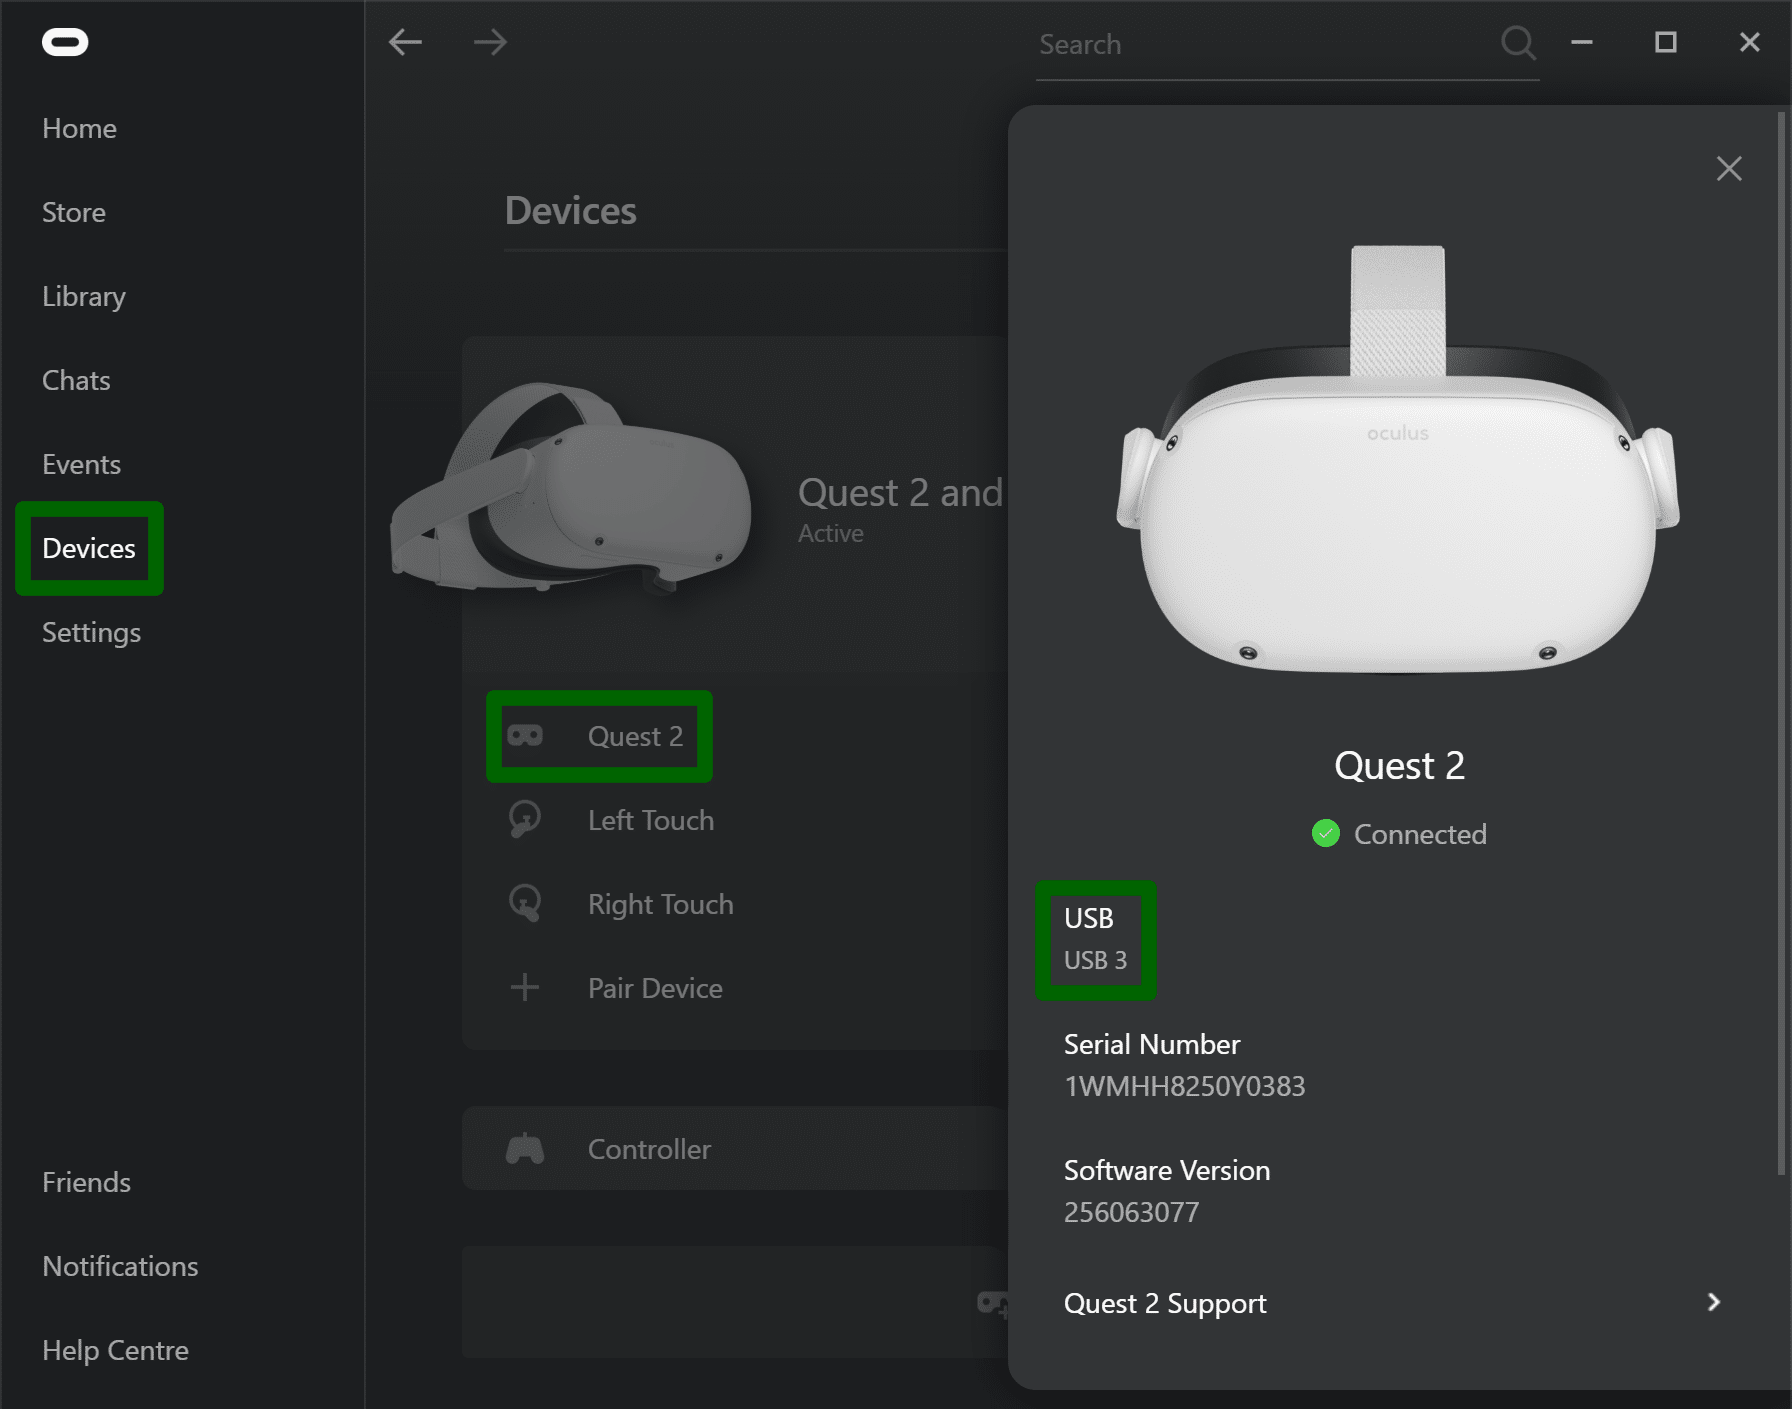
To verify you’re in USB 3 mode, open the Devices tab of the Oculus PC app and click your headset. You should see a green tick mark.
If it only shows up as USB 2 try every USB 3.0 port your PC has. Also try rebooting both your PC and your VR headset. If your graphics card has a USB-C port, use it. If none of these steps work, you can purchase and install a PCI-E USB card like this one.
Recent NVIDIA Cards Work Best
For normal PC gaming, choosing between NVIDIA and AMD is usually just a matter of comparing the raw performance and price. For native PC VR headsets that use DisplayPort or HDMI this is also mostly the case.
When using an Oculus Link your GPU doesn’t just send raw frames. Because USB has considerably less bandwidth, the video stream is compressed using your graphics card’s video encoder.

In 2018 NVIDIA introduced a significantly improved video encoder in its RTX 2000 series Turing graphics cards. The encoder in the recently released RTX 3000 Ampere cards is almost identical.
The video encoders on older NVIDIA cards and AMD cards as new as the RX 5000 series have noticeably worse image quality as well as higher latency. We haven’t yet seen video encoder evaluations for AMD’s newly released RX 6000 series.
Make sure your driver is up to date regardless of your card: NVIDIA Drivers / AMD Drivers
90Hz Feels Great, But Can Be Hard To Hit
Oculus Link works at 72 Hz by default. In USB 3 mode on Quest 2 you can increase this to 80 Hz or 90 Hz.
A higher refresh rate reduces latency, makes controller tracking feel smoother, makes the virtual world look more solid, reduces eye strain, and can even reduce VR sickness. But 90 Hz is 25% harder for your PC to render.
If a specific game stutters even with its graphics settings lowered you should try reducing the refresh rate, but otherwise we’d recommend keeping it at 90 as much as possible.
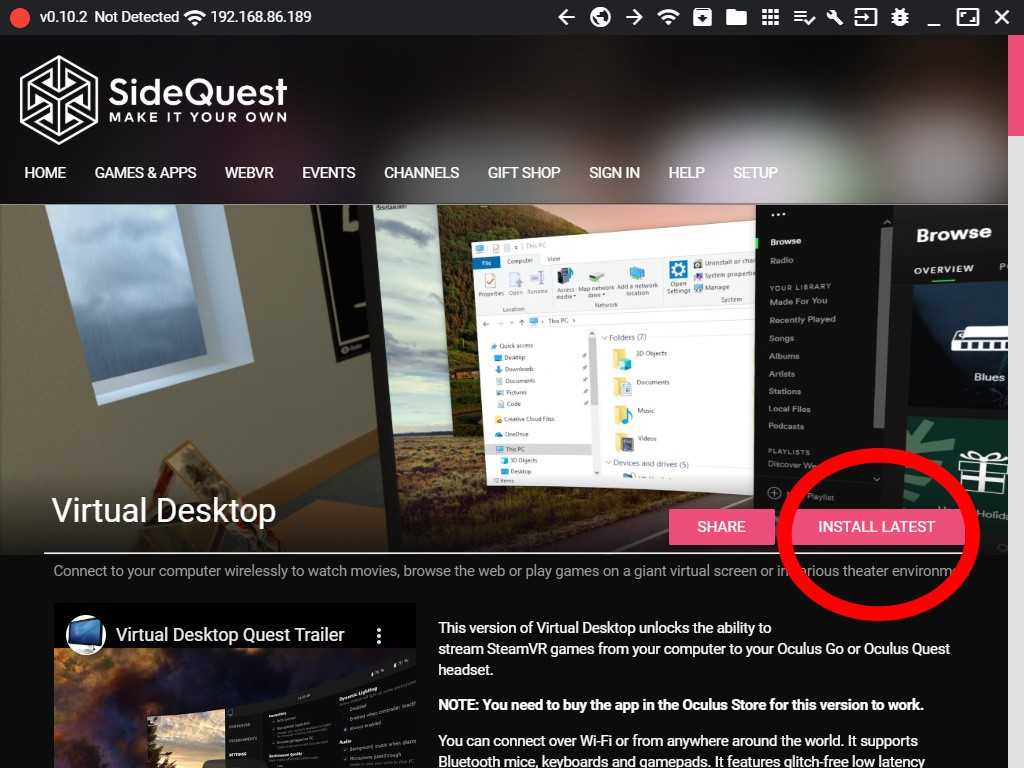
Installing and Using SideQuest
SideQuest is the application that lets you side-load apps and games to the Oculus Quest. It’s also basically an alternate store for VR games.
Download and install the latest version of SideQuest from sidequestvr.com or https://github.com/the-expanse/SideQuest/releases
I’m on a Windows PC, but Mac and Linux versions are also available. Download the correct file for your operating system and run it. It will take you through the install process and launch SideQuest on your PC.
Disable the “Unlock Pattern” on the Quest (if you have one set).
In the Oculus Mobile App: Settings > Quest > More Settings > Unlock Pattern
Launch SideQuest (if it is not already open) and plug your headset into the PC.
Allow USB Debugging—Once connected you will need to allow debugging by approving a popup in the Oculus Quest Headset. Make sure to check the box to “Always allow from this computer.”


if everything is working you’ll see a green dot in the top left corner, along with the device’s IP address and battery level.
Install Apps in SideQuest
As long as your Quest is connected, via either usb or wifi (see below), you’re all set to begin installing apps. You’ll know it’s ready because of the green dot in the top left corner. Browse or search games in SideQuest, then just click on the “INSTALL LATEST” button, or “GET ON ITCH.”
More games and apps from other sources.
More games and apps can be side-loaded from APK files downloaded to your PC from other sources. You might find some things on github, or if you are developing your own apps you can push them to the Quest.
In the top bar, click “Install APK file from folder.” (The icon is the down arrow in the box.)
An explorer window will open, letting you browse your computer for files to manually send to the Quest.
Enable Wireless mode (experimental feature).
After Developer options are enabled, and SideQuest is installed and working, you can switch to ADB over WiFi and continue to use all the awesome features of SideQuest without the USB cord. Click the WiFi icon to “Enable Wireless mode. (Experimental).“
A popup window will show you the Device IP, and allow to connect.
If you’ve previously connected with WiFi, then you may be able to reconnect by sending the ADB command.
Click “Run ADB commands,” and then click “Connect to WiFi ADB.”
Reconnecting to Wireless ADB doesn’t always work for me, especially if I’ve rebooted the headset, but it is after all, still an experimental feature. The solution is to plug the USB cable in, and use “Enable Wireless Mode” again.
That’s all for this guide. You should be ready to begin installing games, apps, and mods on your Oculus Quest. Lots are available directly through SideQuest by browsing the “Games and Apps” tab or visit the website https://sidequestvr.com/.
Developer mode doesn’t appear in Oculus Apps.
If you’re using an Oculus Rift S or Quest, you might notice that the Developer Mode option doesn’t appear in the Oculus App settings. Developer Mode is now only available on the Oculus Go and Gear VR.
If you’re a developer who wants to test their apps on an Oculus Rift S or Quest, you can use the Oculus Quest Development Mode. You’ll need first to connect your Oculus Quest to your PC using a USB cable. Then, open the Oculus App and go to Settings > General > Developer Mode.
Once you’ve enabled Developer Mode, you’ll be able to run Oculus Rift and Quest apps on your headset. However, keep in mind that some apps may not work correctly in Development Mode. If you run into any issues, you can contact Oculus Support.
Адаптивная нагрузка на видеокарту (Adaptive GPU Performance Scale)
Данный параметр позволяет отключить адаптивное масштабирование разрешения в приложениях, которые поддерживают эту функцию. Если установлено значение «По умолчанию», некоторые приложения будут динамически снижать разрешение для поддержания желаемого уровня производительности.
Отключив параметр масштабирования производительности графического процессора, приложения не будут динамически регулировать разрешение, а при возникновении узких мест в производительности вы увидите падение частоты обновления и/или асинхронное искажение пространства.
Рекомендуется оставить для параметра значение «По умолчанию». Отключайте, только если у вас высокопроизводительный ПК и вы предпочитаете максимальную визуальную точность (постоянно) плавному игровому процессу.
Oculus Developer Mode: Pros and Cons
There are two main ways to develop for the Oculus platform: Oculus Developer mode or Oculus Build mode. Both have their pros and cons, and it depends on your development needs as to which one you should choose.
Oculus Developer mode is excellent for developers who want to test their apps on the Oculus Rift hardware. It’s easy to set up and use, and it means you can test your app in the same environment that consumers will use it. However, the Developer mode can be a bit unstable, and if you’re not careful, you can easily break your Rift.
On the other hand, Oculus Build mode is much more stable and is designed for developers who want to create builds of their app that can be used for testing or release. Build mode is also much more flexible, allowing you to customize your app for different types of Oculus hardware easily. However, Build mode can be a bit more complicated to set up and use, and it can be more challenging to test your app on the Rift hardware in Build mode.