
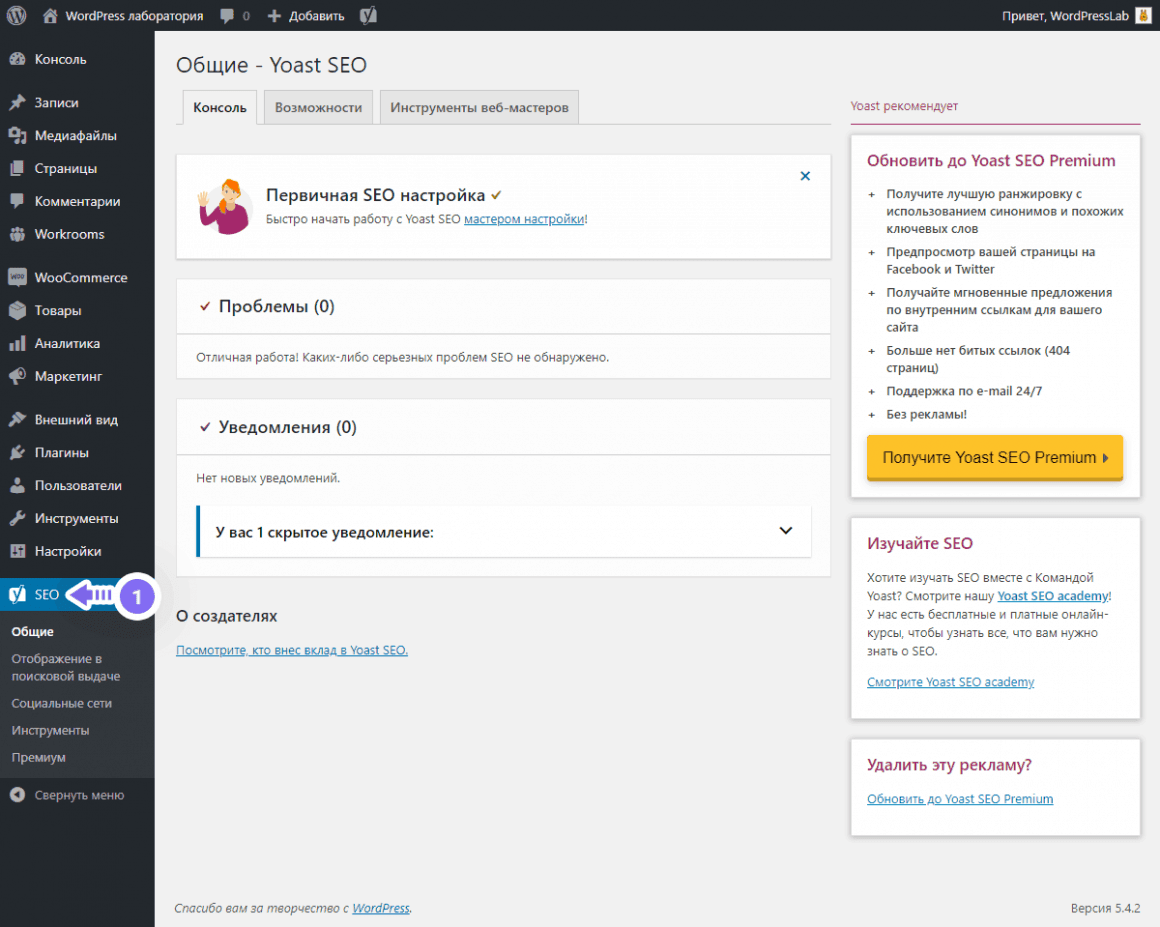
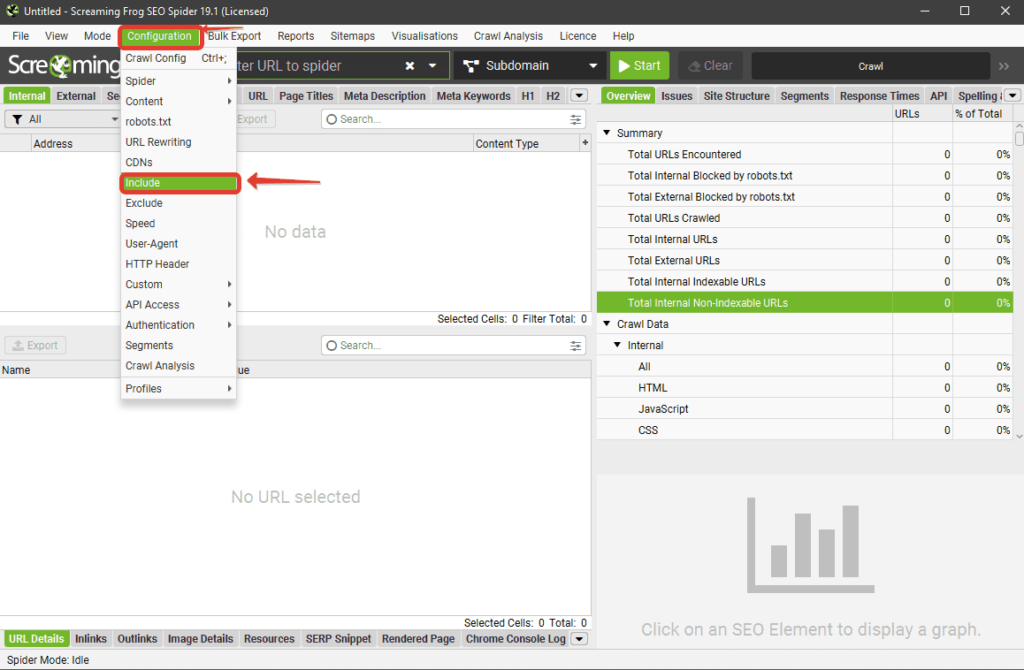
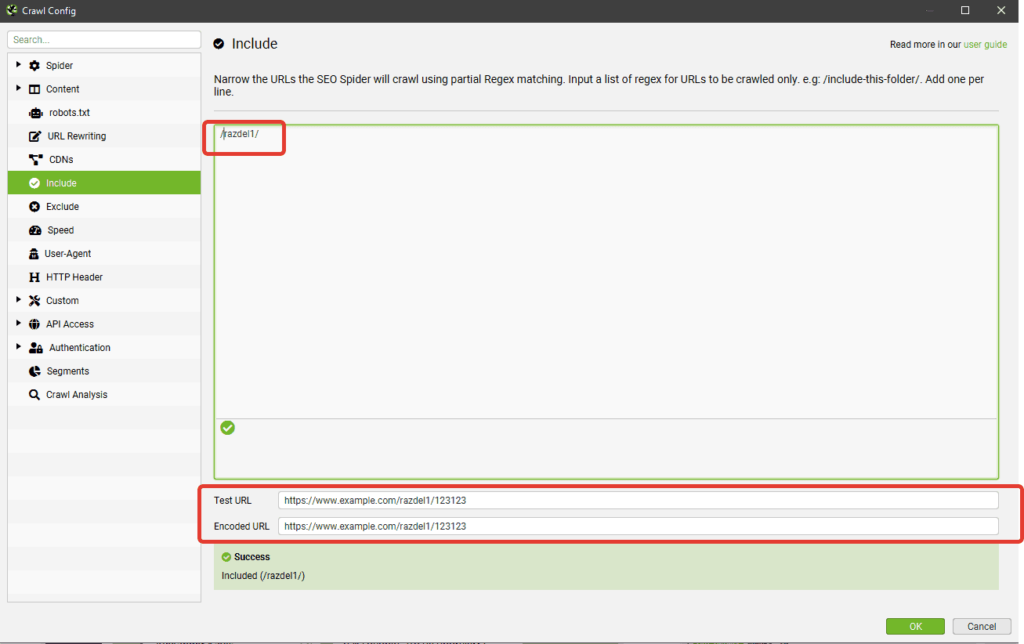
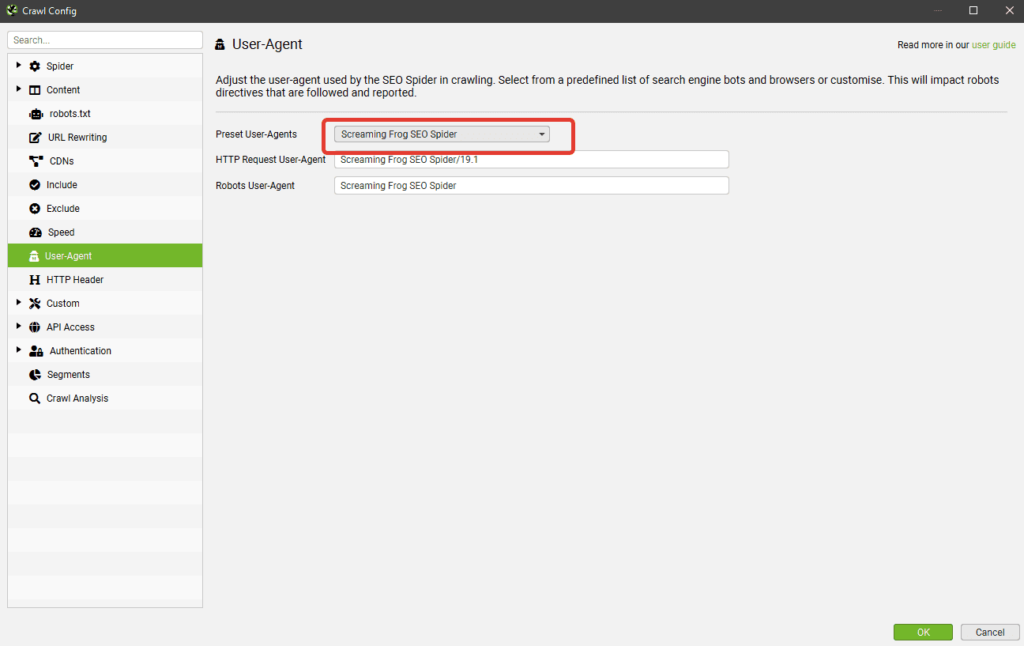
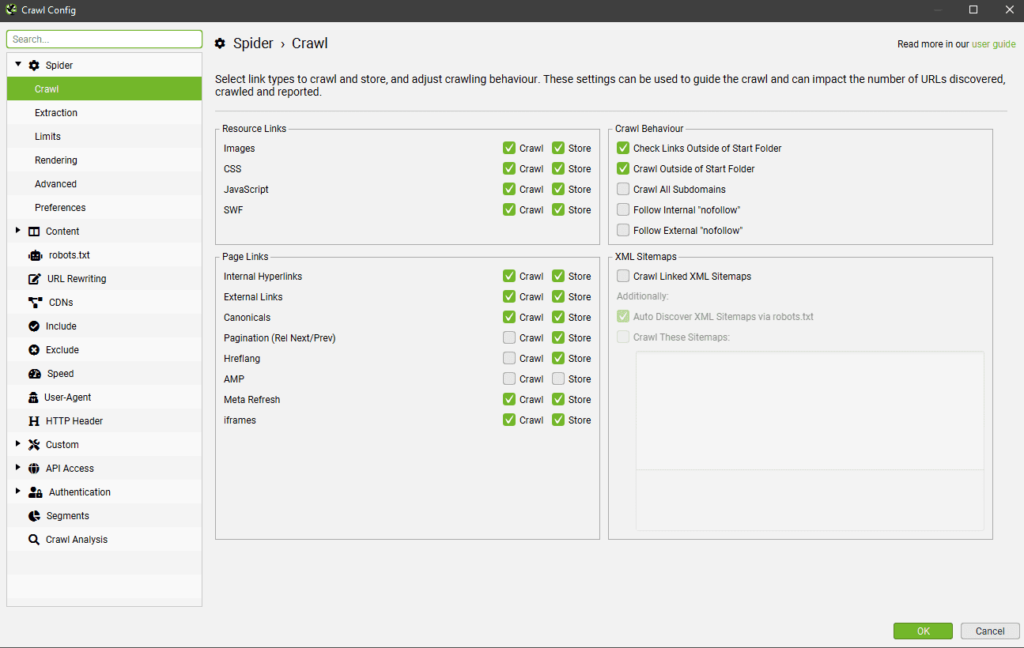
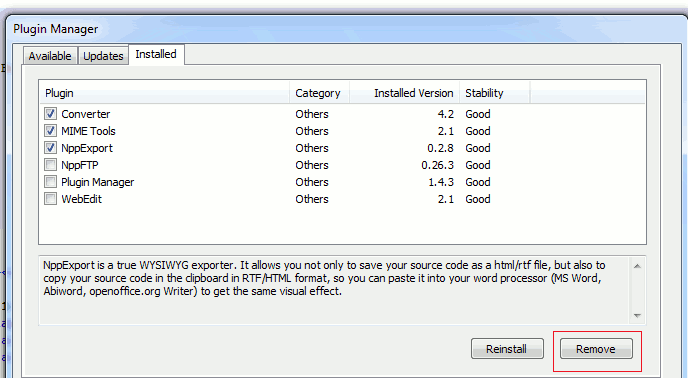
World management plugins on Spigot
It’s time to move to the next level, you are ready to welcome new random players on your server, but to attract them, you’ll need to have something interesting to offer. Create several worlds, with different purposes, is a great way to do this.
Multiverse-core
Multiverse is one old plugin, that was already there with Bukkit at the beginning of Minecraft servers. And it’s still essential on a modern server.
This plugin allows you to create several worlds, for example one to farm resources, where players can mine, in a different environment than the spawn world, where you have your important builds.You can create all kind of worlds with this plugin: Overworld, Nether and End. You can pick the seed you want or use a world generator to add originality.
Multiworld
I will be quick on this one, this is the only concurrent I have found to Multiverse.The idea is exactly the same, so nothing more to add.
I think it has been created at one time, when Multiverse has been a bit slow to update for the newest Minecraft versions. But if you can find a Multiverse version compatible with your Minecraft server, I would recommend Multiverse.
All details on Spigot
Per world inventory
This one is a bit different, and more interesting than the last one. The idea is to have a distinct inventory in each world (or at least one of your worlds). It also does the same thing for the player experience.
For example, you can create a new world where you organize some events, you give player stuff to play in these events, but when they come back to the spawn world they recover their normal equipment. It works great with Multiverse.
Как задать команды для NPC в Minecraft: шаг за шагом руководство
В Minecraft есть возможность создавать НПС (негравитационные потолки), которые могут выполнять различные команды в игре. Последовательность команд для НПС можно настроить с помощью командных блоков, чтобы они выполняли определенные действия, например, движение, говорение или взаимодействие с игроками.
Шаг 1: Создание НПС
Прежде чем задавать команды для НПС, необходимо создать самого НПС на сервере или в однопользовательской игре. Для этого вам понадобится использовать команду /summon для вызова НПС с заданными характеристиками. Допустим, вы хотите создать НПС с именем «Майк», используйте следующую команду:
В результате НПС появится в точке, где вы находитесь, и будет иметь вид обычного жителя с именем «Майк».
Шаг 2: Настроить командные блоки
После создания НПС необходимо настроить командные блоки, чтобы они выполняли нужные вам команды. Командные блоки — это специальные блоки, которые могут автоматически выполнять команды в игре.
- Установите командный блок в желаемом месте на карте, где НПС будет совершать действие.
- Нажмите правой кнопкой мыши на командном блоке, чтобы открыть его меню.
- Введите нужную вам команду в поле ввода команд.
- Настройте дополнительные параметры командного блока, если это необходимо.
- Нажмите кнопку «Готово», чтобы закрыть меню командного блока.
Вы можете повторить эти шаги для создания дополнительных командных блоков с другими командами. Например, вы можете создать командный блок, который заставит НПС говорить определенное сообщение при взаимодействии с ним.
Шаг 3: Связывание командных блоков с НПС
После настройки командных блоков необходимо связать их с НПС, чтобы они выполняли команды в определенное время или при определенных событиях.
- Выберите командный блок, который вы хотите связать с НПС.
- Нажмите и удерживайте Shift, а затем нажмите правую кнопку мыши на НПС.
Теперь выбранный командный блок будет связан с НПС и будет выполняться во время заданного события или в определенное время.
Шаг 4: Тестируйте и настраивайте команды
После связывания командных блоков с НПС вы можете протестировать и настроить команды, чтобы они выполняли нужные действия. Вы можете изменить команды в командных блоках или связанные параметры, чтобы достичь желаемого результата.
Теперь вы знаете, как задать команды для НПС в Minecraft. Используйте эту возможность для создания интересных взаимодействий в игре и настройте действия НПС по вашему усмотрению.
How do I make NPC run commands?
Adding Click Commands By default, “/npc command” will run commands as the server. Use “-p” to run as the player who clicked instead. For example: Use /npc command add -p help to make an NPC automatically execute “/help” as the player when clicked.
How do you make an NPC?
To create NPCs, open your inventory (type E) and add a Spawn Egg to your inventory. Place the Spawn Egg to create an NPC. To program an NPC, right click the NPC to bring up the customize screen. In this screen, you can change the name, displayed text and skin.
What makes a good NPC?
Good NPCs should be rich, fun to play, and interesting to encounter. They should fulfill their plot functions with flair and style. The interesting thing is the way so many of these desirable attributes help make the others easier to achieve.
How do you command NPC?
How to setup the NPC
- Edit config.yml to your likings.
- Select the NPC you wish to add commands too.
- Use the command ‘cmdadd’ (Syntax listed above) to add the commands you wish.
- These commands will be saved.
- If you wish to remove the commands simply use the ‘resetcmds’ command. ( Syntax listed above)
Как дать команду нпс в майнкрафт
Команды в майнкрафт позволяют игрокам и неигровым персонажам (НПС) выполнить определенные действия в игре. НПС могут быть полезными для создания интерактивных сценариев, квестов или просто добавления жизни в игровой мир. В данной статье мы расскажем, как дать команду НПС в Майнкрафт.
Шаг 1: Создайте НПС
Перед тем, как давать команды НПС, необходимо сначала создать самого НПС. Для этого вы можете использовать различные моды или плагины, которые добавляют эту функциональность. НПС могут быть созданы в виде мобов, блоков или с специальными моделями. После создания НПС, убедитесь, что он находится в мире игры и готов принимать команды.
Шаг 2: Определите команды НПС
После создания НПС, вам необходимо определить команды, которые НПС будет выполнять. Команды могут быть различными, например, НПС может говорить определенные фразы, перемещаться по миру, давать предметы игроку и т.д. Для определения команд вы можете использовать файлы конфигурации или специальные плагины.
Шаг 3: Укажите команды НПС
Теперь, когда команды НПС определены, необходимо указать их в НПС. Для этого вы можете использовать специальные команды или интерфейсы модов или плагинов, которые вы используете для создания НПС. Некоторые моды или плагины предоставляют графический интерфейс, который позволяет удобно настроить команды НПС.
Шаг 4: Тестирование команд НПС
После указания команд в НПС, рекомендуется протестировать их, чтобы убедиться, что они работают должным образом. Зайдите в игру и взаимодействуйте с НПС, чтобы проверить, выполняются ли его команды. Если что-то работает неправильно, проверьте правильность указанной команды и возможные ошибки в конфигурации.
Шаг 5: Доработка команд НПС
Если вы обнаружили какие-либо проблемы с командами НПС, вы можете вносить изменения и дорабатывать команды. Возможно, вам понадобится изучить документацию мода или плагина, чтобы понять, как правильно настроить команды НПС или найти модификацию, позволяющую редактировать команды непосредственно в игре.
Шаг 6: Использование команд НПС
После того, как команды НПС настроены и работают правильно, вы можете использовать их в своей игре
НПС могут стать важной частью сюжета и добавить новые возможности для взаимодействия игрока с игровым миром. Вы также можете использовать команды НПС для создания интересных заданий и квестов для игроков
В заключение, когда вы создаете НПС в Майнкрафт, вы можете дать им различные команды, чтобы они выполняли определенные действия. Настройка и использование команд НПС может значительно разнообразить игровой процесс и сделать игру более интересной и увлекательной.
Other interesting plugins for Spigot servers
In this last category, I’m adding all the interesting plugins that I can’t put in the other sections.
WorldEdit
WorldEdit is essentials, you probably already know about it, so I’ll be short.With this plugin, you can create selection and edit them quickly, import/export selections, create specific shapes (like sphere and cubes).
There is a lot of possibilities for builders, players in creative mode and most of all for server administrators.
Crazy Auctions
Crazy Auctions is useful for allowing trade between players (even if they are disconnected). They will get an interface where they can set the items they want to sell at which price, and other players can buy them directly from there.
It also helps to have a certain control over the economy, as you can configure the items that are allowed or not, and price ranges for each of them.You should test it!
AutoRestart
AutoRestart is a basic plugin, but still important because it allows you to set automatic reboot of your server at specified times. You’ll configure everything and it will safely reboot your server and warn the players a few minutes before.
On restart, the map will be saved just before, and it will disable all plugins.It’s a great way to free up some RAM from time to time, and you can also do your own backups at the same time (always better to this with the server off).
ClearLagg
ClearLagg is another toolbox plugin, it will add many features to your server, all related to the server performances.
For example, you can use it to remove items floating on the ground or to set a maximum number of mobs in each chunk. There are many other tools to monitor lag in each area or world.
What are ChatGPT plugins and why should you use them?
ChatGPT plugins are add-ons that extend the AI chatbot’s capabilities. The feature can be accessed through the in-platform store, providing you have a valid ChatGPT Plus subscription and ChatGPT-4 access.
While some of these plugins are developed by OpenAI, the majority come from third-party developers offering a diverse range of functions.
There are hundreds of plugins currently available each helping you to perform specific tasks with ease. This can include everything from helping you to write the perfect prompt to assisting in flight and restaurant reservations. In short, ChatGPT plugins can help improve and extend your experience with the chatbot.
What are the best ChatGPT plugins for research?
The best ChatGPT plugins for research will depend on what you’re researching. For scientific research, turn to plugins trained on scientific journals and trustworthy data to find your answers.
ScholarAI allows its users to search through a database of peer-reviewed studies and academic research.
NextPaperAI retrieves the most recent research papers on a specific topic from PubMed, an online database containing more than 35 million citations on biomedical literature.
If you’re planning your next vacation, anniversary dinner, or learning a new language, you’ll want specialized plugins that meet your needs. The ChatGPT plugins on this list cover many different research topics and use cases to help you find what you’re looking for quickly.
Group Variables
-
/mangaddv Add, or replaces, a variable to a group (like prefix or suffix).
- groupmanager.mangaddv
-
/mangdelv Remove a variable from a group.
- groupmanager.mangdelv
-
/manglistv List variables a group has (like prefix or suffix).
- groupmanager.manglistv
-
/mangcheckv Verify a value of a variable of group, and where it comes from.
- groupmanager.mangckeckv
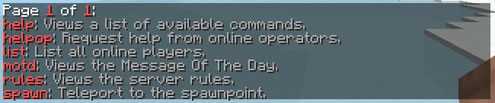
Utility Commands
-
/mansave Save all permissions on file.
- groupmanager.mansave
-
/manload Reload current world and config.yml, or load given world.
- groupmanager.manload
-
/mantogglevalidate Toggle on/off the validating if player is online.
- groupmanager.mantogglevalidate
-
/mantogglesave Toggle on/off the autosave.
- groupmanager.mantogglesave
-
/manworld Prints the selected world name.
- groupmanager.manworld
-
/manselect Select a world to work with next commands.
- groupmanager.manselect
-
/manclear Clear world selection. Next commands will work on your world.
- groupmanager.manclear
-
/mancheckw Obtain the paths to each file a world is storing it’s data in (users/groups).
- groupmanager.mancheckw
Non-Command Permissions
- groupmanager.op Overrides all inheritance and permissions when performing Group Manager commands
- groupmanager.notify.self notifies when your rank changes.
- groupmanager.notify.other notifies when someone’s rank changes.
- groupmanager.noofflineperms Denies all permissions if server is in offline mode.
Spigot plugins to protect your server
Once the basic plugins installed, you can start to protect your server before opening it to the other players.
WorldGuard
WorldGuard is a must-have in this field, as it will help you to protect your builds.You can use it to create areas in your world, and give them specific permissions.For example, one player can build a house here, but the other players can’t break it.
![18 best discord plugins [for betterdiscord] in 2023](https://vvk-yar.ru/wp-content/uploads/7/c/9/7c903d7d84da44542a5bbb4bc3340479.png)
You can also set flags in each region, to change the game settings in this zone. For example, you can set a flag to make players invincible in the spawn area.
I highly recommend installing it as soon as possible on your server.
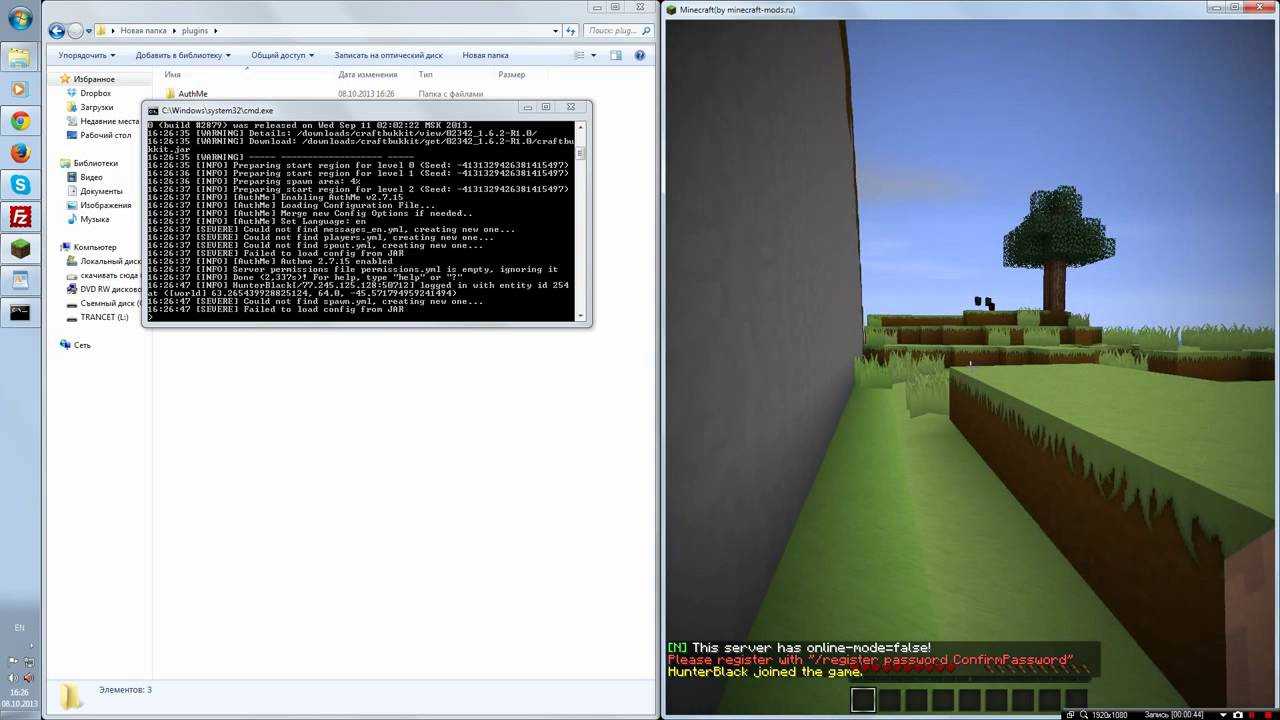
AuthMe Reloaded
AuthMe add an authentication step where players connect to your server.The first time you access the server, you need to create a password. The next times you log in, you’ll need to enter it to confirm the server access with this player name.
It’s mandatory if your server is configured as “offline” (crack), to avoid identity theft.But you can also use it on online servers (premium), to add a two-step authentication. This way, even if the Minecraft password is hacked, the progress on your server stay safe.
There might be other options to do the same thing, but it’s probably the most popular.
CoreProtect
CoreProtect is another toolbox for the server security.There are many features available, that you can enable or disable as you want, but the most common use of this plugin is to log all blocks modifications. There is also a rollback feature to revert an issue in a specific area or for a specific player.
Let’s say an important block disappear somewhere on your server, this plugin can tell you who broke it and when. This might be really useful depending on the server.
AreaShop
AreaShop is a very convenient plugin, allowing you to sell plots automatically.
Create a new region with WorldGuard, select it with AreaShop and create a sign to sell it for a specific price. You can set who will get the money and the rent duration. There are permissions available to limit the number of plots depending on the player rank for example.
I use it on my server for cities to have plots on rent for other players. It works really well.
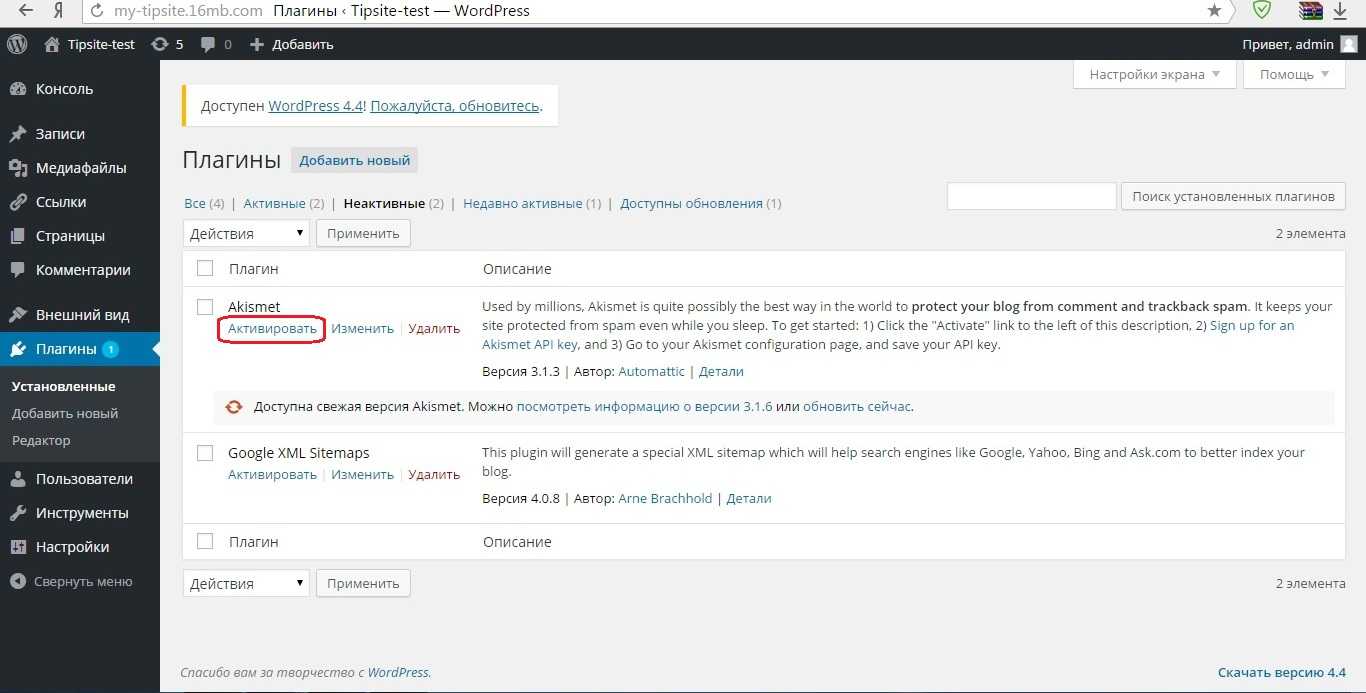
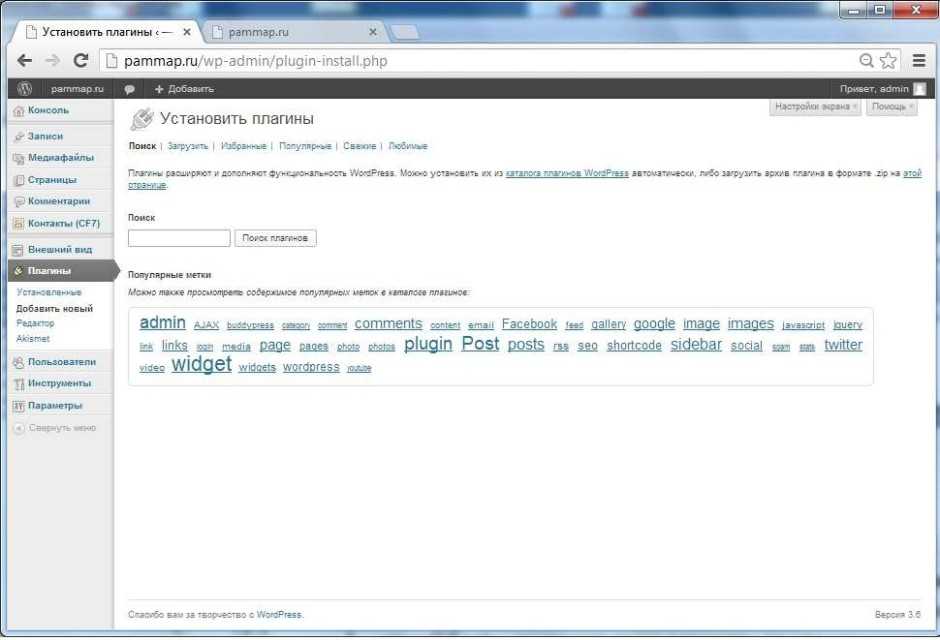
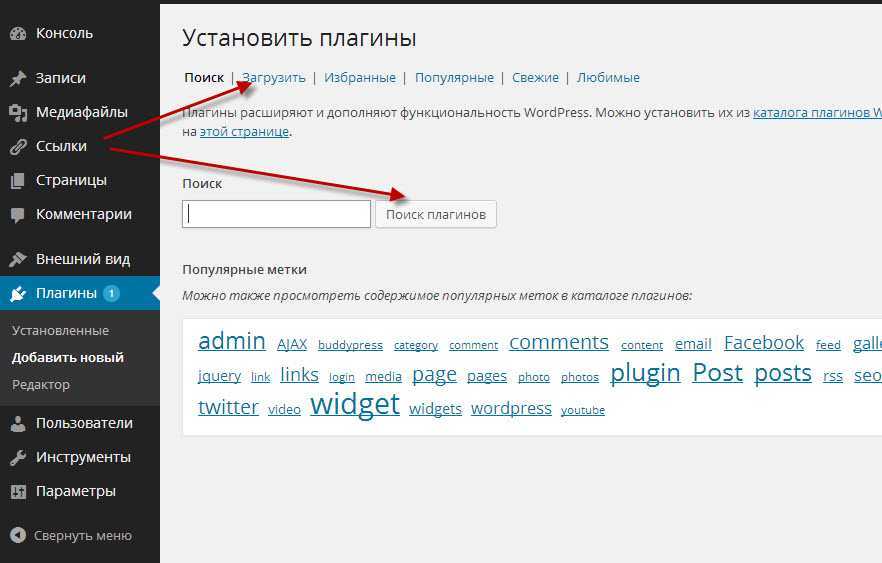
How do I install plugins?
Installing Most Plugins
- Download a plugin of your choice.
- Place the . jar and any other files in your plugins directory.
- Run the server and wait for it to fully load.
- Type stop in your Minecraft server console to bring the server to a clean stop.
- Run the server.
- All done!
What is the NPC command?
Unlike other entities, NPCs do not spawn naturally; they can be spawned using the NPC spawn egg (it can be obtained with the following command: /give @s spawn_egg 1 51 ), or by using the command /summon npc . When spawned, an NPC displays a name hovering over its head.
How do you add commands to NPC citizens?
Adding Click Commands By default, “/npc command” will run commands as the server. Use “-p” to run as the player who clicked instead. For example: Use /npc command add -p help to make an NPC automatically execute “/help” as the player when clicked. To auto-fill the player name, use “
“.
How to install custom NPCs in Minecraft 1.12.2?
If you want to install Custom NPCs in Minecraft 1.12.2, this is the video for you. We show you exactly how to download and install custom NPCs in Minecraft 1.12.2. Custom NPCs allows you to add, change, name, and control all kinds of different NPCs in Minecraft letting you create a truly unique experience in your world.
Adding Commands
By default, «/npc command» will run commands as the server. Add the «-p» flag to run as the player who clicked instead.
For example: Use to make an NPC automatically execute «/help» as the player when clicked. Note that you don’t type the «/» on the command name.
To auto-fill the player name, use «<p>». To autofill the NPC ID, use «<npc>».
For example: Use to make an NPC automatically kick the player when clicked.
Another common example: to automatically teleport the player that clicked the NPC to some coordinates (assumes the vanilla ‘tp’ command. If you use Essentials, use ‘tppos’ instead).
Note that this can be any command from Minecraft or any plugin, so for example if you use Multiverse, will use the Multiverse world teleport command.
Permissions
By default, anybody can click the NPC to cause a command to execute, without any permission requirement.
If is used, any permissions check by the command itself is checked for the player.
If is used, it will execute as-op, meaning the player will be treated temporarily as if they were a server operator (unless you have a plugin that doesn’t respect op, or a protection plugin that disables op). Be warned that can have side effects or performance problems.
Generally, it’s best to execute as-server (don’t specify or to use the default as-server), which will not require any permissions. You will need to use to fill in the player name wherever the command requires one.
If you want to add your own additional permissions requirement, use when adding the command.
Speaking to the Player
To make an NPC command that causes an NPC to speak to the player (if you don’t need the full options of the NPC command feature, just use instead), you can do:
Citizens automatically redirects the «say» command to speak as the NPC rather than as the server console.
Internally, the way this works is it replaces the with .
If you want to use the vanilla «say» command, you can use
Bungee
On Bungee servers, this supports the Bungee command, like . Note that this is a special case built into Citizens internally, and bypasses any normal permission requirements automatically.
This might also work on Velocity or other proxy servers, if-and-only-if that proxy server implements the Bungee protocol, which many do.
Подробный гайд по настройке команд NPC в Minecraft
В игре Minecraft есть возможность создавать и настраивать команды для неписей (NPC). NPC (Non-Playable Characters) — это виртуальные персонажи, которыми управляет компьютер, а не игрок. В этом гайде мы рассмотрим, как настроить выполнение команд NPC в Minecraft.
Шаг 1: Установка плагина
Для настройки команд NPC вам понадобится установить специальный плагин. В Minecraft существует множество плагинов для этой цели, но одним из самых популярных и функциональных является Citizens. Для установки плагина Citizens следуйте следующим инструкциям:
- Скачайте плагин Citizens с официального сайта.
- Переместите скачанный файл плагина в папку plugins на сервере Minecraft.
- Перезапустите сервер для применения изменений.
Шаг 2: Создание NPC
После установки плагина и перезапуска сервера вы можете приступить к созданию NPC. Для этого выполните следующие действия:
- Откройте консоль на сервере Minecraft.
- Введите команду /npc create для создания нового NPC. Замените на желаемое имя NPC.
- Настройте внешний вид NPC, используя команды /npc skin и /npc name .
Шаг 3: Настройка команд NPC
После создания NPC вы можете настроить выполняемые им команды. Для этого выполните следующие действия:
- Выберите NPC, используя команду /npc select . Замените на идентификатор NPC.
- Создайте новое действие, используя команду /npc command add . Замените на желаемую команду.
- Настройте выполнение команды по клику или раз в определенное время, используя команды /npc command edit execute . Замените на идентификатор действия, а на требуемый триггер (например, click или period).
Шаг 4: Примеры команд NPC
Вот несколько примеров настройки команд NPC:
- Выполнить команду игроку на клик NPC:
- Выполнять команду каждые 60 секунд:
Шаг 5: Завершение настройки
После завершения настройки команд NPC сохраните изменения, используя команду /npc save. Теперь ваш NPC будет выполнять заданные команды по вашему триггеру.
Теперь вы можете создавать и настраивать команды для NPC в Minecraft. Будьте креативны и экспериментируйте с различными командами и триггерами, чтобы создать уникальный игровой опыт для ваших игроков!
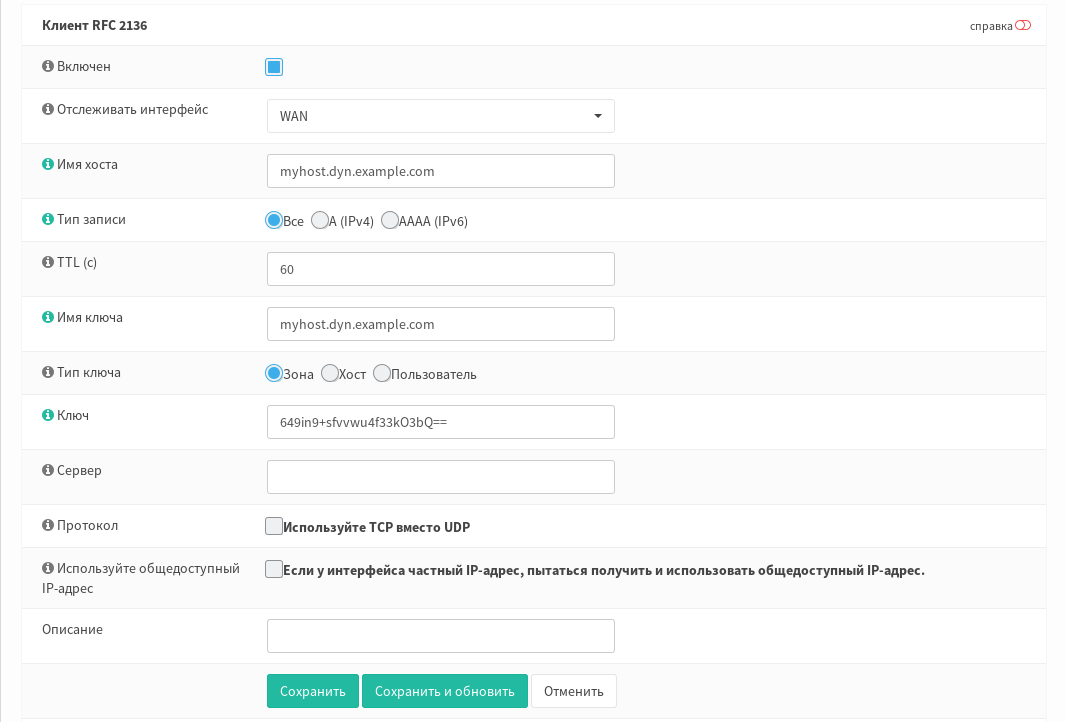
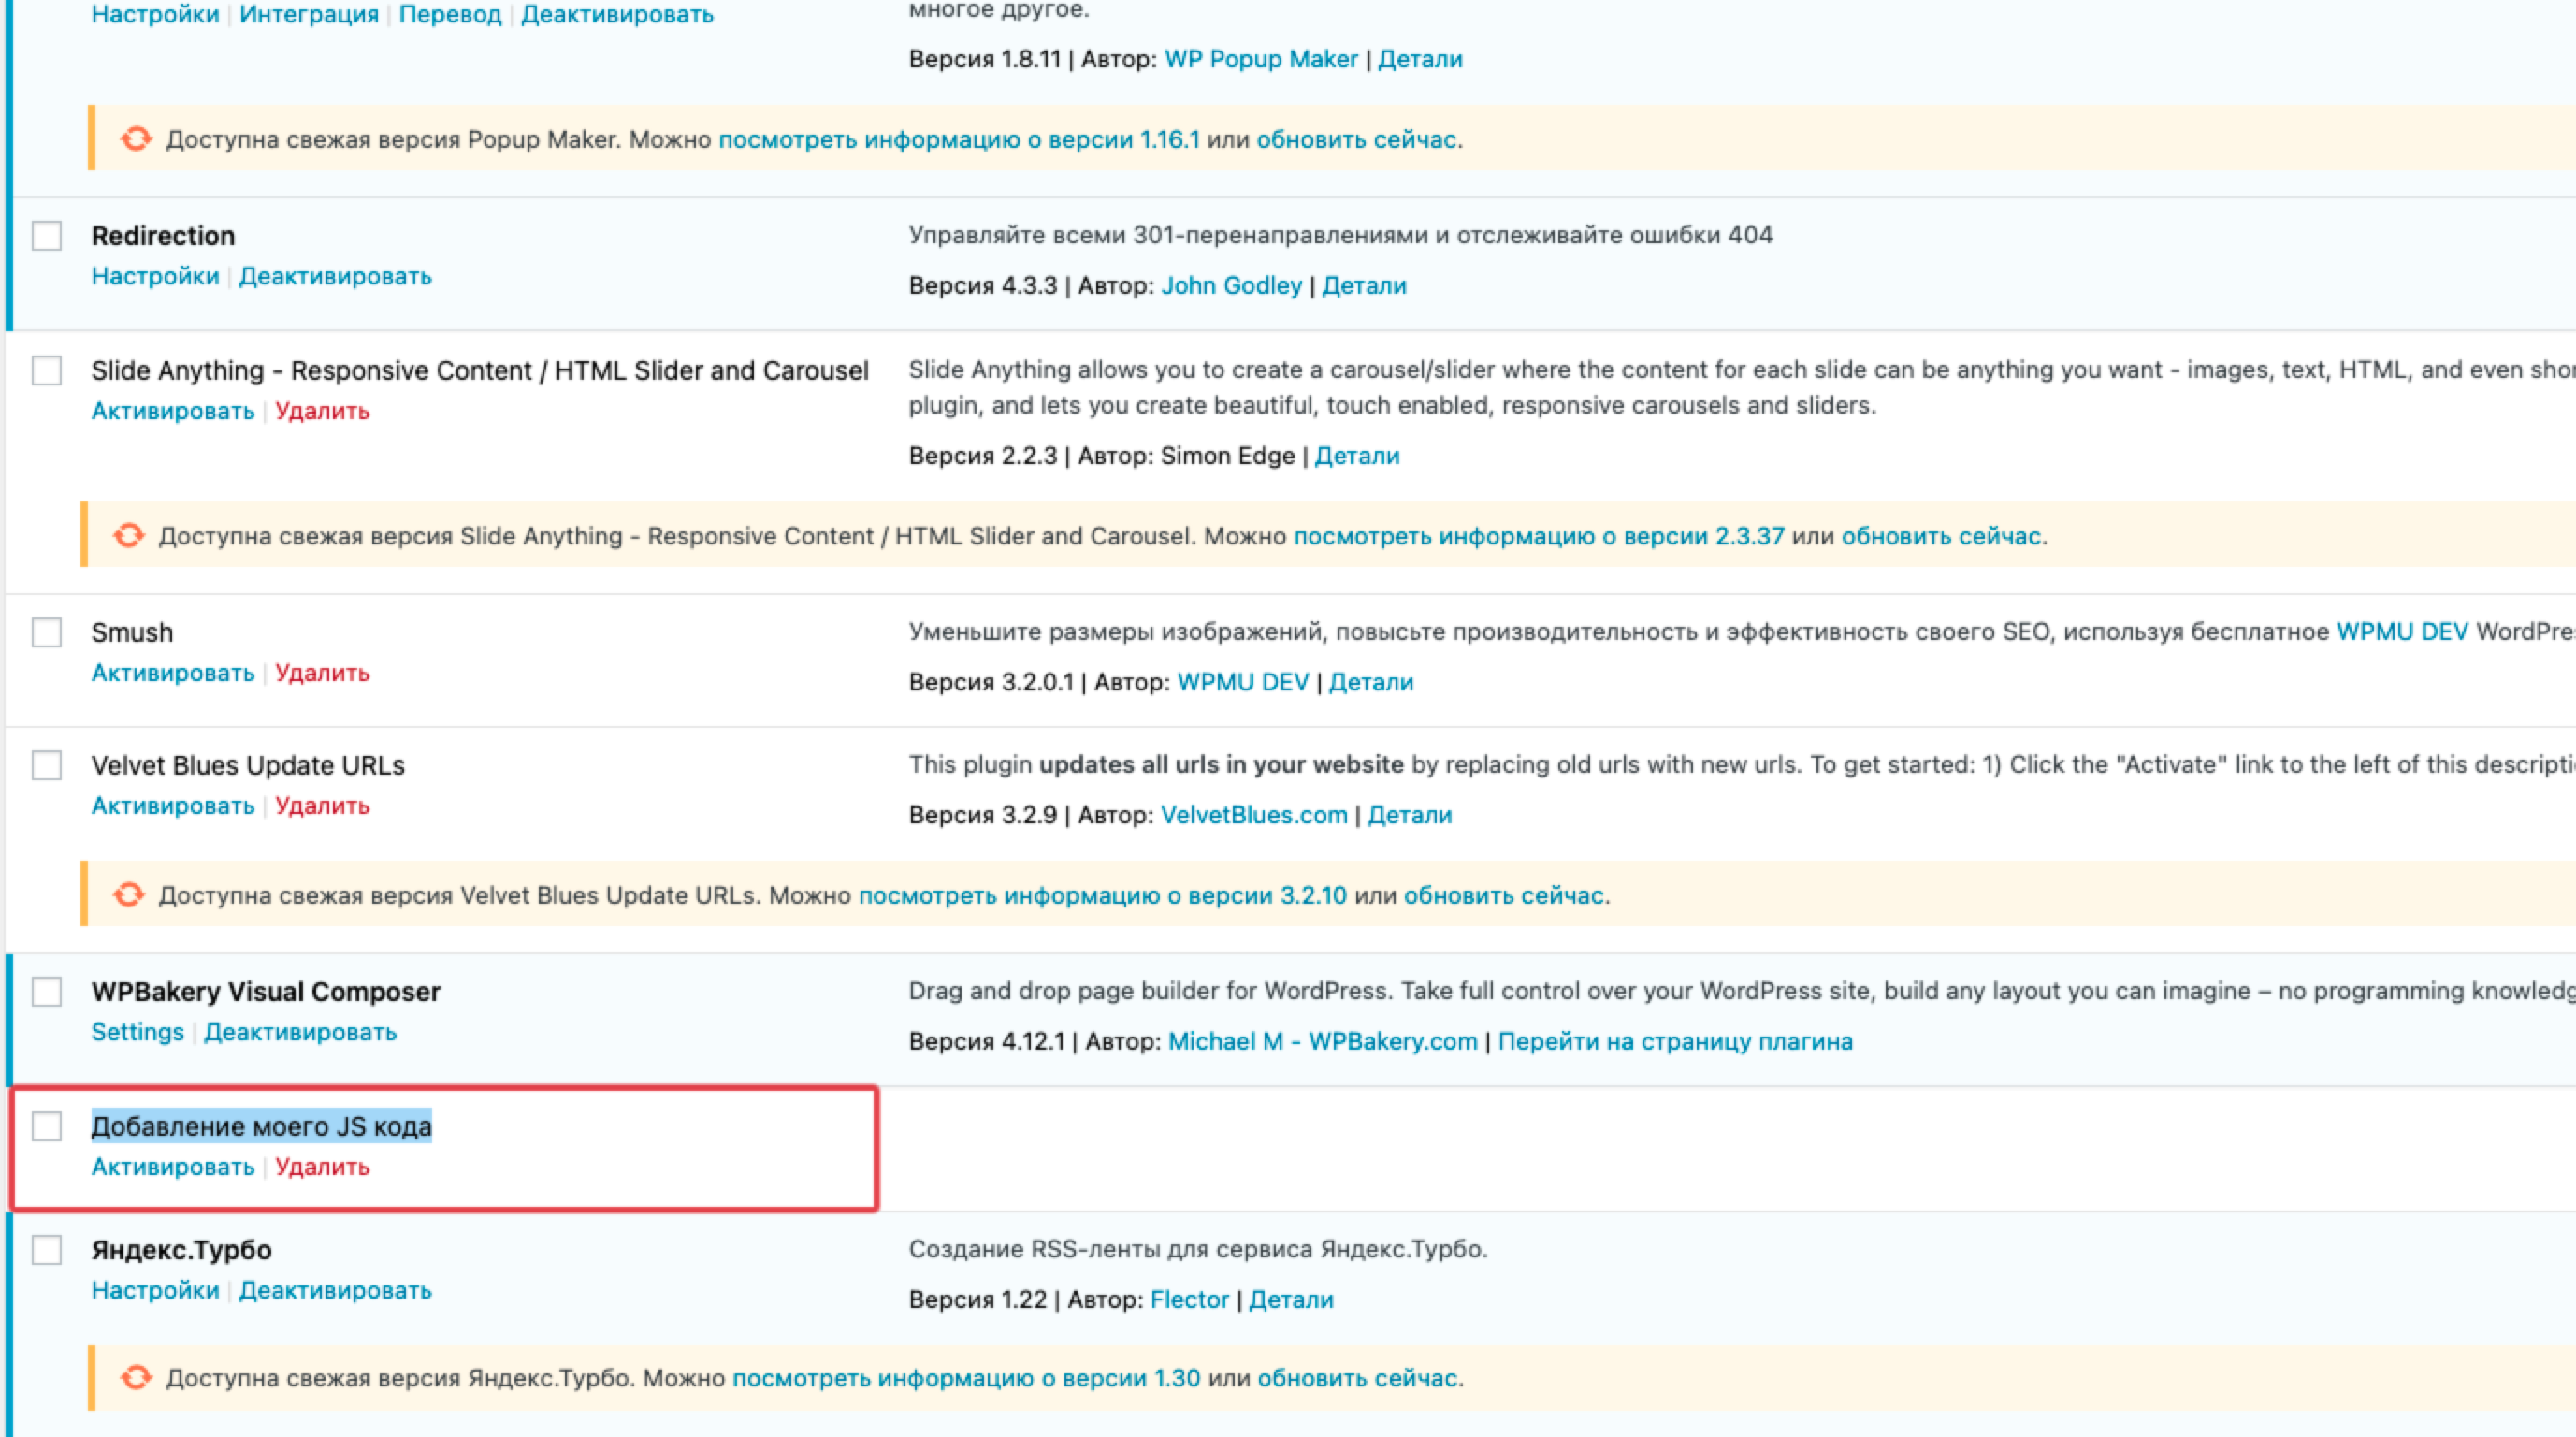
Installing Plugins on a Minecraft Server
-Last updated Sunday, February 10, 2013
Minecraft is probably the most popular indie game ever. It has taken the internet by storm, and can now boast over ten millions users. One of the best parts of Minecraft is it’s multiplayer capabilities. Using a server, you can play with as many people as you like. If you’ve played online, you’ve surely noticed that some server have additional options, such as teleportation or money. This is all possible due to plugins. So how do you install these plugins?
*NOTE: before you start, make sure you have an up-to-date version of Java installed on your computer. Otherwise, you can download it here: http://www.java.com/en/download/index.jsp
Install Bukkit Server
The single most important thing to remember when trying to install plugins on a minecraft server is that you cannot use the traditional server. Instead, you must download Bukkit (or rather: CraftBukkit), an open source variant of the official Minecraft server that supports plugins! Installing Bukkit is as easy as installing a normal server.
- Download CraftBukkit here.
- Copy the *.jar file you’ve just downloaded to a folder with a meaningful name, such as «Minecraft Server» or «Bukkit Server»
- Download the batch file below into this same folder (Right-click the button and select Save as…)
- Change the name of the *.jar file you’ve downloaded to «craftbukkit» (without the quotes).
That’s basically it. Now, If you click on Run.bat, the server will generate a new level and all the required files and folders. In the end, you’ll have something that looks like this:
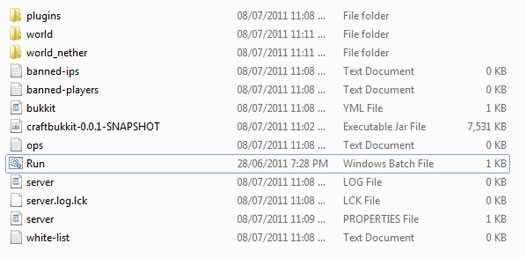
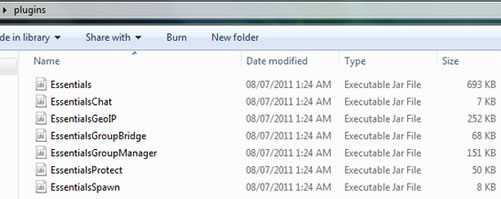
Adding plugins
Notice the new «plugins» folder. Conveniently enough, that is where our plugins will be installed to. As an example, lets set up the Essentials plugin, which provides many basic features you way want as an admin.
- Download the latest version of Essntials from here.
- Once you’ve downloaded the «Essentials.zip» file, extract it to your «plugins» folder, which will now look like this:
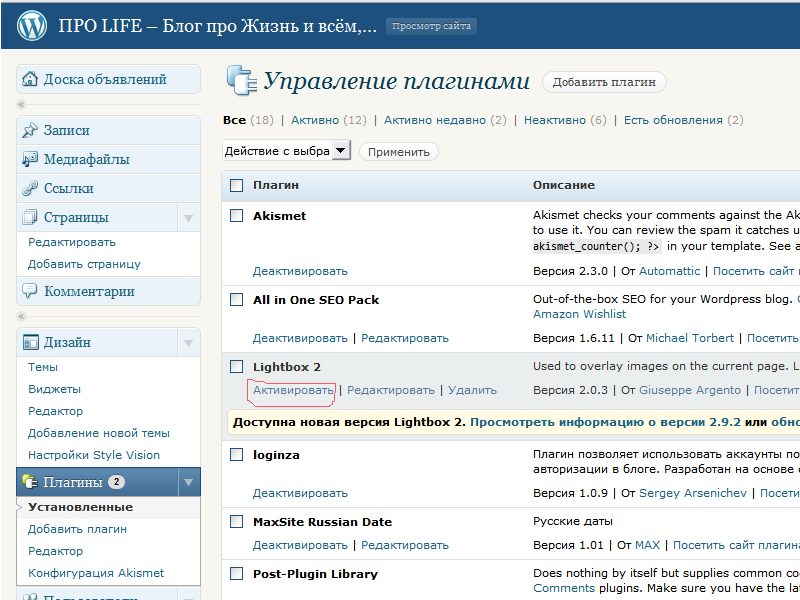
Test the plugin
Ok, so now our plugin is installed. So, open up Minecraft and log into your server. Next, press T, to chat, type /help, and press enter. A list of commands available with the new plugin will appear.
You might notice that there are very few commands available. This is because your player currently doesn’t have the permissions to access all of the functionality of the plugin. To gain full access to the plugin, there are two ways.
![18 best discord plugins [for betterdiscord] in 2023](https://vvk-yar.ru/wp-content/uploads/3/2/a/32a92c34442c46d733c9d9211c9344e5.png)

- OP yourself. This is the easiest way, and won’t work with some plugins. To OP yourself, go to the server’s windows (the black one with lost of text), and type: op, and there your player name. Ex: op Icosebyte.
- Install a permissions plugin, such as Group Manager. This is somewhat more complex, but it’s definitely the way to go. Since installing and setting up Group Manager so long, I’ve decided to make a separate tutorial which you can find here.
Happy minecrafting!
-Icosebyte
Dialogue Command
The Dialogue command enables NPCs to open or read scene files. The command has two distinct modes, each with their own unique purpose and syntax.
Dialogue Open
is used to force open an NPC dialogue box to the targeted player(s). This command can be used on any NPC and doesn’t require a behavior pack unless you want the NPC to use an optional scene file for its dialogue.
The syntax for is:
: The initial command.
: The command variant.
: The NPC that you are targeting.
: The player that you are targeting. This the player who will see the NPC dialog box.
: This is the name used if you want to use dialogue contained in a scene file. The string must be a valid scene tag name, or it will fail. This is an optional parameter.
Note
If no sceneName is specified, whatever the last dialogue that NPC had is displayed.
Practical Usage of Dialogue Open
is primarily used in two ways.
The first is to initiate an NPC dialogue box without the player interacting directly with the NPC, essentially using the NPC as a ‘pop-up’ window that doesn’t require the player to click the NPC. The NPC in this scenario doesn’t have to be visible to the player in the world (although they must be in a loaded chunk and within ticking distance of the player receiving the dialogue) and could be stashed underground or in another inaccessible location.
The second way is used is to create branching dialogue trees using the scene file. By using the command inside of an NPCs scene file, the NPC can automatically open the next dialogue box for a player. This is the basis for all dialogue tree branching paths.
Dialogue Change
is used to direct an NPC to use the dialogue provided in a specifically designated scene file. This command requires the use of a behavior pack containing a dialogue folder and scene file to function correctly. The command will instruct the targeted NPC to pull its dialogue from the location designated by the scene tag name. The command should be run before the player initiates contact with the NPC.
The syntax for Dialogue open is as follows:
: The initial command.
: The command variant.
: The NPC that you are targeting.
: This is the name used if you want to use dialogue contained in a scene file. The string must be a valid scene tag name, or it will fail.
: The player that you are targeting (this is the player who will see the dialogue box). If omitted in a command, the NPC dialogue will be updated for all players.
Practical Usage of Dialogue Change
is primarily used to change an NPC’s dialogue using commands. The command can come from a player-triggered command block in the world, fired by another NPC, or can be run from the targeted NPC itself.
You may want to change an NPCs dialogue based on a player’s actions in the world, such as entering a particular area, speaking with another NPC, or performing a specific task. If the action can be assessed, it can be used to run the dialogue command and change the NPC’s dialogue.
does not display the NPC dialog box as Dialogue Open does, it simply points the NPC to the scene file dialogue that you want the player to see during their next interaction with that NPC.
Top 5 Runelite Plugins for 2023
1: Quest Helper
The Quest Helper is by far the best plugin Runelite has to offer.
This plugin turns any quest into a breeze. Questing is finally fun!
The Quest Helper guides you through any quest in the game.
It will highlight NPCs you need to talk to, highlight the items you need to pick up, and so forth.
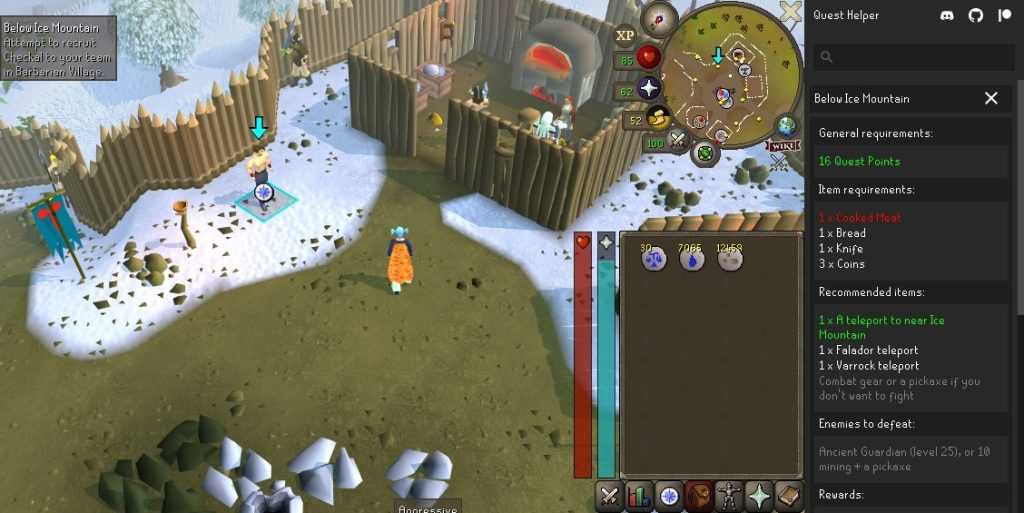
On top of that, it will show you where to run as well on both your minimap as well as the game screen.
Quest Helper also highlights the correct answers in a dialogue.
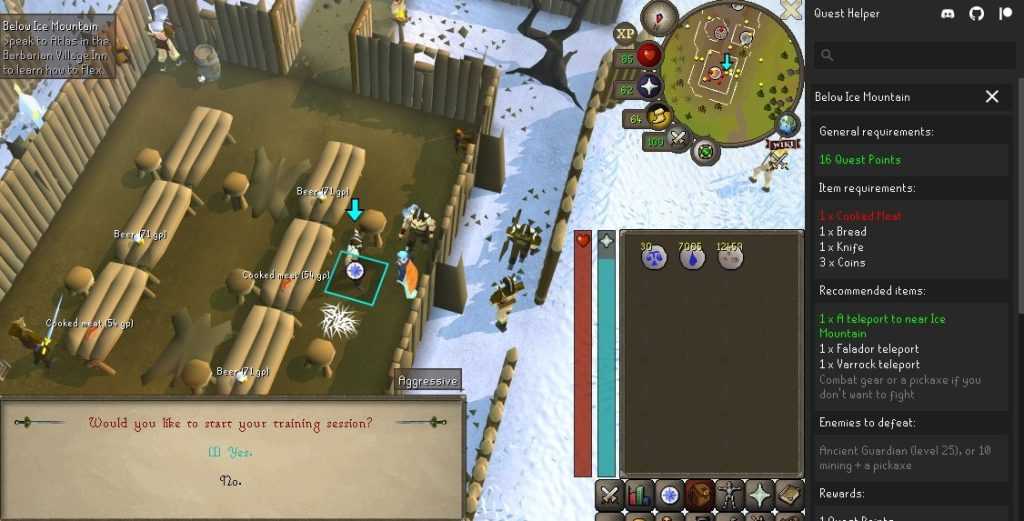
Finally, the plugin will tell you exactly which items you need for the quest and indicate whether you have them or not.
- White means you have the item but it is currently banked
- Green means the item is currently in your inventory
- Red means you don’t have the item at all
This plugin also works with Achievement Diaries as well.
If you aren’t using this Runelite Plugin already, you are definitely missing out. Since its release, it has been used a by a large amount of the player base including plenty of Streamers and YouTubers.
Myself I have used this plugin to get barrows gloves on my Group Ironman account and it was AWESOME.
Once you try it, you will never go back to Video Quest Guides. Sorry, Slayermusiq.
If you are interested, we have an in-depth article on how to install and use the Quest Helper plugin.
2: 117HD
Old School Runescape uses the graphics from 2007. While this is nostalgic to many, a large part of the player base has felt it was time OSRS got an HD version. This is it.
The 117HD plugin turns OSRS into HD OSRS.
And it is AMAZING.
I installed it on day one, and haven’t turned it off since.
You can completely modify the plugin to your preferences and the capabilities of your PC. Even those with a lower-end PC can run this plugin by playing with its settings.
Here is what OSRS looks like with 117HD turned off.
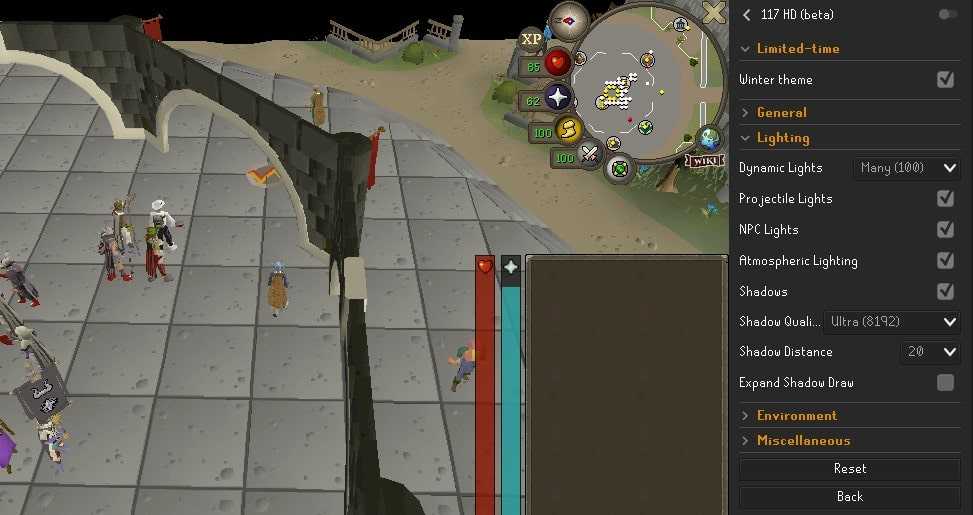
And here is what OSRS looks like with 117HD turned on.
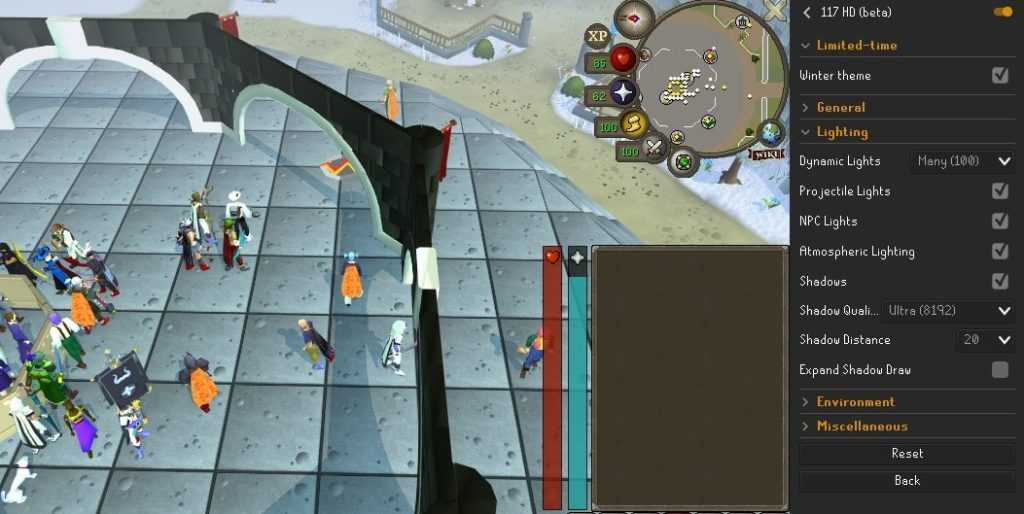
This plugin was much needed and is finally available for us to download from the plugin hub.
If you are interested, we have an in-depth article on how to install and use the 117HD plugin.
3: Menu Entry Swapper
| Default toggle: Off |
The Menu Entry Swapper is a great Quality of Life plugin for Runelite.
It changes the menu order of items, NPCs, and more.
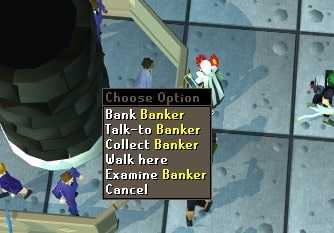
Here’s an example with a banker.
When you don’t have Menu Entry Swapper enabled, you have to right-click in order to bank. If you were to left-click, you would be speaking to the banker instead.


However, with Menu Entry Swapper toggled on, you can now bank using a left-click.
Pretty neat, right?
Banking isn’t the only function that MES helps with, it also helps with skilling (e.g. left-click dismantle birdhouses) and has many other options that you can explore in its settings.
This must-have plugin is turned off by default. (Don’t ask me why)
4: Idle Notfier
| Default toggle: Off |
The Idle Notifier is a plugin that gives you notifications for certain events when you are not looking directly at your Runelite Client (while you are AFKing).
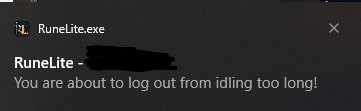
For example, if you are about to log out due to inactivity, Idle Notifier will give you a notification.
You can enable Idle Notifier to notify you when you stop an action (e.g. Attacking) an animation or interaction.
On top of that, you can also add a notification threshold for your Hitpoints, Prayer, Oxygen, and other events.
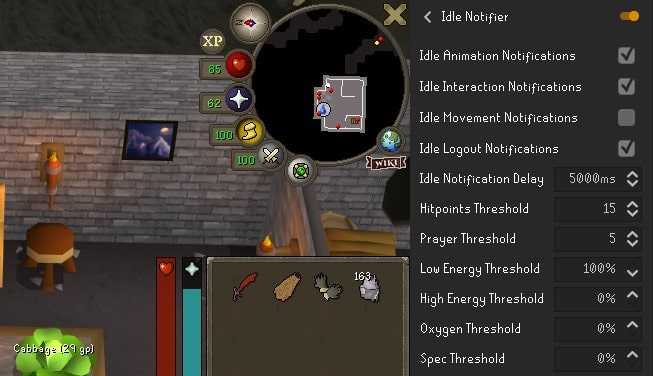
This way, you don’t have to worry about dying while you are AFKing, Idle Notifier will warn you just in time for you to eat/drink a prayer potion.
Here is an example of a notification made by Idle Notifier:
5: Time Tracking
| Default toggle: On |
Time Tracking is a Runelite Plugin that tracks your farming and birdhouse runs for you.
Within this plugin, you can check whether or not your birdhouses are ready to dismantle or your herb/tree patches are ready to harvest.
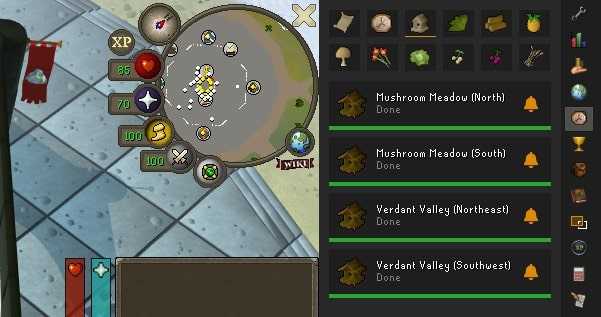
You can also toggle notifications on for any activity by hitting the bell icon.
This plugin can be found in the Runelite Side Menu disguised as a clock icon.
Building & World Management Plugins
Why build everything by hand when you can use tools to do it for you? These plugins speed up and help improve your building.
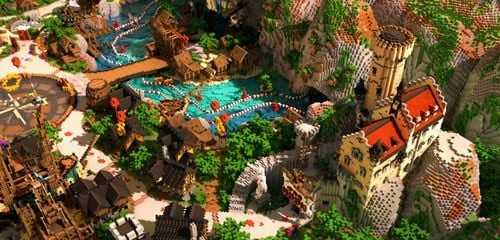


Amazing Minecraft builds — made possible by tools provided by building plugins.
WorldEdit
WorldEdit allows you to select an area of blocks and set all of these to a new block of your choice.
There are also advanced features that take this even further, such as setting the area to a variety of blocks, creating different shapes or placing large amounts of blocks from a distance.
Download WorldEdit: https://dev.bukkit.org/projects/worldedit
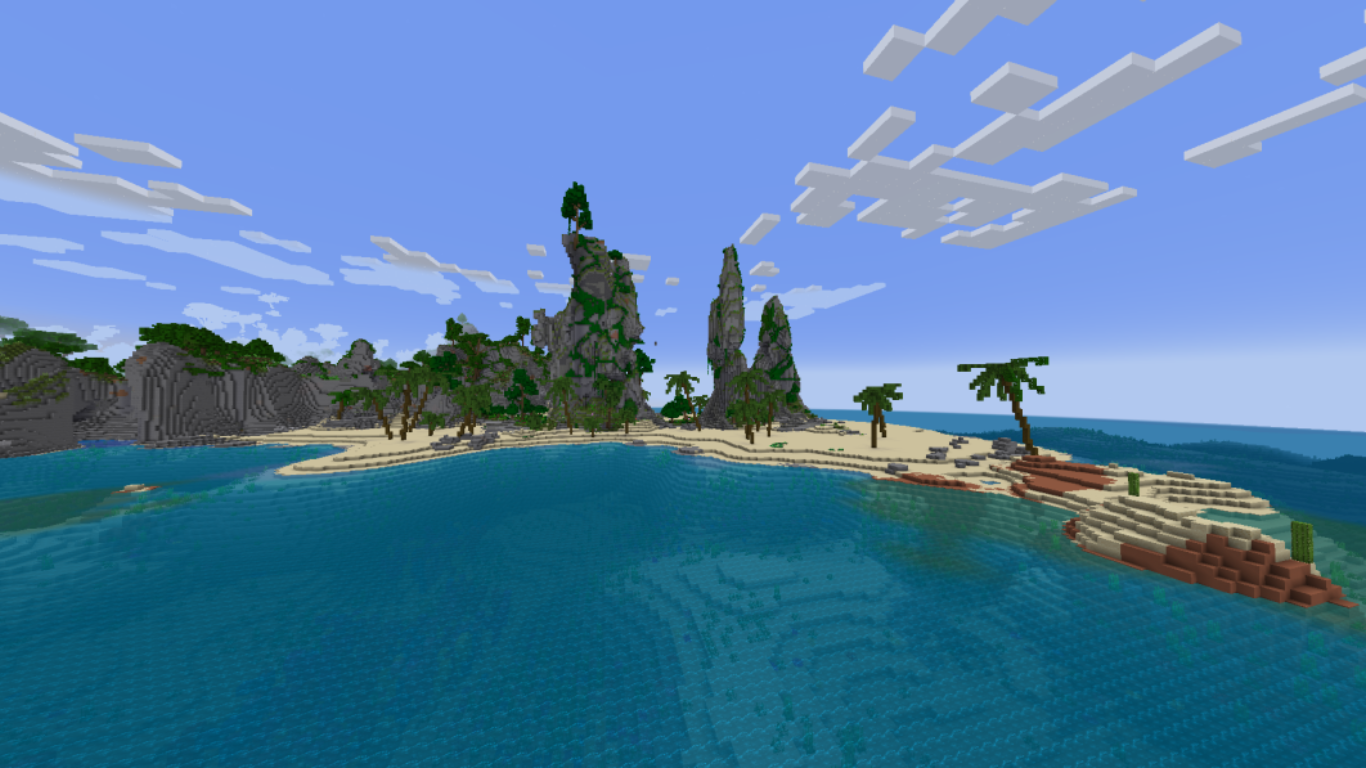
Terra World Generation
Terra is an incredibly unique world generation plugin in how it creates each world completely independently of Minecraft, allowing Terra’s generation to be ported cross-platform as well.
Terra is popular among server owners due to it’s complete customization with a powerful API, allowing everything from standard Minecraft world generation to cinematic beach locations and mountainous regions.
Download Terra: https://modrinth.com/plugin/terra