

Инструкции по настройке Wol wow
Шаг 1. Подключение к интернету
Для использования функции Wol wow на вашем телевизоре, в первую очередь, необходимо подключить его к интернету при помощи провода Ethernet или Wi-Fi.
Шаг 2. Включение функции Wol wow
Для включения функции Wol wow на вашем телевизоре, необходимо перейти в настройки и выбрать пункт «Сеть». Затем выберите «Wol wow» и настройте его в соответствии с вашими предпочтениями.
Шаг 3. Настройка устройств
Чтобы использовать функцию Wol wow, все устройства, подключенные к вашей сети, должны быть правильно настроены. Убедитесь, что у вас есть доступ к маршрутизатору и соответствующим устройствам, и настройте их в соответствии с инструкциями производителя.
Шаг 4. Использование функции Wol wow
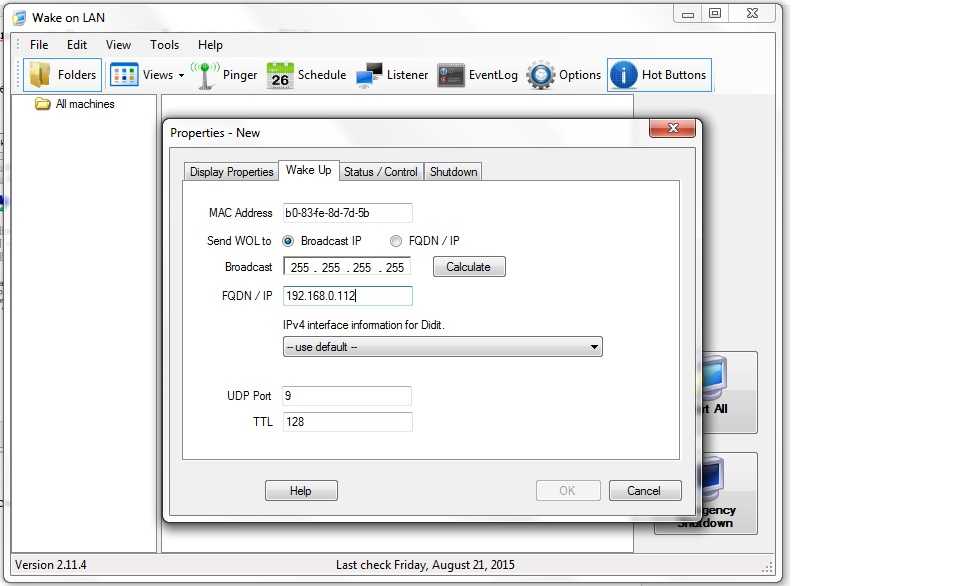
Теперь, когда все устройства настроены, вы можете использовать функцию Wol wow. Чтобы включить телевизор с помощью Wol wow, перейдите на другое устройство (например, компьютер или смартфон), подключенное к той же сети, и отправьте «магический пакет» на MAC-адрес телевизора. Телевизор автоматически включится, когда получит этот пакет.
Обратите внимание, что для использования функции Wol wow телевизор должен быть в режиме ожидания. Если телевизор выключен, функция Wol wow не сработает
Таким образом, Wol wow — это удобная функция, которая позволяет включать телевизор удаленно. Следуйте вышеуказанным инструкциям, чтобы настроить ее правильно и наслаждаться ее преимуществами.
Find the Correct Network Card (NIC) Connected to the Router
Do you have more than one network card, as I do? There’s an easy way to figure out which one you must configure for WOL.
Note: you can configure all NICs to enable WoL, but only the one connected to the router will be able actually to wake up the computer.
Open the Start menu and type Network status.

On top of the page is a small schematic with your computer, a globe representing the Internet, and your network card linking them together. Check the name of the card. If you didn’t rename it previously it will match the card name from Device Manager. In my case, the NIC name is “Intel NIC 1000Mb” in the image below.
Что представляет собой Wake-ON-LAN?
WOL, придуманная и введённая в функционал сетевых устройств достаточно давно, но не слишком изначально востребованная (только в узких кругах — сетевые бизнес-решения) Wake-On-LAN позволяет включать ПК дистанционно, посредством подачи специальной команды через локальную сеть, или даже через интернет. Сразу становится понятно, что это удобная функция – «разбудить» свою «машину» удаленно, чтобы получить доступ к своим файлам, операционной системе и установленному в ОС программному обеспечению.
Таким образом, используя связку Wake-On-Lan + программа удаленного доступа (TeamViewer, Radmin, и прочие) – любой человек может контролировать свой ПК, работать в нём, настраивать его компоненты из любой точки мира, обращаясь к ПК через интернет. При этом никакой помощи, присутствия кого-либо еще непосредственно возле компьютера не требуется.
Так же, вкратце стоит отметить, что на базе WOL возможно реализовать Wake-on-Wireless LAN – это технология беспроводного включения компьютера, на основе работы WiFi роутеров и других подобных устройств. Конечно же, подобные устройства беспроводной передачи данных должны включать в свой программно-аппаратный функционал поддержку удалённого включения.
How to wake up a computer remotely on Windows 10
Once the feature has been configured, you can turn on the computer in multiple ways. For instance, you can use the WoL tool built into the router. You may be able to find scripts that you can use with PowerShell. Or you can use third-party tools to send the magic packet to wake up the device.
For the purpose of this guide, we’ll use the «WakeMeOnLan» tool from NirSoft to wake a device remotely:
Warning: Although the app works as advertised, it’s a third-party tool, and you should use it only at your own risk. You have been warned.
- Open the NirSoft download page.
- Click the download link to save the app on your device.
(Image credit: Future)
- Extract the contents from the .zip folder with File Explorer.
- Open the folder with the extracted files.
- Double-click the WakeMeOnLan.exe file to launch the standalone tool.
- Click the Play (Start Scanning) button to discover all the devices in the network.
Quick note: The device you want to wake up remotely has to be turned on for the tool to find it. Once it is on the list, the device can be offline to use the WoL feature. You can also use the Ctrl + N keyboard shortcut to add the remote computer information (IP address, computer name, and MAC address) manually.
- Right-click the remote computer and select the Wake Up Selected Computers option.
(Image credit: Future)
- Click the Yes button.
Once you complete the steps, the tool will send the magic packet, which should turn on the device immediately if the network adapter is still operational, even when the computer is turned off.
Confirm IP and MAC address
If you use another tool, you have to determine the IP and MAC address of the computer to wake up, which you can easily do from the Settings app. Here’s how:
- Open Settings.
- Click on Network & Internet.
- Click on Status.
- Under the «Network status» section, click the Properties button for the active connection.
(Image credit: Future)
- Under the «Properties» section, confirm the IPv4 address and Physical address (MAC).
(Image credit: Future)
If you use Command Prompt, you can query the adapter addresses using the ipconfig /all command.
Once you complete the steps, you can use the addresses with the utility of your choice to wake up a remote computer.
«Магический» пакет Wake-On-Lan
Как Вы заметили, в предыдущем разделе упоминался такой термин, как «магический» пакет, его ещё называют «волшебный» пакет. О чем идёт речь в данном случае, о какой магии, если суть тематики сугубо техническая – настройка ПК?
Дело в том, что «магическим» пакетом была названа та самая команда, передаваемая по сети, которая заставляет компьютер «проснуться», включиться по «приказу» владельца.
Как выглядит «магический» пакет? Всё достаточно просто — это незамысловатая комбинация чисел, эдакий числовой блок, который отправляется по сети от устройства пользователя к его удаленному компьютеру, находящемуся в режиме сна. Данный блок состоит из следующих частей:
- шестнадцатеричный код «0xFF», повторённый 6 раз подряд;
- MAC-адрес сетевой карты компьютера, повторённый 16 раз.
В силу того, что MAC-адрес любого сетевого устройства в мире – уникален, и не повторяется, то «магический» пакет, содержащий этот MAC-адрес, может предназначаться вполне конкретному, одному, сетевому устройству. Что и позволяет удалённо, находясь в любой точке планеты, и имея доступ в сеть Интернет – адресно обратиться именно к своему устройству. Все другие ПК, роутеры и прочие сетевые устройства – соответственно, никак не среагируют на появление такого пакета данных, т.к. у них уже свои, также абсолютно уникальные, MAC-адреса.
Сетевой адаптер, благодаря включенной технологии Wake-On-Lan, постоянно сканирует сеть на появление как раз этой команды, чтобы инициировать в то же мгновение процесс включения персонального компьютера – будет подано питание, ПК включится, инициируется запуск операционной системы Windows.
Для всего этого нужно перевести сетевую карту в режим управления питанием ПК, то есть разрешающий ей включать компьютер при появлении сигнала – «магического» пакета, что мы и сделали в предыдущем разделе.
Wake-on-LAN не работает
Если вы столкнулись с этой проблемой, вы можете попробовать наши рекомендуемые решения в указанном ниже порядке и посмотреть, поможет ли это решить проблему.
- Отключить быстрый запуск
- Обновите драйвер сетевой карты (NIC)
- Изменить настройки схемы электропитания
- Настройте параметры управления питанием сетевой карты
- Настройка дополнительных свойств драйвера сетевой карты
- Изменить ключ реестра
- Создать ключ реестра вручную
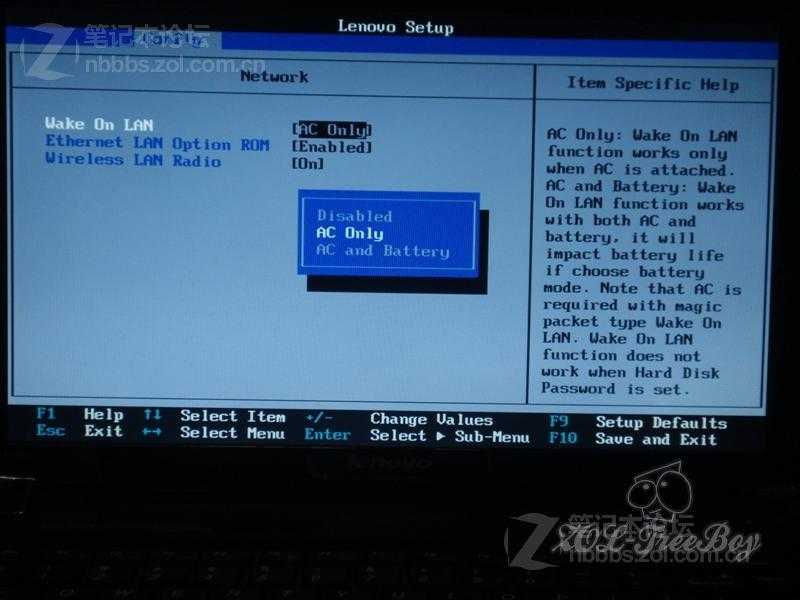
- Проверьте настройки BIOS
- Сбросить BIOS
- Обновите BIOS.
Давайте посмотрим на описание процесса, связанного с каждым из перечисленных решений.
1]Отключить быстрый запуск
В Быстрый запуск функция в Windows 10 включена по умолчанию, если применимо. Быстрый запуск предназначен для ускорения загрузки вашего компьютера после его выключения. Когда вы выключаете компьютер, он фактически переходит в состояние гибернации вместо полного выключения.
Для этого решения необходимо отключить быстрый запуск и посмотреть, Wake-on-LAN не работает вопрос решен.
2]Обновите драйвер сетевой карты (NIC).
Проблемы с функцией Wake-on-LAN могут быть вызваны вашими сетевыми драйверами, и если у вас есть эта проблема, вам следует попробовать обновить драйвер сетевой карты до последней версии.
Вы можете обновить драйверы вручную через Диспетчер устройств или получить обновления драйверов в разделе «Дополнительные обновления» в Центре обновления Windows. Вы можете скачать последнюю версию драйвера с сайта производителя.


Если при обновлении драйверов сетевой карты до последней версии проблема все еще сохраняется, вы можете попробовать установить старую версию драйвера сетевого адаптера.
3]Изменить настройки схемы электропитания
Сделайте следующее:
- Щелкните правой кнопкой мыши значок батареи в области уведомлений справа от панели задач.
- Выбирать Варианты питания.
- в Варианты питания найдите свой текущий план электропитания.
- Нажмите на Изменить настройки плана рядом с ним.
- Теперь нажмите на Изменить дополнительные параметры питания.
- Расширять PCI Express раздел.
- Расширять Link State Power Management.
- Теперь установите энергосбережение на Выключенный для обоих От батареи и Подключенный государственный.
- Нажмите Подать заявление > Ok сохранить изменения.
Проблема должна быть решена сейчас. Если нет, попробуйте следующее решение.
4]Настройте параметры управления питанием сетевой карты.
Следующая конфигурация предназначена для сетевой карты Intel.
- Нажмите Клавиша Windows + X , чтобы открыть меню опытного пользователя.
- Нажмите M клавишу на клавиатуре, чтобы открыть диспетчер устройств.
- Как только ты внутри Диспетчер устройств, прокрутите список установленных устройств и разверните Сетевые адаптеры раздел.
- Щелкните правой кнопкой мыши основной сетевой адаптер (tпервый адаптер в списке обычно является основным адаптером) и выберите Характеристики.
- Выберите Управление энергопотреблением таб.
- Установите флажки для Разрешите компьютеру выключить это устройство для экономии энергии, Разрешить этому устройству выводить компьютер из спящего режима и Разрешить только волшебный пакет разбудить компьютер.
В зависимости от вашей сетевой карты Intel, если она доступна, проверьте Пробуждение по Magic Packet и Пробуждение при совпадении с шаблоном вариант и снимите флажок Уменьшите скорость соединения во время простоя системы в разделе Параметры энергосбережения.
- Нажмите Ok.
- Перезагрузите компьютер.
5]Настройка дополнительных свойств драйвера сетевой карты
Проверьте свойства драйвера сетевой карты в Windows и убедитесь, что там включен WOL. Эти настройки могут иметь приоритет перед BIOS в Windows 10.
Следующая конфигурация предназначена для сетевого адаптера Realtek PCIe GBE.
- Откройте диспетчер устройств.
- Разверните Сетевые адаптеры раздел.
- Щелкните правой кнопкой мыши контроллер семейства Realtek PCIe GBE. и выберите Характеристики.
- Щелкните значок Передовой таб.
- в Свойство окошко, выберите один за другим; Выключение Wake-On-Lan, Пробуждение по Magic Packet, Пробуждение при совпадении с образцом и установите Ценить к Включено.
- Затем, наконец, выберите WOL и скорость соединения при выключении и установите Ценить к 10 Мбит / с.
- Нажмите Ok когда закончите.
- Перезагрузите компьютер.
6]Изменить ключ реестра
Этот метод работал для Realtek сетевые адаптеры.
Поскольку это операция реестра, рекомендуется создать резервную копию реестра или создать точку восстановления системы в качестве необходимых мер предосторожности. После этого вы можете действовать следующим образом:
ComputerHKEY_LOCAL_MACHINESYSTEMControlSet001ControlClass{4d36e972-e325-11ce-bfc1-08002be10318}
Требования технологии WOL
Чтобы реализовать такую схемы работы ПК, необходимо соблюдение следующих технических условий:
- В материнскую плату ПК (в которую, как правило, и интегрирована сетевая карта) должна быть встроена функция поддержки Wake-On-Lan. Успокоим Вас сразу – в современных материнских платах такая функция присутствует всегда, т.е. есть практически по умолчанию.
- Блок питания ПК должен поддерживать известный стандарт ATX. Этой технологии более 1,5 десятка лет, он популярен и используется и стандарт ATX поддерживается практически всеми блоками питания, имеющимся на рынке компьютерных комплектующих.
- Сам компьютер должен быть постоянно подключен к источнику питания – будь это электросеть, аккумулятор (если это ноутбук или другой вид портативного ПК), либо источник бесперебойного питания (ИБП).
В силу того, что работа технологии WOL реализована на аппаратном уровне компьютера, то данная технология работает в большинстве видов операционных систем, будь то Windows, Mac или Linux.
Удобство технологии Wake-On-Lan в том и заключается, что, когда компьютер не востребован Вами (а Вы удалены от компьютера) – ПК может находиться в любом из рабочих состояний, которые экономят электроэнергию. Будь то режим гибернации, спящий режим, да что там – ПК даже может быть выключен (но, естественно, не отсоединён физически от электропитания)! Ну а в случае, если Вам понадобятся какие-либо файлы на этом ПК, или же нужно будет запустить определенную программу на нём – Вы с лёгкостью можете «разбудить» свой компьютер, включить удалённо и начать работу с ним. И это, согласитесь, очень удобно, очень эффективно.
Итак, если технические условия соблюдены, стандарты и формат WOL поддерживаются — перейдем к разделу настроек Wake-On-Lan, чтобы реализовать данный функционал.
How to Wake Your Computer with Wake-on-LAN Magic Packets
To send out Wake-on-LAN requests, you have a cornucopia of options available.
Depicus has an excellent series of lightweight tools to get the job done, including a GUI-based one for Windows and command-line-based one for both Windows and macOS. Wiki.tcl.tk has a great cross-platform lightweight script that handles the requests as well.
DD-WRT has great WoL support, so if you don’t feel like downloading software to do it, you really don’t have to. Or, if you’re out and about, you can use your Android device to wake your computers.
In addition, many applications support Wake-on-LAN within them. For example, if you’re trying to access your computer from afar with a remote desktop program, you can wake the sleeping computer with TeamViewer’s built-in «Wake Up» button, which uses Wake-on-LAN.
You may need to tweak other settings in that program for it to work, so refer to the program’s manual for more info on Wake-on-LAN.
In addition, depending on the program, Wake-on-LAN may only work if you send the magic packet from a computer on your existing network. If your program doesn’t automatically handle the network connections for Wake-on-LAN, you’ll need to set up your router to forward UDP ports number 7 and 9, specifically for the MAC address of the PC you’re connecting to. If you’re not sure how to do this, check out our guide on forwarding ports from the router. You may also want to set up a dynamic DNS address so you don’t need to check your remote computer’s IP address every time.
Wolow – Wake on LAN Download for PC Windows 10/8/7 Laptop:
Most of the apps these days are developed only for the mobile platform. Games and apps like PUBG, Subway surfers, Snapseed, Beauty Plus, etc. are available for Android and iOS platforms only. But Android emulators allow us to use all these apps on PC as well.
So even if the official version of Wolow – Wake on LAN for PC not available, you can still use it with the help of Emulators. Here in this article, we are gonna present to you two of the popular Android emulators to use Wolow – Wake on LAN on PC.
Wolow – Wake on LAN Download for PC Windows 10/8/7 – Method 1:
Bluestacks is one of the coolest and widely used Emulator to run Android applications on your Windows PC. Bluestacks software is even available for Mac OS as well. We are going to use Bluestacks in this method to Download and Install Wolow – Wake on LAN for PC Windows 10/8/7 Laptop. Let’s start our step by step installation guide.
- Step 1: Download the Bluestacks software from the below link, if you haven’t installed it earlier – Download Bluestacks for PC
- Step 2: Installation procedure is quite simple and straight-forward. After successful installation, open Bluestacks emulator.
- Step 3: It may take some time to load the Bluestacks app initially. Once it is opened, you should be able to see the Home screen of Bluestacks.
- Step 4: Google play store comes pre-installed in Bluestacks. On the home screen, find Playstore and double click on the icon to open it.
- Step 5: Now search for the app you want to install on your PC. In our case search for Wolow – Wake on LAN to install on PC.
- Step 6: Once you click on the Install button, Wolow – Wake on LAN will be installed automatically on Bluestacks. You can find the app under list of installed apps in Bluestacks.
Now you can just double click on the app icon in bluestacks and start using Wolow – Wake on LAN app on your laptop. You can use the app the same way you use it on your Android or iOS smartphones.
If you have an APK file, then there is an option in Bluestacks to Import APK file. You don’t need to go to Google Playstore and install the game. However, using the standard method to Install any android applications is recommended.
The latest version of Bluestacks comes with a lot of stunning features. Bluestacks4 is literally 6X faster than the Samsung Galaxy J7 smartphone. So using Bluestacks is the recommended way to install Wolow – Wake on LAN on PC. You need to have a minimum configuration PC to use Bluestacks. Otherwise, you may face loading issues while playing high-end games like PUBG
Wolow – Wake on LAN Download for PC Windows 10/8/7 – Method 2:
Yet another popular Android emulator which is gaining a lot of attention in recent times is MEmu play. It is super flexible, fast and exclusively designed for gaming purposes. Now we will see how to Download Wolow – Wake on LAN for PC Windows 10 or 8 or 7 laptop using MemuPlay.
- Step 1: Download and Install MemuPlay on your PC. Here is the Download link for you – Memu Play Website. Open the official website and download the software.
- Step 2: Once the emulator is installed, just open it and find Google Playstore app icon on the home screen of Memuplay. Just double tap on that to open.
- Step 3: Now search for Wolow – Wake on LAN app on Google playstore. Find the official app from Jack Baker developer and click on the Install button.
- Step 4: Upon successful installation, you can find Wolow – Wake on LAN on the home screen of MEmu Play.
MemuPlay is simple and easy to use application. It is very lightweight compared to Bluestacks. As it is designed for Gaming purposes, you can play high-end games like PUBG, Mini Militia, Temple Run, etc.
В Windows
В операционной системе Виндовс, настроить включение по локальной сети после отключения можно с помощью изменения одного параметра:
- Нажмите ПКМ по Пуск и запустите «Диспетчер устройств».

- Выберите свой LAN-адаптер и перейдите в его свойства.

- Перейдите во вкладку «Дополнительно».

- Скрольте список и внимательно смотрите на свойства. Ищите «Wake on Magic Packet». Переведите «Значение» в разряд «Enabled».

- Кликните «Управление электропитанием» и убедитесь, что обе галочки установлены. Третью выставляйте «по желанию».

При этом не важно, настраиваете вы сетевую карту или Wi-Fi адаптер. Опция Wake on Wireless LAN будет работать точно так же, как и через кабельное соединение
What Is Wake-on-LAN?
Wake-on-LAN (sometimes abbreviated WoL) is an industry-standard protocol for waking computers up from a very low power mode remotely. The definition of «low power mode» has changed a bit over time, but we can take it to meanwhile the computer is «off» and has access to a power source. The protocol also allows for a supplementary Wake-on-Wireless-LAN ability as well.
This is useful if you plan to access your computer remotely for any reason: it allows you to retain access to your files and programs, while keeping the PC in a low-power state to save electricity (and of course, money). Anyone who uses a program like VNC or TeamViewer, or keeps a file server or game server program available, should probably have the option enabled for the sake of convenience.


Wake-on-LAN is dependent on two things: your motherboard and your network card. Your motherboard must be hooked up to an ATX-compatible power supply, as most computers in the past decade or so are. Your Ethernet or wireless card must also support this functionality. Because it is set either through the BIOS or through your network card’s firmware, you don’t need specific software to enable it. Support for Wake-on-LAN is pretty universal nowadays, even when it’s not advertised as a feature, so if you have a computer built in the past decade or so, you’re covered.
For those of you who build your own rigs, take care when buying an Ethernet card. While most built-in cards on motherboards don’t need this step, discrete network cards often need a 3-pin cable attached to the motherboard to support Wake on LAN. Do your research online before you buy, so you’re not disappointed later on down the line.
Wolow Wake On Lan | How To Setup Windows For Wake On Lan | Turn Your Pc On With Your Phone
Wolow Wake On Lan | How To Setup Windows For Wake On Lan | Turn Your Pc On With Your Phone
ever wondered how to turn your pc on remotely from your phone? here is a tutorial showing how to configure the wolow wake in this video i will show you how to turn on your computer remotely with use wake on lan turn on computer remotely. subscribe: c behfor?sub confirmation=1 ▻follow me on instagram: in this video, i’m going to show you how to turn a computer on remotely with a smartphone. your windows operating system offers smartphone tripod holder: amzn.to 2bimr22 app name: wake on lan my pc: computer case: cooler master n200 how to enable wake on lan in windows 11 wake on lan (wol) is a networking feature that it pros have been using we’ll teach you how to turn on your pc with your smartphone or google assistant in this short video. this useful function allows wake on lan not working on windows 10 computer your windows 10 device can be used in different ways and for this video explains how to remotely turn on and control your computer over internet do you want to power on your computer whether you need your pc for remote connection or had a power failure and need to start your pc from anywhere? watch this
BIOS/UEFI configuration
To enable Wake on LAN on the device firmware, use these steps:
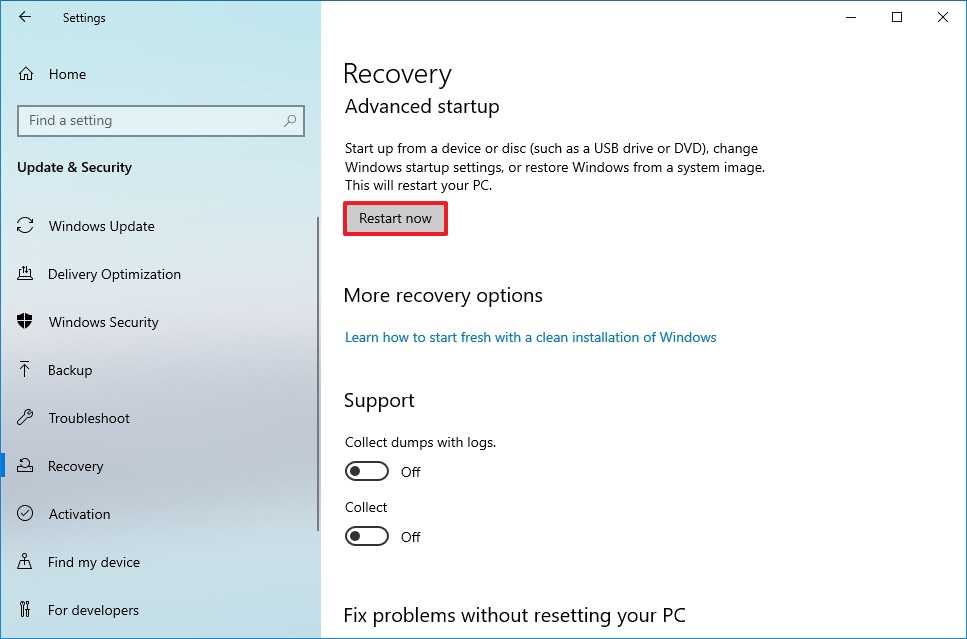
- Open Settings.
- Click on Update & Security.
- Click on Recovery.
- Under the «Advanced startup» section, click the Restart now button.
(Image credit: Future)
- Click on Troubleshoot.
- Click on Advanced options.
- Click the UEFI Firmware Settings option.

(Image credit: Source: Windows Central)
- Click the Restart button.
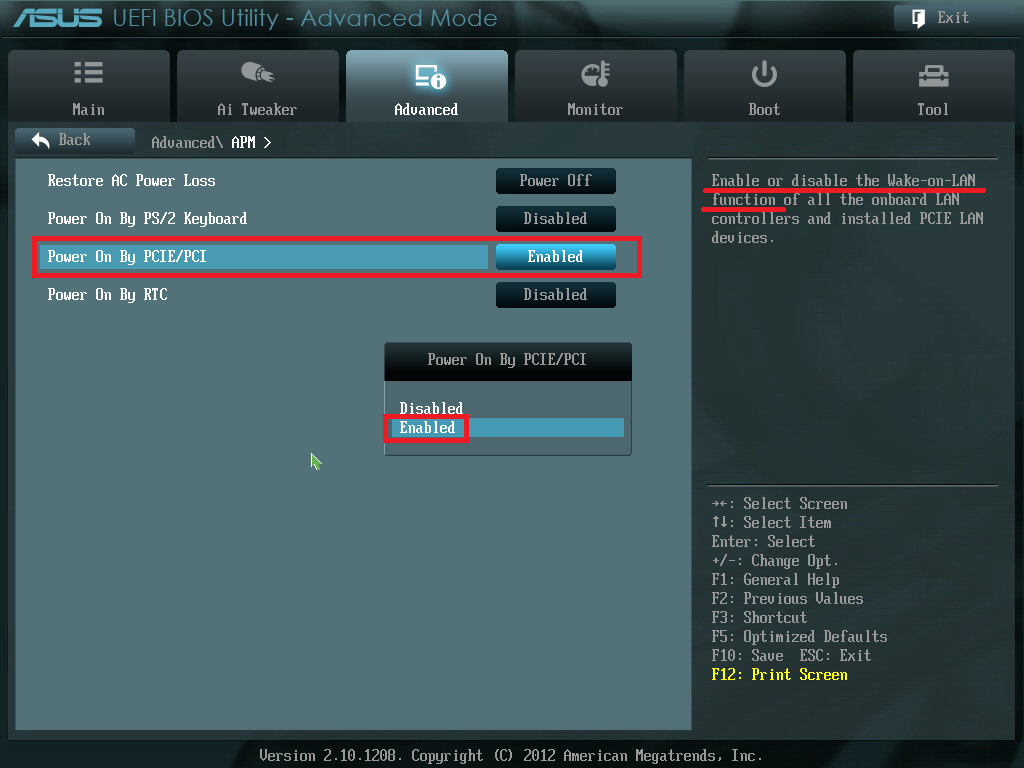
In the firmware settings, navigate to the power options and enable the «Wake on LAN» (WoL) feature. The feature may have a slightly different name since most manufacturers build their firmware differently. If this is the case, check the device documentation online for more specific details.
Once you complete the steps, you can proceed with the instructions to configure the feature on Windows 10.
If your device does not support Wake on LAN, you can always get an adapter like the USB-A 3.0 to RJ45 Gigabit Ethernet LAN Adapter from «uni» that provides support to wake a device from sleep at a reasonable price.

uni USB-A 3.0 to RJ45 Adapter
A great alternative
The USB-A 3.0 to RJ45 Gigabit Ethernet LAN Adapter from uni is a cost-effective alternative to Wake on LAN support for your Windows 10 computer. The adapter is plug-and-play, supports networking speed transfers up to 1Gbps, and supports connectivity via a USB 3.0 hub.
Windows configuration
To enable WoL on Windows 10, use these steps:
- Open Settings.
- Click on Network & Internet.
- Click on Status.
- Under the «Advanced network settings» section, click the Change adapter options button.

(Image credit: Future)
- Right-click the active network adapter and select the Properties option.

(Image credit: Future)
- Click the Networking tab.
- Click the Configure button.

(Image credit: Future)
- Click the Advanced tab.
- Select the Wake on Magic Packet option.
- Use the «Value» drop-down menu and select the Enabled option.

(Image credit: Future)
- (Optional) Select the Wake on pattern match option.
- Use the «Value» drop-down menu and select the Enabled option.
- (Optional) Select the WoL & Shutdown Link Speed option.
- Use the «Value» drop-down menu and select the 10Mbps option.
Quick note: The optional settings may be required if you use a network adapter from Realtek.
- Click the Power Management tab.
- Check the Allow this device to wake the computer option.
- Check the Only allow a magic packet to wake the computer option.

(Image credit: Future)
- Click the OK button.
After you complete the steps, the device will be ready for the remote magic packet using a third-party tool.
If you don’t want to use the feature, you can use the same instructions outlined above to disable Wake on LAN, but on step No. 9, make sure to select the Disabled option. In addition to disabling the feature, you may also want to turn off the WoL feature inside the device firmware using your manufacturer’s instructions.
How can I find the MAC address on Windows 10?
To use the Wake-on-LAN feature and wake up your or another PC from sleep, you will need its Mac address which is a unique 12 digit code for any network adapter.
There are a few ways to find out that information but we’re going to show you only the easiest method below:
- Click the Start button, type cmd, and select Run as administrator to launch Command Prompt with full privileges.
- Now type or paste the following command and press Enter to run it: ipconfig /all
- The command will display a lot of network adapter settings. Look for the Ethernet adapter and you will find its physical address that you will have to use to wake this PC up using the LAN connection.
Now, the Wake-on-Lan feature should be working just fine on your Windows device.
If these steps aren’t useful for you, try to put your computer to hibernate instead of shutting it off – usually, this is resolving all the problems.
And while we are on the subject, you might be interested in the best remote PC wake-up software to use right now.
Be careful because the Wake-on-LAN is a two-way street feature. If someone has physical access to your PC, it can set it up to be awakened and control it afterward with remote software.
This can cause a major breach of your data so if it’s not absolutely necessary to enable the Wake-on-LAN, don’t do it.
Also, use the Комментарии и мнения владельцев field below if you have questions regarding the Wake On LAN not working issue or if you need our assistance and we will get back to you as soon as possible.
Как устранить неполадки с функцией пробуждения по локальной сети в Windows 10
Если устройство не выходит из спящего режима с этими инструкциями, вы можете выполнить несколько действий для устранения проблемы.
Система должна поддерживать функцию пробуждения по локальной сети на уровне прошивки. Если этот параметр недоступен в BIOS или UEFI материнской платы или в сетевом адаптере (например, в адаптере USB-Ethernet), вы не сможете использовать эту функцию.
Если вы используете адаптер USB-Ethernet, WoL может работать только тогда, когда компьютер находится в спящем режиме, поскольку выключение устройства также может привести к прекращению подачи питания на порт USB.
Возможно, вам придется отключить быстрый запуск, чтобы эта функция работала.
Возможность удаленного включения устройства работает только в том случае, если сетевой адаптер активен и доступен. Если вы используете соединение Ethernet, убедитесь, что индикаторы на карте продолжают мигать после выключения устройства.
На ноутбуке необходимо убедиться, что устройство подключено к розетке. В противном случае это не сработает.
При использовании этой функции вы также можете столкнуться с сетевыми проблемами, которые могут помешать пробуждению устройства. Если вы подозреваете проблему с сетью, используйте команду ping, чтобы убедиться, что источник может связаться с целевым устройством. Кроме того, рекомендуется перепроверить, что вы используете правильный MAC-адрес и IP-адрес целевого компьютера. Вы можете получить эту сетевую информацию с помощью команды ipconfig (см. приведенную выше ссылку, чтобы узнать больше).
How do I enable Wake-on-LAN on Windows 8?
Enable Wake-on-LAN in Windows 8 Open Device Manager by pressing Win + X and clicking Device Manager. You can also find it by right-clicking on the Start screen, choosing All Apps –> Control Panel –> Windows System –> Device Manger.
Where can I download Wake on LAN for Windows 10?
Download this app from Microsoft Store for Windows 10, Windows 8.1. See screenshots, read the latest customer reviews, and compare ratings for Wake On Lan. Download this app from Microsoft Store for Windows 10, Windows 8.1.
What is Wake-on-LAN and how does it work?
With wake-on-LAN enabled, your computer will “listen” for a “magic packet” containing its MAC address while it is in sleep mode. The computer can be woken up by sending it a magic packet from another device on the network. There are some caveats to this: First, wake-on-LAN only works with a wired Ethernet connection.


How many devices can I install Wake on LAN on?
Get this app while signed in to your Microsoft account and install on up to ten Windows 10 devices. Language supported English (United Kingdom) More Language supported English (United Kingdom) Close Publisher Info Wake On Lan support More Publisher Info Wake On Lan support Close Additional terms Wake On Lan privacy policy
https://youtube.com/watch?v=2Pu4EDQVe3w
[edit] WOL Methods
WOL through Telnet/SSH
Note: This is the preferred method to send WOL magic packets remotely.
If you have local or remote Telnet/SSH access to your router, you can wake up a machine on the LAN by using the following command:
/usr/sbin/wol -i 192.168.1.255 -p PP AA:BB:CC:DD:EE:FF
Note that the full path to «/usr/sbin/wol» is important. Simply «wol» will not work.
Substitute AA:BB:CC:DD:EE:FF with the actual MAC address of the computer which you wish to boot remotely. Likewise, replace 192.168.1.255 with the actual broadcast address of the network (192.168.1.255 is the broadcast address when the machine has an IP of 192.168.1.x and subnet mask of 255.255.255.0). Replace «PP» with the port number your machine listens on (usually 7 or 9).
Remote Wake On LAN via Port Forwarding
To remotely wake up a computer over the Internet using Wake On LAN— follow these instructions:
1 — Create a rule on the Web Interface (Applications & Gaming -> Port Range Forward) to the chosen ip:
wol | 9 | 9 | udp | 192.168.1.254 | x
- Here, 9 is the default, but you can use any port number so long as your client wake-up application can talk to a port other than 9. Most WOL services will use either UDP port 7 or 9.
- 192.168.1.254 is just an IP address in your LAN’s subnet; it can be any IP, as long as it is not assigned to any device on your network.
2 — Add a static ARP entry by typing the following line into the Administration -> Commands section of the Web Interface and then saving with Save Startup.
arp -i br0 -s 192.168.1.254 FF:FF:FF:FF:FF:FF
- Do not change the FF:FF:FF:FF:FF:FF MAC address; this is a special MAC address used when broadcasting. WOL magic packets are constructed using the MAC address of the target computer, but should be and almost always are sent via broadcast; the MAC address used here controls with how the packet is sent, not how it is formed.
- The 192.168.1.254 IP address should correspond with the IP address you used in the previous step. Again, this IP should be in your LAN’s subnet, and you must not assign this IP address to any actual device on your network.
- Explanation/rationale for this setup: Normally, WOL magic packets are sent to a special broadcast IP—to the final .255 in a subnet or to 255.255.255.255. Since port-forwarding to these special dedicated broadcast IPs does not work, what we need to do is create our own broadcast IP by taking an unused IP and assigning it a broadcast MAC and then port-forward to that.
- As an optional alternative, instead of arp, you can use ip neigh (which does the exact same thing as arp). Support for ip neigh was removed from DD-WRT starting with build 17650, and arp is unavailable in DD-WRT builds older than 5672.
ip neigh change 192.168.1.254 lladdr ff:ff:ff:ff:ff:ff nud permanent dev br0
ip neigh add 192.168.1.254 lladdr ff:ff:ff:ff:ff:ff nud permanent dev br0
NOTE: SOME BCM USERS HAVE REPORTED ISSUES WITH ARP. SEE THIS:
3 — Reboot the router, or execute the startup commands manually.
To wake your computer from the internet using the DD-WRT device DynDNS name (or if you know it, the public IP of the router), try one of the following services;
- To use the WOL Magic Packet application from a second PC:
- Host Name: DynDNS name of your DD-WRT device.
- Subnet Mask: 255.255.255.255
- MAC Address: WOL computer MAC address, not the DD-WRT MAC.
- Click the green Send button.
Automatic Wake-On-LAN Daemon
The Automatic WOL daemon will send out a periodic wake on lan packet at the intervals you specify. This may be useful to keep a system online most of the time even if it is turned off. (eg: A Media Center PC).
For Interval you can enter a value in seconds as low as 15 seconds and as high as 86400 seconds (1 day).
Host name should be the broadcast address for your LAN. eg: 255.255.255.255 or 192.168.1.255.
SecureON Password is computers that have a BIOS feature that secures the WOL function. If you do not have a BIOS that requires this form of password then you can leave the box blank or type in 00-00-00-00-00-00.
MAC Address(es) should contain the MAC address of the networked machines you want a WOL to be sent to on your LAN.
The packets generated by the WOL daemon are sent to UDP port 40000. You likely will not need to worry about this unless the system you are attempting to send the WOL packet is on another subnet or you are trying to monitor the packets.
note: the UI says that the Interval accepts a range of 1-86400 seconds but it will only send out a WOL packet at a minimum of 15 second intervals. All values below 15 are accepted but the interval will still be every 15 seconds.
Expert-tested solutions to fix WOL on your PC right now
Andrew is not just trying to bring you closer to Windows, but he’s truly interested in this platform. He just happens to be passionate about sharing that knowledge. read more
Passionate about technology, Windows, and everything that has a power button, he spent most of his time developing new skills and learning more about the tech world. Coming. read more
- Wake-on-LAN is a default feature in Windows 10 that allows you to start a PC with a signal through the network.
- It is actually a network so-called magic packet that will trigger the start of the machine.
- If Wake On LAN is not working, you will have to make a few changes to the system using Settings, BIOS, and the Registry Editor.
To fix various PC problems, we recommend DriverFix: This software will keep your drivers up and running, thus keeping you safe from common computer errors and hardware failure. Check all your drivers now in 3 easy steps:
Your Windows device can be used in different ways and for various tasks since Microsoft added useful in-built features that can ease your daily schedule.
But, maybe the most popular feature that can be used in Windows 10 and Windows 11 is Wake-on-LAN. Unfortunately, more and more users are complaining about WOL issues, which means that we must find a way to fix these problems.
So, due to some reasons, if the Wake on LAN is not working on your device, try to use the guidelines from below in order to easily correct that.