Как работает передача сигнала через NDI в Vmix?
В процессе передачи сигнала через NDI в Vmix используется принцип работы сети. Когда вы подключаете устройство, поддерживающее NDI (как например видеокамеру или компьютер), оно становится доступным в сети для других устройств. Далее в Vmix вы можете выбрать источник NDI, который отображает все доступные устройства, подключенные через NDI.
После выбора источника NDI в Vmix, вы можете использовать этот сигнал для создания многокамерной съемки, прямой трансляции, монтажа видео и других задач. Vmix предоставляет широкий набор инструментов для обработки и управления сигналом NDI, таких как наложение графики и текста, управление аудиоуровнем и изменение параметров видео.
Основные преимущества передачи сигнала через NDI в Vmix:
- Высокое качество передачи аудио-видео сигнала в реальном времени
- Отсутствие задержек и потери качества
- Возможность использования различных источников сигнала (камер, компьютеров и т.д.)
- Простота настройки и использования
- Широкие возможности обработки и управления сигналом
Таким образом, передача сигнала через NDI в Vmix является удобным и эффективным способом работы с аудио-видео сигналом, позволяющим создавать профессиональные монтажи и трансляции в режиме реального времени.
Wirecast, vMix или OBS – какая программа лучше для трансляции?
Самыми популярными программными микшерами является программа Wireсast, vMix и OBS Studio. Они имеют аналогичный функционал: к компьютеру или ноутбуку через карты захвата подключаются камеры, софт их определяет как отдельные источники и далее вы можете всем управлять.
Программные микшеры также включают кодировщики, чтобы мы могли транслировать их в прямом эфире на YouTube или Facebook прямо из софта. В них есть много функций: возможность делать плавные переходы между камерами, возможность вставить презентацию спикера, добавить видео или анимированные заставки. Можно создать свою виртуальную студию или записать на жесткий диск мастер-запись или каждую камеру отдельно. Возможности таких программ огромные. Я бы даже сказал больше – они практически безграничны, даже мы не знаем всех возможностей того же vMix, хотя провели уже несколько сотен трансляций с его помощью.
Мы не будем углубляться в интерфейс Wirecast или vMix на следующих уроках, задача на данном этапе просто выбрать нужное ПО и установить на свой компьютер. У нас большой опыт работы с обеими программами: я начинал использовать Wirecast с самого начала своей карьеры, но два года назад решил перейти на vMix и подробно расскажу о причинах.
Bringing WebRTC (and Janus) in the picture
A relatively easy way to test WebRTC sources, instead of scripts sending SNL clips, could have been the usual RTP forwarders: as I’ve said on multiple occasions (including my CommCon presentation just a few days ago), we use them A LOT, and wouldn’t be out of place here either. It would simply be a matter of creating a VideoRoom publisher, RTP-forward them to the tool, and the job would be done. For a few reasons I’ll get in later, though, I wanted something more integrated, and something that could be used on its own.
This led me to write a new Janus plugin that would allow a WebRTC user to:
- publish audio and/or video via WebRTC through Janus;
- decode the published streams;
- translate them to NDI.
In a nutshell, I wanted to combine the injection part the gstreamer pipeline provided, take advantage of the integrated RTP server functionality in the Janus core for receiving the packets, and embed the RTP-to-NDI process from in this new plugin. This was a quite straightforward process, so I came up with a simple demo page that would allow a web user to insert a name for the NDI sender, and then setup a sendonly PeerConnection with Janus as several other plugins do already:

Negotiating a new PeerConnection instructs the plugin to create the related resources, i.e., an Opus decoder, a VP8 decoder, and an NDI sender with the provided name. Once a PeerConnection has been established, the demo looks like this:
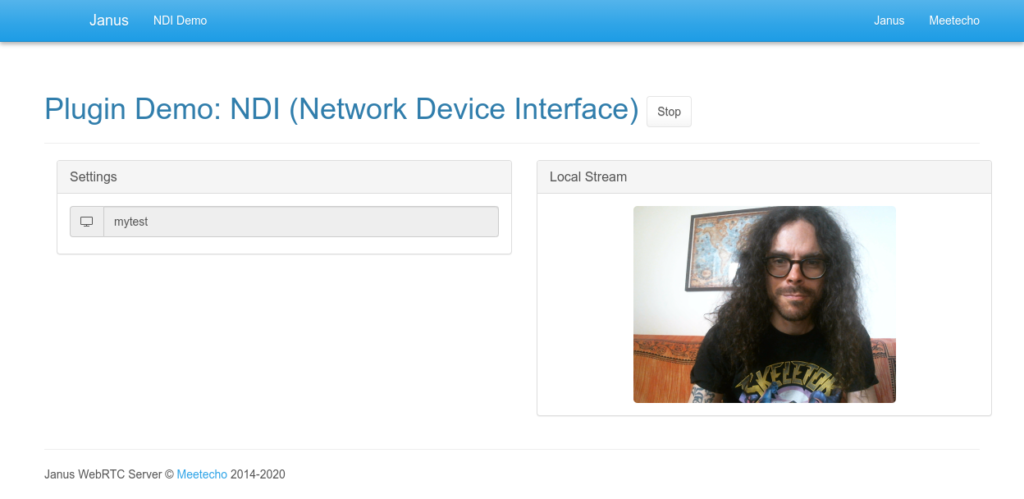
As you can see, nothing groundbraking: we’re simply displaying the local stream the browser is capturing and sending to Janus. The Janus core then passes the unencryted audio and video packets to the plugin as usual: the Janus NDI plugin is configured to decode them and relay the uncompressed frames via NDI (exactly as did before), which means the stream originated via WebRTC is now available to NDI recipients as well, which we can once again confirm via the gstreamer NDI plugin:
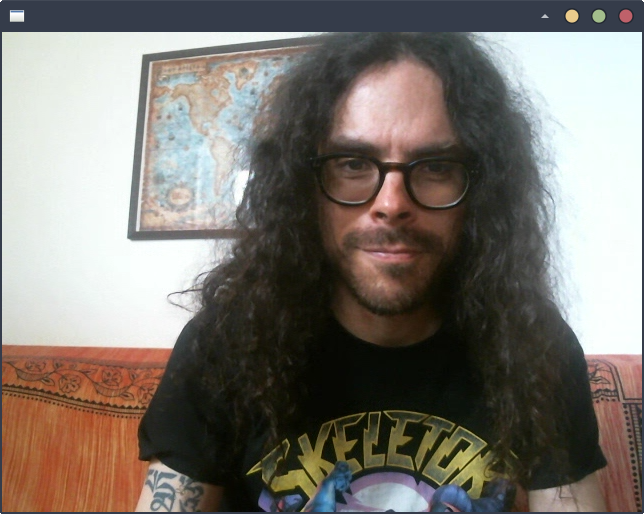
This was already quite exciting, but still wasn’t what I was really trying to accomplish. In fact, if you think about it, this does indeed allow Janus to act as a WebRTC/NDI gateway, but doesn’t help much when the Janus server handling the conversation you’re interested in is actually on the Internet, rather than your LAN (which would be almost always the case). If Janus is sitting somewhere in the Internet, e.g., on AWS, there’s not much you can do with the NDI stream created there: actually, there’s nothing you can do at all, as NDI only really makes sense when all the streams are exchanged within the context of your LAN network.
As such, I decided to bring this one more step forward. More specifically, I decided to try and have two Janus instances talk to each other:
- a Janus on the public internet (e.g., the one hosting the online demos);
- a Janus in my LAN.
The purpose was simple: use the Janus in my LAN to consume, via WebRTC, a stream actually served by the Janus on the public internet, so that the local Janus instance might translate that remote feed to an NDI stream I could indeed access locally. Long story short, use my local Janus instance as a WebRTC “client” that receives media from the remote Janus instance, and gateway it to NDI, as the picture below sketches:

While this sounds convoluted and is indeed a bit unconventional, it’s actually not unusual to have Janus instances talk to each other that way. There are people using this trick to inject via WebRTC media coming from one plugin to another, for instance. Getting this to work is usually just a simple matter of orchestrating Janus API calls on both sides so that the SDP offer of one (and possibly candidates, when trickling) is passed to the other, and the SDP answer is sent back accordingly, thus getting the two Janus instances to negotiate a PeerConnection with each other. That’s the beauty of working with a standard like WebRTC!
I decided to try and do exactly that: in particular, I decided to subscribe to the default Streaming mountpoint on the Janus online demos (the Meetecho spot), and use the related offer as a trigger to negotiate a new PeerConnection with my Janus NDI plugin. In fact, Streaming plugin subscriptions are functionally equivalent to VideoRoom (SFU) subscriptions in Janus, which means they’re an easy and yet effective way to validate the deployment.
And a bit of orchestration code later…
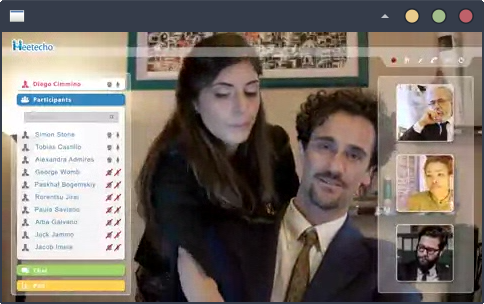
Eureka! The video from the remote Streaming mountpoint on the online demos was successfully pulled via WebRTC by the local Janus instance as a subscriber, and correctly translated to NDI as the gstreamer NDI recipient once more confirmed.
How to Set Up NDI for Streamlabs Desktop
Streamlabs Desktop is only able to receive an external NDI stream as a source. Therefore, you need another application that is capable of capturing and sending out an NDI stream on your local network. You will first need to set up your output in order to set up your reception. For output, see our articles on sending NDI in OBS Studio or Create NDI stream with Scan Converter 2, vMix, or Mobile Device.
1. Install NewTek NDI Tools
To get started with NDI streams and sources, you’ll need to haveNDI Toolsinstalled on the computer with which you want to use Streamlabs Desktop to receive an NDI stream or on the computer you are using to create and send an NDI stream. After installing the NDI Tools, reboot your computer.
*Some computers may not be powerful enough to run NDI Tools, so be sure to check the system requirements.
Firewall or Antivirus restrictions will cause issues. If you are encountering issues receiving an NDI stream with Streamlabs Desktop, make sure the application generating the NDI stream is allowed through your firewall. For Windows, whitelist NDI_ScanConverter in your Windows Defender Firewall settings.
The file path for this will generally be: C:\Program Files\NDI\NDI 5 Tools\Screen Capture.
Seethis article on how to open your firewall for various applications.
2. Setup to Receive an NDI Stream with Streamlabs Desktop
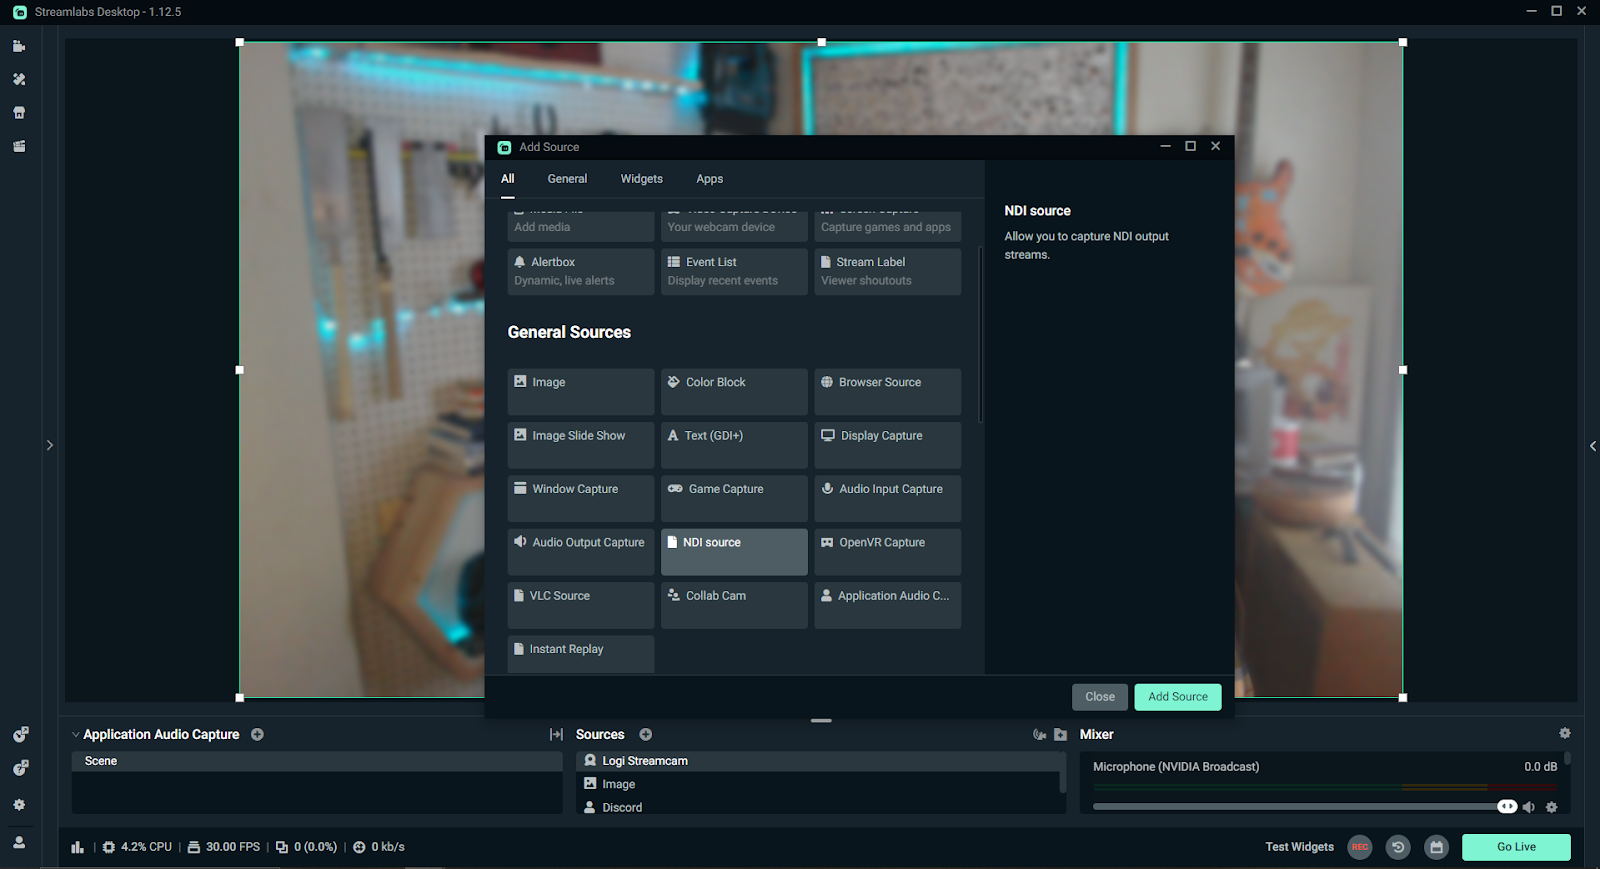
Once your local network contains one (or more) NDI streams, you can add them as a source in Streamlabs Desktop. Simply click the plus (+) icon above the sources to add a new source and select NDI Source. In the properties of the NDI source, select which NDI stream you want to receive and display. Active NDI streams on your local network are automatically detected.
History of NDI
I first heard about NDI in April of 2016 when vMix added it into their production software. Due to a lack of hardware support, the most practical use for this new technology was bringing screen captures from computer to computer. While there were other options for doing this, including running SDI, HDMI, or other screen capture solutions, NDI was the most straightforward for me at the time.
There were not any cameras or converters that supported it, and the streaming industry didn’t respect it as a whole. In 2017 things started to speed up for NDI due to NewTek releasing their Connect Spark. NewTek’s Connect Spark was a small on-camera POE solution for camera capture that converted HDMI or SDI to NDI|HX (more on that later). During the same year, BirdDog shipped its first family of NDI converters. The biggest thing that set BirdDog converters apart was them being full NDI rather than NDI|HX. BirdDog took NDI from being limited to IP-based video distribution to a complete production system capable of powering entire productions and replacing the need for SDI runs.
Since its birth in 2015, NDI has slowly improved in efficiency, compatibility, and performance as a result of constant refinement by NewTek and the adoption of the technology, which is fueled by NewTek’s willingness to license it royalty-free to developers.
First of all, what’s NDI?
Quoting Wikipedia (because I’m lazy):
In a nutshell (and probably oversimplifying it a bit), it allows for a live exchange of multichannel and uncompressed media streams within the same LAN, taking advantage of mDNS for service discovery. This allows producers to consume media from different sources in the same LAN, i.e., without being limited to the devices physically attached to their setups. The following image (which comes from their promotional material) makes the whole process a bit clearer from a visual perspective.
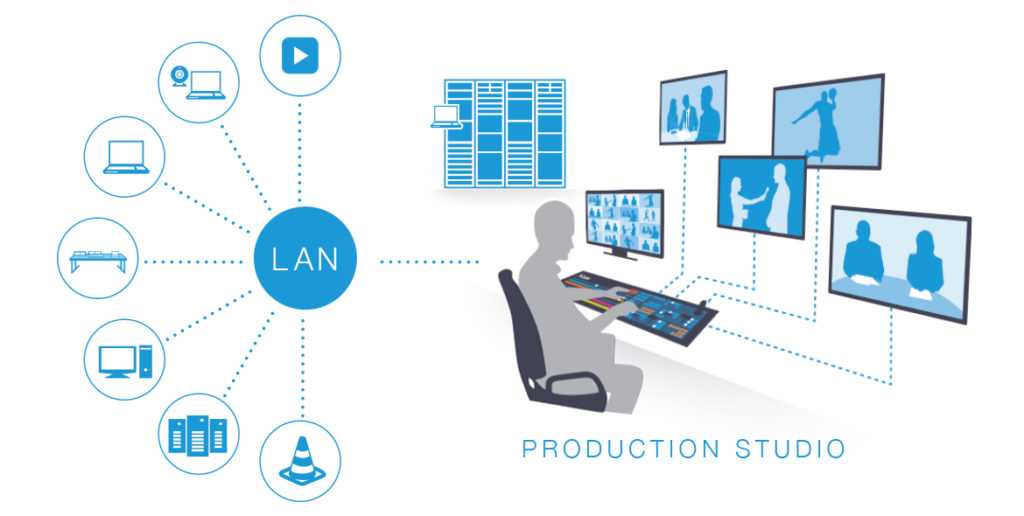
Apparently, the real strength behind the technology are the royalty free SDK they provide, and the wide set of tools that can actually interact with NDI media: once a stream, no matter the source, becomes available, it’s easy to cut/manipulate/process in order to have it embedded in a more complex production environment. Because of this, NDI is actually very wildly deployed in many media production companies.
Which brings us to the key issue: if this is the way remote interviews are produced as well, producers will likely try to use whatever makes it easy for them to get an NDI source that can use directly. Apparently, WebRTC is still hard for them to work with: without a way to directly pull a WebRTC feed in, they’re basically forced to use workarounds like capturing the browser window rendering the remote video and cropping what they need using an NDI recorder, and inject the result that way; for audio, it might mean recording the system output or similar hacks.
Needless to say, this is a suboptimal solution that requires more work than should be needed: besides, it can be even more challenging if the web page that renders the streams has dynamic interfaces that could move the part you’re interested in around, or even limited functionality (e.g., no screen sharing support). That’s exactly why I started looking into ways to get RTP more or less directly translated to NDI, in order to make the whole process much easier to work with instead.
Регистрация аккаунта и получение лицензии
Для того чтобы начать использовать vmix и получить доступ ко множеству функций программы, вам необходимо зарегистрировать свой аккаунт и получить соответствующую лицензию. В этом разделе мы расскажем вам, как выполнить данную процедуру.
2. Нажмите на кнопку «Sign up now» или «Зарегистрироваться» (если доступен русский перевод).
3. Заполните все необходимые поля в форме регистрации, включая ваше имя, адрес электронной почты и пароль. Убедитесь, что вы указываете корректные данные, поскольку они будут использоваться для входа в ваш аккаунт и получения лицензии.
4. После заполнения формы нажмите на кнопку «Register» или «Зарегистрироваться» (если доступен русский перевод).
6. После подтверждения регистрации вы сможете войти в свой аккаунт на официальном сайте vmix, используя ваш адрес электронной почты и пароль.
7. Перейдите на страницу «Licenses» или «Лицензии» и выберите тип лицензии, который соответствует вашим требованиям и бюджету.
8. Нажмите на кнопку «Buy Now» или «Купить сейчас» и выполните оплату, используя предлагаемые методы платежа.
9. После успешной оплаты вам будет предоставлена лицензионный ключ, который необходимо активировать в программе vmix.
10. Для активации лицензионного ключа откройте программу vmix и перейдите на страницу «Titles and Settings» или «Заголовки и настройки». В разделе «Licensing» или «Лицензирование» введите ваш лицензионный ключ в соответствующее поле и нажмите на кнопку «Apply» или «Применить».
Поздравляем! Теперь у вас есть зарегистрированный аккаунт и активированная лицензия для использования всех функций программы vmix.
What is NDI?
NDI (Network Device Interface) is a royalty-free software standard developed by Newtek that provides a workflow for IP-based video. One of the benefits of using an NDI based system is that video signals can be routed anywhere on the network with low latency, without having to use additional switching & routing hardware.
NDI|HX uses lower bitrates but is compressed with h.264.
The system was first unveiled in 2015 and released in March 2016, since then, it has been growing with new hardware options from not only Newtek but third party manufacturers like BirdDog as well as software companies with Vmix, Skype, OBS & more adding NDI compatibility.
You will even find NDI & NDI|HX found in cameras, like Panasonic’s AG-CX10. Certain cameras can be upgraded to full NDI with a paid license upgrade.
Leveraging NDI
The first job that required us to deploy our big remote production workflow was a court case in which the judge, counsel, witnesses, experts, and court registrar were all communicating in real time over Zoom. We used our equipment to remix and stream, to the public and press, a video feed in which our producer could control who was visible at all times. Typically, there were between two to six participants who needed to be seen at the same time.
Our solution required the client to dedicate eight computers to connect to Zoom and to pin one participant each. We duplicated the signal via HDMI to a vMix system that had an eight-input video capture card, and the producer created a set of looks for all of the countless combinations of participants who needed to appear simultaneously at any given time. This workflow performs well for the clients and has been extremely stable for several months of daily use. But I discovered a simpler approach using NDI.
Instead of connecting an SDI cable or an HDMI cable, you can connect multiple computers and NDI-supported devices together over an Ethernet connection. Ethernet and network switches are very inexpensive compared to SDI cables.
In this alternative approach, you use free NDI tools or vMix Desktop Capture to send the signal from one computer to NDI-capable video switching software such as vMix or OBS. You can repeat this process on multiple devices and turn each computer on your network into an NDI video source. This solution works great for videoconference services that don’t natively support NDI and for when you want to capture multiple participants fullscreen on their own screens and send the feed to your video switcher.
Sharing PowerPoints in This Workflow
One other workflow consideration that you need to be aware of with Teams is that there are three share options for presenters (Figure 5, below). The Desktop share option allows the presenter to select which screen to share, if the user has multiple connected monitors. It can also generate an NDI signal, but depending on the user’s desktop settings, it may or may not show the Windows taskbar and runs the risk of accidentally showing whatever content ends up in the screen that is selected.
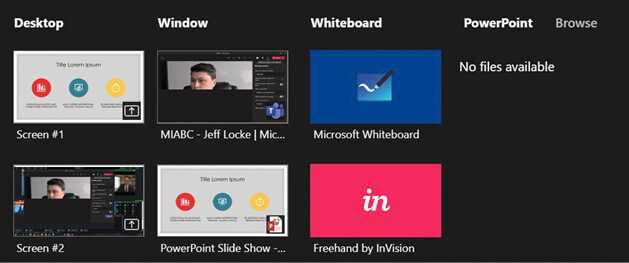
Figure 5. Available share options
I prefer to instruct my presenters to share the second option, a Window, and to select the specific application they want to share. For PowerPoint, this would be the fullscreen PowerPoint Slide Show, and it would still allow the presenters to see their presenter view notes. This workflow generates a clean NDI signal, but presenters first need to launch their PowerPoint presentation before they toggle the Teams share function for it to be available. This can also get a bit tricky for users to manage if they only have a single computer monitor and aren’t comfortable using the ALT+ Tab Windows shortcut to move between applications.
The third option is named PowerPoint, and it allows the presenter to upload a PPTX file. Unfortunately, this workflow does not generate an NDI signal, and thus is to be avoided.
Page 1
Related Articles
Featured Articles: Pros and Cons of Zoom and Teams for Remote Production
Anthony Burokas of Stream4us discusses the limitations of using business chat apps such as Zoom, Teams, and Skype in pro live production—such as the inability to correct color or edit isolated audio tracks—and recommends ways to circumvent those limitations in this clip from his presentation at Streaming Media East Connect 2021.
Featured Articles: Multicam Switching and Streaming Solutions for Remote Producers
Anthony Burokas of Stream4us runs through a litany of multicam switching and streaming software and their pros and cons for live producers working with multiple remote guests in this clip from his presentation at Streaming Media East Connect 2021.
Featured Articles: Bonding and Multicasting for Remote Production
Anthony Burokas of Stream4us discusses cellular bonding and multistreaming solutions and their advantages for remote production pros in this clip from his presentation at Streaming Media East Connect 2021.
Featured Articles: Equip, Ship, and Control Remote Production Kits
Anthony Burokas explains how Stream4us builds and sends out production kits to remote guests that enable full control of their desktops and cameras during live shows.
Featured Articles: Integrating NDI Sources From Conferencing Platforms
Live-event video production during COVID has rapidly accelerated the use of NDI output from popular conferencing tools such as Zoom and Microsoft Teams, particularly for one-to-many broadcasts in which remote contributors are the norm. This article will explain how to enable NDI in Zoom and Microsoft Teams for higher-quality input sources into your live-streaming workflow.
Featured Articles: Review: Ficihp Keyboard & Screen for Content Creators
Streaming media producer Anthony Burokas demos ingenious keyboard-touchscreen all-in-one for use with streaming and live content creation tools like vMix.
Featured Articles: vMix Cloud and Other Indispensable Cloud Production Tools
LiveX’s Corey Behnke and Social180Group’s John Porterfield discuss the essential cloud-based tools in their live production workflows from the Live Streaming Summit at Streaming Media West 2022.
Featured Articles: Review: Netgear M4250 Network Switch
As streaming producers, we are already expected to provide expertise in video cameras, switchers, live streaming, audio, and wrapping cables using the over-under method. How are we now going to master the advanced network management requirements of NDI? Start with the Netgear M4250 AV line of switches.
Featured Articles: vMix’s Tim Vandenberg Talks NVIDIA GPU Unlocking, SRT, and vMix 26 at NAB 2023
vMix Operations Manager Tim Vandenberg and Streaming Media’s Shawn Lam discuss multistream encoding via GPU unlocking, SRT output, new mix effects and more in vMix 26 and more in the vMix booth at NAB 2023.
Featured Articles: Tutorial: Green Room Chat for Remote Production with vMix Call
This quick tutorial for remote producers should enable you to bring guest presenters into vMix via vMix Call and give you the ability to talk to them, and give them the ability to talk to you, without the audience hearing. Then, when the callers go live, the bus will automatically switch and the audience will hear them but they will not hear what’s going on outside of the live show.
¶ Управление камерой через NDI
- Установите NDI Tools (на студийных компьютерах уже есть). Откройте Studio Monitor.
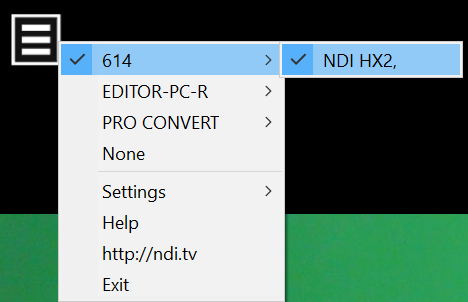
- Откройте меню нажав на иконку в левом верхнем углу или щелкнув правой кнопкой мыши в любом месте экрана. Выберите вашу камеру.
3. Снова откройте меню, перейдите в раздел Settings, далее перейдите в раздел PTZ Settings, где необходимо нажать Show PTZ Control.
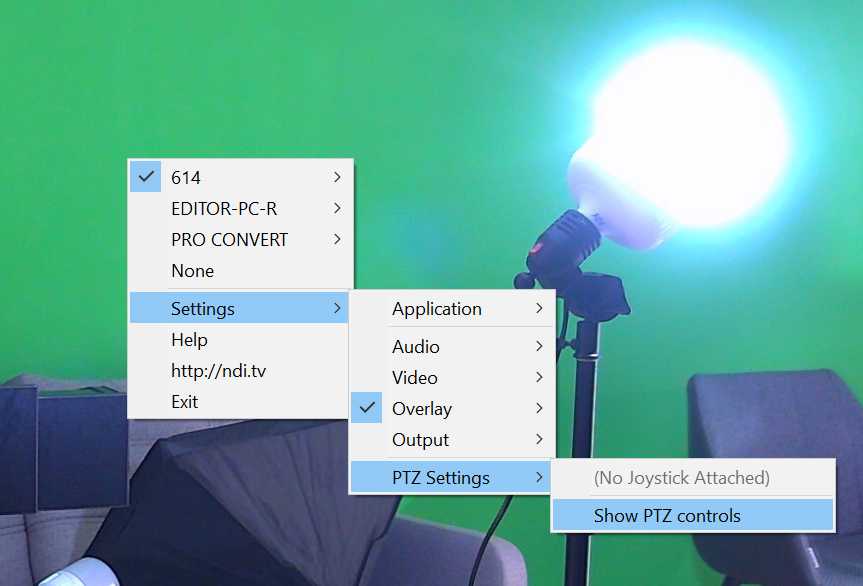
4. На экране должна появиться навигационная панель. Движение камеры происходит с помощью зажатой левой кнопки мыши и движения курсора внутри круга. Прямо справа от круга находится панелька для приближения и отдаления изображения.
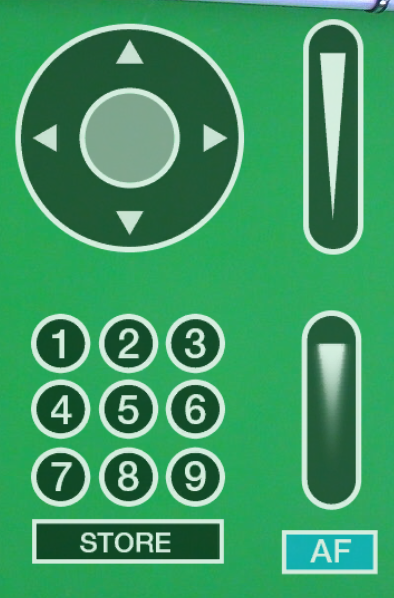
Видео пример работы.
What Can it do?
The question should really be what can’t it do?
Since its entrance in 2015, NDI has been getting more and more powerful and Newtek have just recently released V.4 of the protocol. NDI is so powerful in fact that Newtek made the decision to make it open to the public, to give the access to developers to make their own tools using their SDK.
So let’s look at some use cases.
First off, it depends on whether you are a Windows or Mac user as to what tools are immediately at your disposal. Tricaster’s and a lot of the free tools for NDI are aimed at Windows but that isn’t a roadblock as there are plenty of applications that have Mac in mind for NDI.
Head to NDI.tv and download the NDI Tools package for either Windows or Mac.
In this package you will certainly have a program called NDI Scan Converter (now called Screen Capture and Screen Capture HX) also in that package is a Windows program called NDI Studio Monitor and for Mac a program called NDI Video monitor. Install both depending on which operating system you are on.
 NDI Tools Downloads for Windows & Mac
Start Learning vMix
- What is vMix. Learn here
- Getting Started with the vMix interface here
- Learn how to work with vMix inputs here
- Mixing Inputs Together with vMix Multiview here
- Learn about vMix titles here
- Learn how to mix Audio in vMix here
- Learn how to use VST3 audio plugins with vMix here
- Learn all about vMix settings here
- Learn about how to use vMix Full Screen and Multiview here
- Learn how to record video with vMix here
- Learn how to live stream with vMix here
- Learn how to use vMix video overlay channels here
- Learn how to make Stinger Transitions in vMix here
- Learn how to use social media comments in your live stream with vMix Social here
- Learn how to use vMix shortcuts here
- Learn how to use GT Title Editor to make custom vMix titles here
- How to use vMix Call to bring guests in your live stream here
- How to control vMix remotely with the web controller here
- How to use vMix color correction tools here
- How to use virtual sets with vMix here
- How to use NDI with vMix here
- How to control PTZ cameras in vMix here
- Learn how to connect vMix with Zoom using the virtual webcam output here
- Learn how to use automated playlists with vMix here
- Learn how to use data sources with vMix here
- Learn how to use vMix triggers here
Tagged as NDI vMix Desktop Capture
NDI Myths and Common Concerns
“It isn’t broadcast quality.” That couldn’t be further from the truth, as we discussed above.
“It requires a super good network.” Most streams don’t have more than four cameras. Most have less. If you’re running four cameras at 1080p on a modern gigabit network, you’re solid.
“It’s not supported by top brands.” Adobe, Atomos, Avid, ChyronHego, EVS, Epic Games, Grass Valley, Magewell, Microsoft, Panasonic, Renewed Vision, Ross, and Sony, just to name a few.
If you’re still a skeptic, here’s a great article crushing some of the most popular myths and rumors. https://www.redsharknews.com/production/item/4846-ten-misconceptions-about-ndi
Sending NDI from vMix
Keep in mind that it is also simple to send NDI across your network from inside vMix. Just go to your Settings menu and select Output. You can then easily assign any of your output to send an NDI signal from your Output, Preview, MultiView, or any input source.
What is an NDI Camera?
NDI cameras are able to communicate using the Network Device Interface or NDI protocol. They can connect to a LAN (Local Area Network) and seamlessly integrate with hundreds of software applications including OBS, Wirecast, vMix, xSplit, NDI Studio Monitor and much more.
What is an NDI camera used for?
NDI cameras often have PTZ (Pan, Tilt and Zoom) functionality which takes advantage of the two-way communication capabilities of NDI. In this way, NDI cameras can be controlled over the same single ethernet cable used to send audio and video. For example, a PTZOptics NDI camera can use a single ethernet cable to power the camera, control the PTZ functionality of the camera, and to send audio and video to a source on the network. PTZ camera controls inside of vMix will be reviewed in an upcoming chapter.
What is the difference between NDI and SDI?
SDI is a technology that has been around for decades. SDI stands for Serial Digital Interface, and the cable itself is capable of sending uncompressed video long distances. NDI is a much newer technology that uses the latest video compression methods to make sending and receiving high-quality video possible over standard computer networks. An SDI camera video feed can be converted into an NDI stream and sent over the network. An NDI video feed can also be converted into an SDI video output and plugged into a monitor.
How do I set up an NDI camera?
Most NDI cameras are plug and play when it comes to setup. NDI cameras can be plugged into any LAN (Local Area Network) and configured to operate with any software or hardware solution that supports NDI. Once an NDI camera is plugged into the network, it will show up as an available source on your network; therefore, the friendly NDI name that you give your camera will show up in any software or hardware solution when you click the “add NDI source” option.

vMix Desktop Capture
How can I capture video from another computer?
Perhaps one of the most popular ways to get started with NDI is sending video from one computer to another. Popular examples of this include sending PowerPoint slides from one computer on your local area network to the main vMix video production software. vMix has a handy tool called vMix Desktop Capture that you can download for free to enable a secondary Windows computers to send video via NDI back to your main vMix computer.
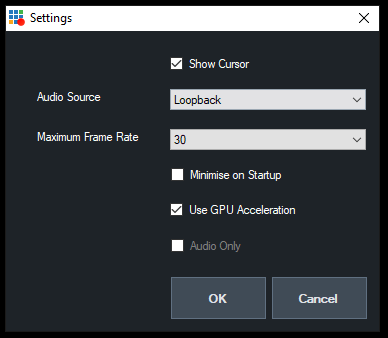
Desktop Capture Settings
vMix Desktop Capture for NDI is incredibly easy to use. Once you open it up, it will search your computer for potential screens and applications to capture and it makes them available on your local area network via NDI. Back at your main vMix computer, you will instantly see all of the available screens and windows available to connect with via NDI using the vMix Desktop Capture for NDI tool.
There are just a few options that are revealed when you click the Settings button. vMix Desktop Capture for NDI allows you to show or hide the mouse cursor. You have the option to send loopback audio, choose silence or a specific audio interface. You can also minimize this application at startup and enable GPU acceleration. It is easy to use!
Преимущества использования NDI в программе vMix
NDI (Network Device Interface) представляет собой открытый протокол для передачи видео и аудио по IP-сети. В программе vMix NDI предоставляет ряд преимуществ, которые делают его весьма удобным и эффективным инструментом для производства видеоконтента.
Одним из основных преимуществ NDI является возможность передавать видео- и аудиопотоки высокого качества через Ethernet-сеть без необходимости использования дополнительного оборудования, такого как видеосигнальные кабели или видеоинтерфейсы. Это позволяет значительно сократить расходы на оборудование и упростить настройку производства.
Другим важным преимуществом NDI является его низкая задержка передачи данных. В программах, где точность тайминга играет важную роль, таких как живые трансляции, минимальная задержка может быть критически важна. NDI обеспечивает практически мгновенную передачу данных, что позволяет синхронизировать множество источников видео и аудио без заметных задержек.
NDI также обладает очень высокой степенью сжатия видео без потери качества. Это позволяет передавать видеопотоки в высоком разрешении и с высоким битрейтом по ограниченным сетевым ресурсам. Благодаря этому, в программе vMix можно использовать множество источников видео и аудио, не испытывая проблем с пропускной способностью сети.
Также следует отметить гибкость NDI в программе vMix. Он позволяет передавать не только обычные видео- и аудиопотоки, но и различные метаданные, такие как альфа-каналы и прозрачность, что открывает широкий спектр возможностей для создания сложных и интересных визуальных эффектов.
В заключение, использование NDI в программе vMix позволяет максимально упростить процесс работы с множеством источников видео и аудио, обеспечивает высокую точность тайминга и качество передачи данных, а также предлагает гибкие возможности для создания визуальных эффектов. Все это делает NDI незаменимым инструментом для производства видеоконтента.
Ndi vmix: настройка и использование лучшего инструмента для стриминга
Первым шагом для настройки Ndi vmix является установка программы на ваш компьютер. Вы можете скачать ее с официального сайта Ndi и установить на свой компьютер.
После установки программы откройте ее и настройте параметры стрима в соответствии с вашими потребностями. Вы можете выбрать разрешение и качество видео, настроить аудио и выбрать источник для стрима. Не забудьте указать IP-адрес и порт для соединения.
Когда вы настроили параметры стрима, вы можете начать использовать Ndi vmix для стриминга. Программа предлагает множество функций, которые могут помочь вам создавать профессиональные видео-стримы. Вы можете добавлять графику и эффекты, менять угол обзора, переключаться между различными источниками, настраивать аудиоуровни и многое другое.
Для использования Ndi vmix вам также понадобится подключенный видеовходной носитель, такой как видеокамера или захватывающее устройство. Вы можете подключить его к компьютеру и выбрать его в качестве источника видео в Ndi vmix.
Когда вы закончили настраивать стрим, вы можете начать трансляцию на платформе своего выбора. Ndi vmix предлагает множество вариантов для стриминга, включая популярные платформы, такие как YouTube, Facebook Live и Twitch. Просто выберите платформу и укажите необходимые данные для входа.
В заключение, Ndi vmix является лучшим инструментом для стриминга, который предоставляет множество функций и возможностей для создания профессиональных видео-стримов. Настройте программу в соответствии с вашими потребностями и начинайте транслировать на вашу любимую платформу прямо сейчас!
Возможности технологии NDI vMix для пользователей
1. Легкое подключение и интеграция.
Технология NDI позволяет пользователям без особых усилий подключать и интегрировать различные видеоисточники. С ее помощью можно легко включать в трансляцию камеры, компьютерные экраны, внешние видеоисточники и многое другое.
2. Масштабируемость и гибкость.
NDI vMix обеспечивает возможность работать с множеством источников одновременно и осуществлять многокамерную съемку. Такая гибкость позволяет пользователям создавать сложные видеопроекты и трансляции с использованием различных источников, таких как камеры, компьютеры, графические карты и другое.
3. Высокое качество видео и звука.
Технология NDI vMix позволяет передавать видео и звук в высоком качестве без потерь
Это особенно важно при создании профессиональных трансляций и презентаций, где важно передать все детали изображения и хорошо слышать звуковое сопровождение
4. Поддержка различных платформ.
NDI vMix совместима с различными операционными системами, включая Windows и macOS. Это делает ее доступной для широкого круга пользователей и позволяет использовать технологию в различных профессиональных и хобби проектах.
5. Возможность удаленного доступа.
Благодаря технологии NDI vMix пользователи могут получить доступ к видеопотокам и управлять ими удаленно. Это особенно полезно в случаях, когда необходимо проводить трансляции из разных мест или же осуществлять мониторинг ситуации на расстоянии.
6. Интеграция с другими программными продуктами.
Технология NDI vMix может быть легко интегрирована с другими программами и оборудованием, такими как видеоредакторы, стриминговые платформы, системы видеоконференций и многое другое. Это позволяет пользователям создавать сложные видеопроекты с использованием своих любимых инструментов.
В результате, технология NDI vMix предоставляет пользователям широкие возможности для создания и управления профессиональными видеопроектами и трансляциями. Ее преимущества включают легкость подключения и масштабируемость, высокое качество видео и звука, поддержку различных платформ, удаленный доступ и интеграцию с другими программами. Это делает NDI vMix идеальным выбором для ведущих и профессионалов в области видеопроизводства.
Шаги по созданию NDI источника
Для создания NDI источника в Vmix необходимо выполнить следующие шаги:
- Открыть программу Vmix на компьютере.
- Перейти в раздел «Настройки» и выбрать вкладку «NDI».
- Включить опцию «Включить отправку NDI сигнала».
- Задать имя для NDI источника.
- Выбрать видео-, аудио- и метаданные, которые необходимо отправить через NDI.
- Настроить параметры сжатия и качества видео и аудио.
- Нажать кнопку «ОК», чтобы сохранить настройки.
После выполнения этих шагов, NDI источник будет создан и готов к использованию в других приложениях или устройствах, поддерживающих технологию NDI.
Важно отметить, что для работы с NDI источниками необходимо установить дополнительное программное обеспечение, такое как NewTek NDI Tools или NDI Virtual Input
| Шаг | Описание |
|---|---|
| 1 | Открыть программу Vmix на компьютере. |
| 2 | Перейти в раздел «Настройки» и выбрать вкладку «NDI». |
| 3 | Включить опцию «Включить отправку NDI сигнала». |
| 4 | Задать имя для NDI источника. |
| 5 | Выбрать видео-, аудио- и метаданные, которые необходимо отправить через NDI. |
| 6 | Настроить параметры сжатия и качества видео и аудио. |
| 7 | Нажать кнопку «ОК», чтобы сохранить настройки. |
После выполнения этих шагов, NDI источник будет создан и готов к использованию в других приложениях или устройствах, поддерживающих технологию NDI.
Важно отметить, что для работы с NDI источниками необходимо установить дополнительное программное обеспечение, такое как NewTek NDI Tools или NDI Virtual Input


