Solution 02: Uninstall any third-party antivirus software installed on your computer
If turning off antivirus did not work or you want to get rid of third party antivirus, you can uninstall any antivirus software installed on your computer to get rid of “These settings are being managed by vendor application” message and turn Windows firewall/security back on.
It is easy to uninstall antivirus software, just follow these steps below:
- Go to settings and then Apps
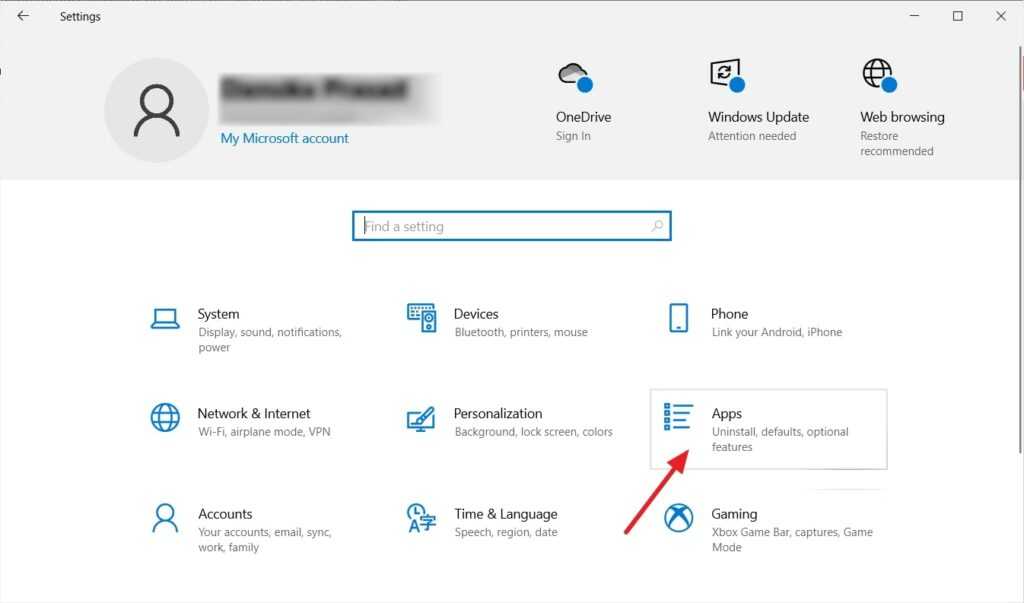
- Scroll down and find the 3rd party antivirus software then click on it
- Uninstall button will be visible and then click on it
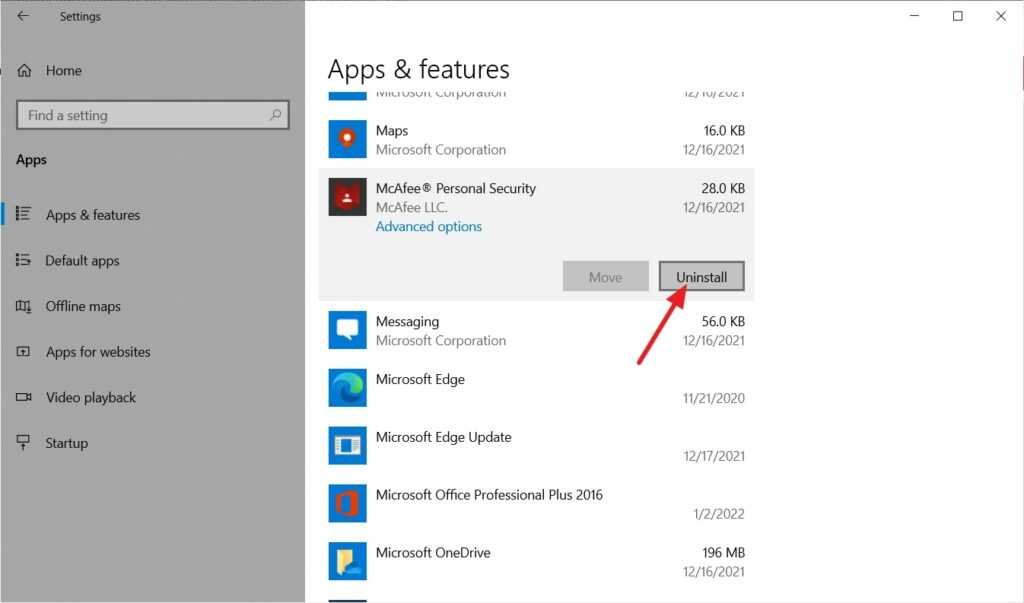
- Complete the uninstallation, then restart your computer
- Go back and turn on Windows firewall/Security again.
Как установить и настроить аудио декодер LAV
LAV (Lite Audio Video) является популярным аудио декодером, который позволяет воспроизводить различные форматы аудио на вашем компьютере. В этой статье мы расскажем вам о том, как установить и настроить аудио декодер LAV.
Шаг 1: Скачайте установочный файл
Первым шагом в установке аудио декодера LAV является скачивание установочного файла с официального сайта. Вы можете найти последнюю версию LAV на сайте разработчика. После скачивания установочного файла продолжите к следующему шагу.
Шаг 2: Установка LAV
Запустите установочный файл, который вы скачали на предыдущем шаге. Следуйте инструкциям установщика, чтобы установить LAV на ваш компьютер. По умолчанию LAV будет установлен в папку Program Files, но вы можете выбрать другую папку установки, если хотите.
Шаг 3: Настройка LAV
После установки LAV, вам нужно будет настроить его, чтобы он работал правильно с вашими аудиофайлами. Чтобы настроить LAV, запустите программу и найдите настройки аудио декодера.
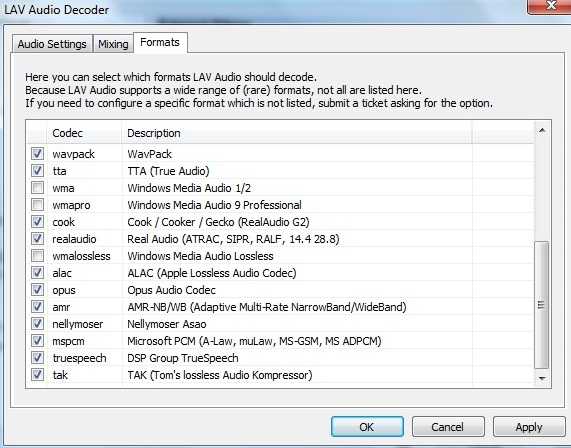
В настройках LAV у вас будет возможность выбрать форматы аудио, с которыми LAV будет работать. Вы можете выбрать все форматы или только те, которые вам нужны. Также, в зависимости от ваших потребностей, вы можете настроить другие параметры LAV, такие как разрешение аудио и выбор аудиоустройства.
Шаг 4: Проверьте настройки
После завершения настройки LAV, вам следует проверить, что все работает правильно. Откройте любой аудиофайл на вашем компьютере и воспроизведите его с помощью LAV. Если аудио воспроизводится без проблем, значит, LAV был успешно установлен и настроен.
Если у вас возникли проблемы с установкой или настройкой LAV, вы можете обратиться за поддержкой на форуме разработчиков или посмотреть руководство пользователя, которое обычно поставляется вместе с программой.
Теперь у вас должен быть установлен и настроен аудио декодер LAV, который позволит вам воспроизводить аудиофайлы различных форматов на вашем компьютере. Наслаждайтесь качественным звуком во время просмотра видео и прослушивания музыки!
Fix 1 – If you are getting this message on Lock screen settings
1. Press the Windows key along with the “R” key from your keyboard.
2. After that, type this line and click on “OK“.
gpedit.msc
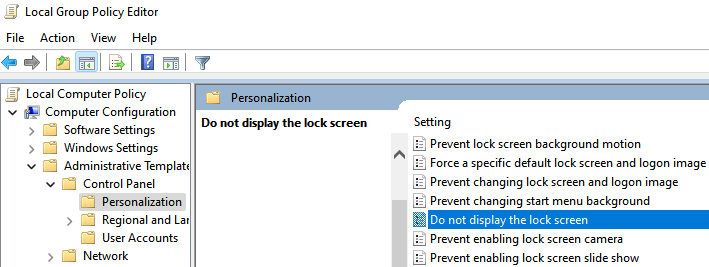
3. Once the Local Group Policy Editor screen appears on your screen, go to this location-
Computer configuration > Administrative Templates > Control Panel > Personalization
4 – Now, in the right side , if you are facing this message on Lock screen settings page, Just double click on Do not display the Lock screen
5 -Choose not configured and then click on Apply.

6 – Now, Search Powershell in windows search and then right click on search result icon of powershell and then click on run as administrator.
7 – Now, run the command given below and hit enter to execute it.
gpuupdate /force
8 – Close the powershell window.
Note that, if you are getting this message on any other screen, try to find that settings and choose not configured for that particular settings.
Use a Local/Offline Account
Local Account setup in Windows 10 (Credit: PCMag)
Microsoft prefers if you sign in to Windows with your Microsoft account—the one attached to all things Microsoft, be it your Xbox, Office 365, or OneDrive account, buying apps or music or video in the Windows Store, even talking on Skype, to name just a few. When you set up Windows 10 or 11, Microsoft specifically asks you to sign in using that account.
In Windows 10, you don’t have to. During setup, click Skip this step. If you already signed in with a Microsoft account, go to Settings > Accounts > Your info. Click Sign in with a local account instead. Enter a local account name and new password (and a hint for when you forget it).
In Windows 11 Home, you are forced to use a Microsoft Account, which means you must have an internet connection (or jump through some serious hoops to get around it). It’s one of our top 10 reasons not to upgrade to Windows 11.
Windows 11 Pro can use a local account, but the steps are a little different. When you get to the initial sign-in options, select Offline Account. Microsoft then throws some tricky language at you to try to get you to go with the Microsoft account, but click Skip for Now. Enter a username and create a password (ignore that “Even better, use an online account” link). Set up some security questions and click Next each time. Enable your privacy settings and you’re done.
Also, FYI, after setup on either OS, you can always switch to a local account. In Windows 10 access Settings > Accounts > Sign in with a local account instead. In Windows 11, use Settings > Accounts > Your Info > Sign in with a local account instead.
The downside of a local account is that when you end up on a service or site that requires Microsoft credentials, you’ll have to enter your Microsoft login each time; it won’t automatically sign you in as it does if you log into Windows with a Microsoft account.
Download Our One-Click Registry Hacks
If you don’t feel like diving into the Registry yourself, we’ve created two downloadable registry hacks you can use. One hack forces the Control Panel to open to category view, one forces it to open to icon view, and the third restores the default where Control Panel opens to the last view you used. All three are included in the following ZIP file. Double-click the one you want to use and click through the prompts.
These hacks are really just the key, stripped down to the value we described above, and then exported to a .REG file. Running either of the «Force a view» hacks creates that value and sets it to the appropriate number. The «restore» hack deletes the value, restoring default Windows behavior. And if you enjoy fiddling with the Registry, it’s worth taking the time to learn how to make your own Registry hacks.
Решение проблем с воспроизведением аудио
При настройке аудио декодера LAV могут возникать проблемы с воспроизведением звука. В этом разделе мы рассмотрим несколько распространенных проблем и предложим их решения.
1. Отсутствие звука при воспроизведении видео
Если у вас нет звука при воспроизведении видео, то первоначально проверьте следующие пункты:
- Убедитесь, что звук на вашем компьютере включен и громкость не установлена на минимум.
- Проверьте, подключены ли ваши аудио устройства (наушники или динамики) к разъему на компьютере или другому устройству.
- Проверьте настройки звука в LAV декодере. Чтобы это сделать, откройте настройки LAV декодера и перейдите на вкладку «Аудио». Убедитесь, что выбран правильный аудио устройство и что громкость не установлена на минимум в LAV декодере.
Если после выполнения этих действий звук все равно не воспроизводится, попробуйте запустить видео с использованием другого медиаплеера, чтобы убедиться, что проблема не связана с LAV декодером.
2. Прерывистое воспроизведение звука или шумы
Если звук воспроизводится с перебоями или сопровождается нежелательными шумами, то рекомендуется выполнить следующие действия:
- Убедитесь, что драйверы аудио устройств на вашем компьютере обновлены до последней версии.
- Проверьте настройки аудио в LAV декодере. Откройте настройки LAV декодера, перейдите на вкладку «Аудио» и проверьте, что выбран правильный аудио устройство. Попробуйте изменить настройки формата аудио и частоты дискретизации, чтобы улучшить качество звука.
Если проблема с прерывистым воспроизведением звука или шумами все еще не решена, попробуйте запустить другое аудио с использованием LAV декодера и сравните результаты.
3. Не совпадение аудио и видео
Если видео воспроизводится с задержкой или звук не совпадает с изображением, можно попробовать исправить эту проблему, выполните следующие действия:
- Убедитесь, что у вас установлена последняя версия LAV декодера и вашего медиаплеера.
- Переустановите LAV декодер и медиаплеер, если проблему нельзя решить другим способом.
- Проверьте настройки LAV декодера и медиаплеера. Убедитесь, что выбраны правильные настройки синхронизации аудио и видео.
Если после выполнения этих действий проблема не решена, возможно, стоит обратиться в техническую поддержку LAV декодера или медиаплеера для получения дополнительной помощи.
Надеемся, что эти решения помогут вам решить проблемы с воспроизведением аудио при использовании LAV декодера.
Changing the Install Folder for Win32 Apps
The more traditional apps, familiar to decade-long Windows users, can also be installed in a separate drive. In fact, when Windows runs a Win32 app, it prompts you to select the install folder.


![Lav filters 0.57 [2013, кодеки и декодеры] / скачать бесплатно](https://vvk-yar.ru/wp-content/uploads/a/6/0/a60217717f2850fc177e1c573fefdcf4.png)
With Windows Store apps, you could only select the drive you want an app to be installed on, while the Win32 Install Wizard offers you to select the exact location of the file. This means that you can create a new folder for your new app and install it there.
But unlike Windows Store apps, Win32 apps cannot be moved to another drive. The only way to do so is to uninstall and then select a different destination folder when reinstalling. This is mostly because the way these apps are installed is completely different.
Changing the Default Location for Apps
Instead of changing the drive and location every time you try to install a Win32 app, you can change the default location. Although this allows you to also select the exact default install folder, unlike the case was with Windows Store apps, this process is a bit less user-friendly. Here is what you need to do:
- Press Win + R to bring up the Run
- Open Regedit by typing the word in the Open:
- Navigate to the following in the list to the left: “HKEY_LOCAL_MACHINESOFTWAREMicrosoftWindowsCurrentVersion”
- In the right pane, open the value ProgramFilesDir/ProgramFilesDir (x86), depending on whether your Windows is 32-bit or 64-bit.
- Once you double-click it, the value will open an edit box.
- Under Value data: type in your new desired default location.
More Information
If you’re a home user and are clueless about which Policy controls which user interface option, here is the list of Policy keys for Personalize in Windows 10. The Policy name, the registry location as well as the equivalent Group Policy setting are given.
Note that this list may not necessarily cover all the Personalize Policies. There may be additional Policy settings for Personalization, but this page is primarily written to help users understand which Policy is affecting which GUI option in Personalize window. For a full listing of Policies, you need to use Group Policy Editor, available in Windows 10 Pro Editions and higher.
Policies can be set either in HKEY_CURRENT_USER or HKEY_LOCAL_MACHINE, in the registry paths given in the table. You need to check both the registry locations, to set or remove Policies. For example, to remove the NoChangingWallpaper Policy, you need to go to the specified registry paths (both), and delete or rename the value named NoChangingWallpaper, if exists in the right pane.
Where
Where do I find the configuration file? This is a deceptively complicated problem. Since configuration is hierarchical, there are actually multiple configuration files that may affect an application. These include the machine configuration file, the application (or web) configuration file, the user local settings file, and the user roaming settings file.
Machine Configuration
The machine configuration file lives with the, not so easily found, .NET Framework files. The location of the configuration file is dependent on the version of .NET and type of platform (e.g., 64 bit) used by your application.
A typical example, might be C:\Windows\Microsoft.NET\Framework\v4.0.30319\CONFIG\machine.config.
In your C# application code, the following will return the location of the file:
C#
System.Runtime.InteropServices.RuntimeEnvironment.GetRuntimeDirectory()
               + @"CONFIG\machine.config"
Application Configuration
The application configuration file usually lives in the same directory as your application. For web applications, it is named Web.config. For non-web applications, it starts life with the name of App.config. Following a build, it is copied to the same name as your .exe file. So, for the program MyProgram.exe, you might expect to find MyProgram.exe.config, in the same directory.
In your C# application code, the following will return the location of the file:
C#
AppDomain.CurrentDomain.SetupInformation.ConfigurationFile
While it is not generally recommended, you may find that some applications alter the location of the application configuration file as follows:
C#
AppDomain.CurrentDomain.SetData("APP_CONFIG_FILE", "NewName.config")
User Settings
The user settings are almost impossible to find, perhaps by design. The names of the directories vary with versions of Windows. To complicate matters further, the parent folder is generally hidden. The folder structure also incorporates the company name (of the application vendor), the application name, a unique identity for the application, and the application version.
An example, on Windows 7, for local user settings might look like:
C:\Users\MyUsername\AppData\Local\CompanyName\MyProgram.exe_Url_pnbmzrpiumd43n0cw05z2h4o23fdxzkn\1.0.0.0\user.config
In C#, you can get the base directory for local user settings (first line) or roaming user settings (second line) as follows:
C#
Environment.GetFolderPath(Environment.SpecialFolder.LocalApplicationData)
Environment.GetFolderPath(Environment.SpecialFolder.ApplicationData)
In C# (see notes in Overview), you can get the exact file path for local user settings (first line) or roaming user settings (second line) as follows:
C#
ConfigurationManager.OpenExeConfiguration
                     (ConfigurationUserLevel.PerUserRoamingAndLocal).FilePath
ConfigurationManager.OpenExeConfiguration(ConfigurationUserLevel.PerUserRoaming).FilePath
Other Configuration
If this isn’t all confusing enough, you should be aware of a few other files. There is a root Web.config (located in the same directory as machine.config). Also, sub-directories of a web application may provide additional overrides of inherited settings, via a Web.config specific to that sub-directory.
Lastly, IIS provides some of its own configuration. A typical location would be: C:\Windows\System32\inetsrv\ApplicationHost.config.
Adding undetected resolutions
Due to buggy hardware or drivers, your monitor’s correct resolutions may not always be detected. For example, the EDID data block queried from your monitor may be incorrect.
If the mode already exists, but just isn’t associated for the particular output, you can add it like this:
$ xrandr —addmode S-video 800×600
If the mode doesn’t yet exist, you’ll need to create it first by specifying a modeline:
$ xrandr —newmode
You may create a modeline using the gtf or cvt utility. For example, if you want to add a mode with resolution 800×600 at 60 Hz, you can enter the following command: (The output is shown following.)
$ cvt 800 600 60
# 800×600 59.86 Hz (CVT 0.48M3) hsync: 37.35 kHz; pclk: 38.25 MHz
Modeline «800x600_60.00» 38.25 800 832 912 1024 600 603 607 624 -hsync +vsync
Then copy the information after the word «Modeline» into the xrandr command:
$ xrandr —newmode «800x600_60.00» 38.25 800 832 912 1024 600 603 607 624 -hsync +vsync
After the mode is entered, it needs to be added to the output using the —addmode command as explained above.
Откуда загрузить?
Прежде, чем перейти к загрузке K-Lite Codec Pack, необходимо ознакомиться с различными вариациями этого набора кодеков и решить — какую версию лучше всего скачать?
Дело в том, что K-Lite Codec Pack имеет несколько версий для распространения:
- K-Lite Codec Pack Basic имеет в своем составе жизненно необходимые элементы, которых хватит для воспроизведения большинства наиболее распространенных форматов аудио и видео файлов, в том числе: AVI, MKV, MP4, FLV, OGM, MPEG, MOV, HDMOV, TS, M2TS, OGG, MP3, DivX и XviD. Также данного набора хватит для просмотра фильмов, записанных в формате DVDrip и TVrip, но если вдруг возникнет необходимость просмотреть запись с DVD-диска, то в этом случае данного пака кодеков уже будет недостаточно.
- K-Lite Codec Pack Standard является именно тем решение, которое без проблем поможет вам наслаждаться записями на DVD-дисках. Кроме того, данный сборник способен воспроизводить все те же форматы файлов, что и предыдущий, но в отличии от него, оснащается бесплатным проигрывателем Media Player Classic Home Cinema. Поэтому для тех, кто воспроизводит мультимедиа-файлы на своем компьютере и не причастен к их редактированию, данного набора будет вполне достаточно.
- K-Lite Codec Pack Full является более продвинутым пакетом кодеков, в котором присутствует поддержка форматов, сжимаемых «без потери качества» звучания, а также набор инструментов для перекодирования файлов и тонкой настройки самих кодеков.
- K-Lite Codec Pack Mega имеет функционал, который содержится во всех менее продвинутых версиях, но дополнительно позволяет воспроизводить RealMedia-файлы, без необходимости устанавливать подходящий для них плеер, так как в его составе уже имеются необходимые для этого кодеки. Кроме того, данный пакет обеспечивает поддержку потокового аудио и видео, размещаемого на веб-страницах. На данный момент, K-Lite Codec Pack Mega является наиболее полным пакетом кодеков K-Lite Codec Pack.
Из этого выходит, что для разных типов пользователей предназначен свой отдельный пакет, но я советую остановиться на версии Mega, так как при установке этого набора кодеков, у вас никогда не возникнет проблем с воспроизведением каких-либо файлов. Поэтому останавливайте свой выбор на нем и загружайте установочный файл.
Загрузить K-Lite Codec Pack
Stop Auto Reboots
Windows 10 Active Hours settings (Credit: PCMag)
Windows updates are regular and seemingly never-ending, and pretty much out of the user’s control (unless you turn off updates altogether, which is a bad idea). What’s worse: If you don’t reboot your PC after an update, Windows eventually takes it upon itself to reboot for you. That’s a good way to lose data in open apps.


Take advantage of the feature called Active Hours, which lets you schedule a time for updates and reboots. In Windows 10, Navigate to Settings > Update & Security > Windows Update > Change active hours. To select your own timeframe, click Change and choose a start and end time. Or toggle on the option for Automatically adjust active hours for this device based on activity.
In Windows 11, go to Settings > Windows Update > Advanced Options > Active Hours, then set them manually, or go with the Automatic option that tracks your usage.
When need to change default install location on Windows 11?
By default, downloaded files, personal folders, etc. will be automatically stored on the C drive. At the same time, as the boot disk of Windows, the C drive also stores all system-related files and data. Therefore, sometimes the C drive will become full.
When the C drive is full of downloaded applications or files, and you don’t realize the importance of stopping programs installing on the C drive, your PC will soon fall into problems such as poor performance, dull response and even computer freezes.
Therefore, when there’s few space on the C drive, it’s essential to change default install location on Windows 11.
Lav audio decoder как удалить
Приветствую друзья. Иногда чтобы понять предназначение некоторых программ, нужно лезть в дебри терминов, каких-то функций и прочего.. обычному пользователю — это мягко говоря не нужно. Сегодня мы поговорим о подобной проге, вроде бы понятно зачем она нужна, но в интернете инфа расплывчатая..
LAV Filters — что это такое?
Набор бесплатных фильтров DirectShow, основанных на библиотеках libavformat и FFmpeg. Набор позволяет проигрывать любой формат файла, который поддерживает DirectShow.
Окно установки LAV Filters, где уже видим, это точно некая альтернатива паку кодеков (похожий список устанавливаемых компонентов):
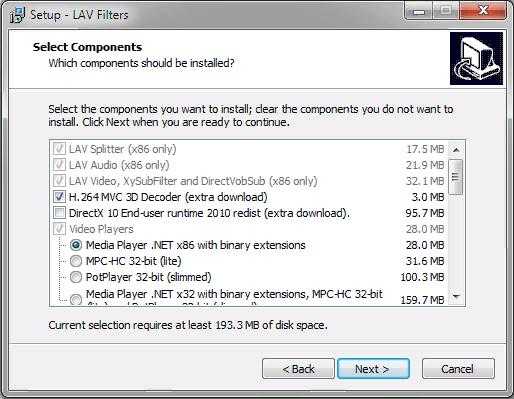
Данная прога может сразу вам поставить и видеоплеер, например MPC-HC, PotPlayer. Кстати плееры неплохие, но мне лично нравится VLC — бесплатный, всеядный (в нем вшиты уже кодеки) и быстро работает.
Я могу ошибаться. Но вроде бы после установки LAV Filters фильмы могут проигрываться быстрее, картинка будет более плавной, комп не так будет нагружаться.
Устанавливается в папку:
C:Program FilesLAV Filters
- Пользователи говорят что LAV Filters менее глючный чем ffdshow.
- В отличии от ffdshow реализована многопоточность.
- Включает собственную разработку автора CUDA декодера для видеокарт NVIDIA.
- Уступает ffdshow отсутствием фильтров постпроцесса.
- Поддерживает аудио TrueHD и DTS-HD.
В общем ребята, повторюсь, данная программа нужна для того чтобы у вас на ПК нормально проигрывались видео, аудио, чтобы не тормозило, плавно показывало. То есть LAV Filters — это что-то вроде кодеков, если удалить, то некоторые форматы могут не воспроизводиться, либо будут какие-то глюки.
Кодеки — это компоненты, при помощи которых воспроизводится видео и аудио. От кодеков зависит будет ли ПК глючить при воспроизведении тяжелого фильма в высоком разрешении или нет, поэтому существуют разные кодеки, чтобы понять какой лучший — нужно тестировать. Но есть и универсальный набор из серии поставил и забыл — K-Lite Codec Pack Full.
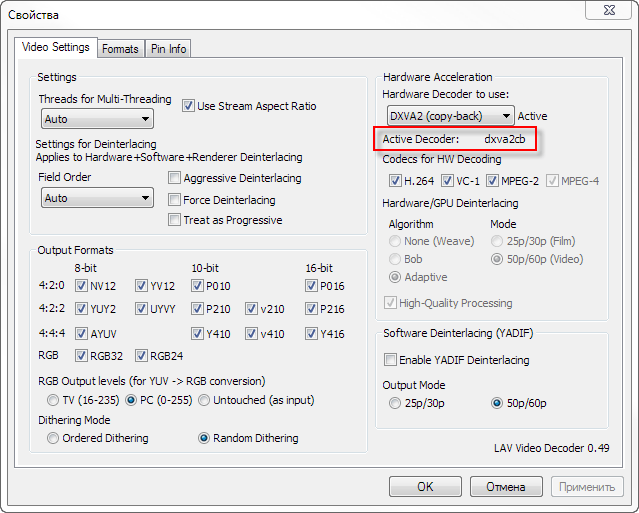
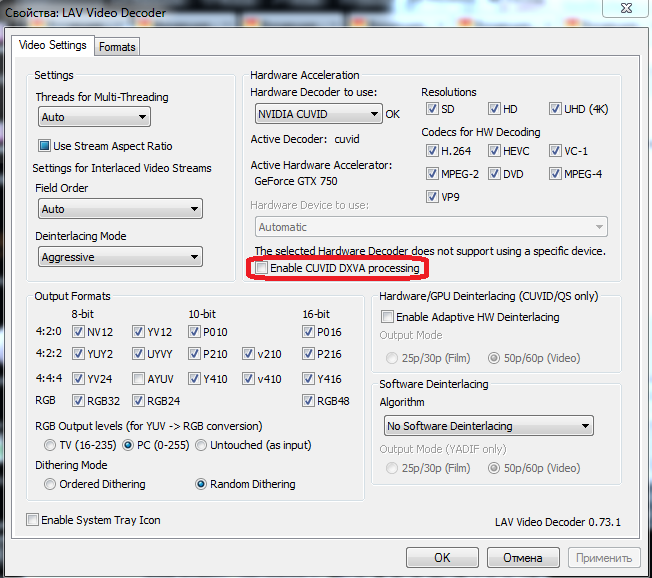
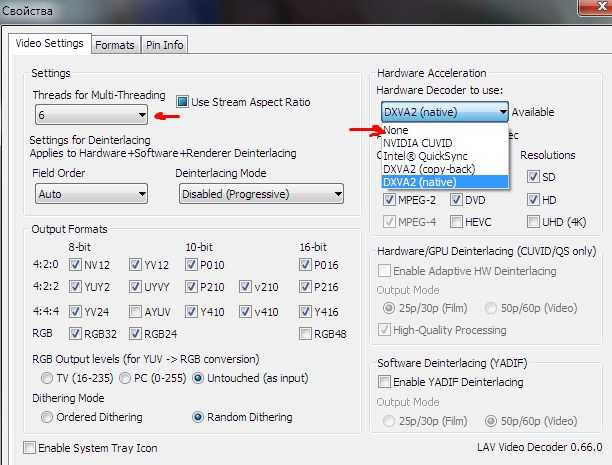
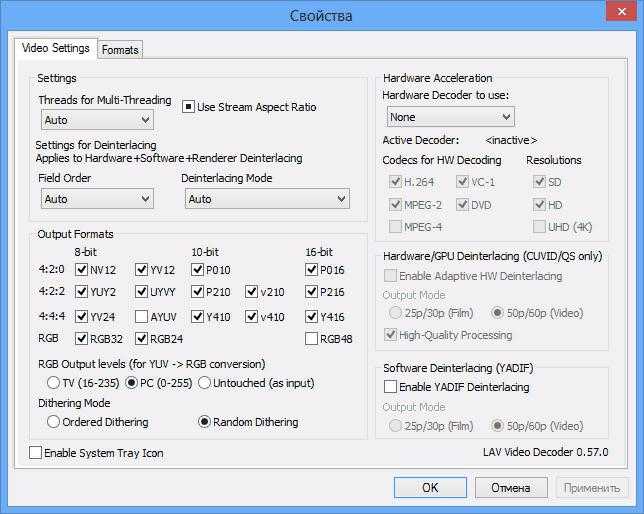
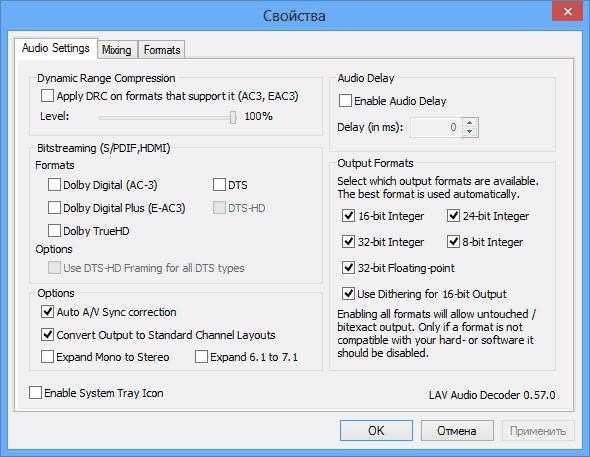
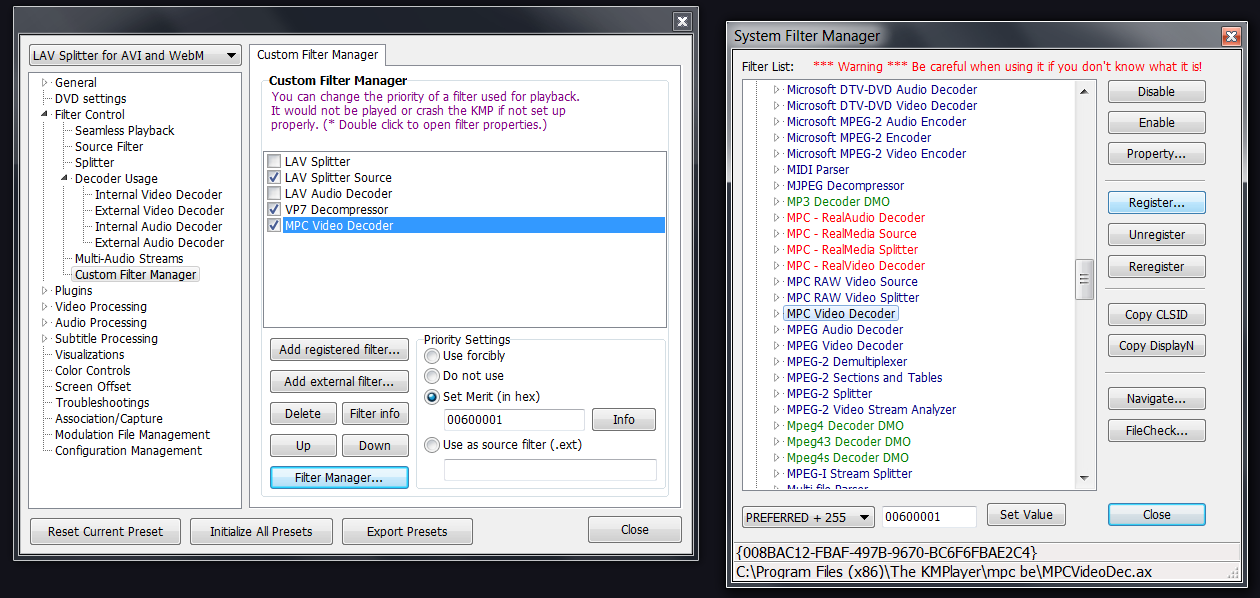
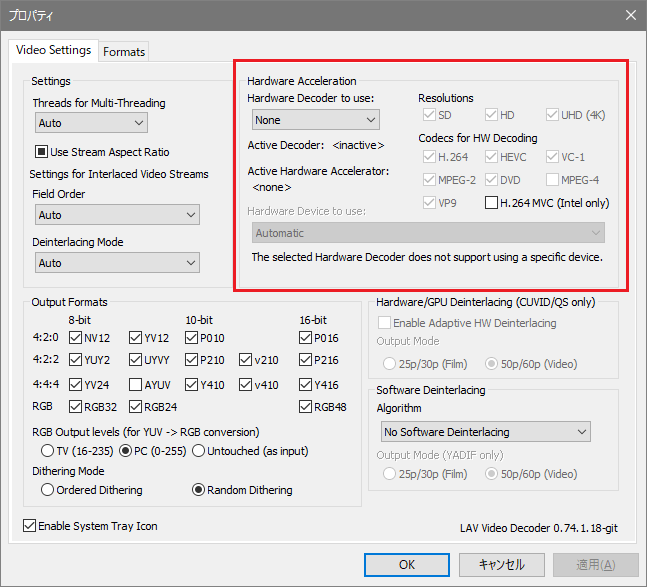
Посмотрим на некоторые настройки, но судя по их количеству и названиям — в этом точно нужно разбираться. Поэтому просто так настройки лучше не менять. Вот окно Свойства, вкладка Video Settings:
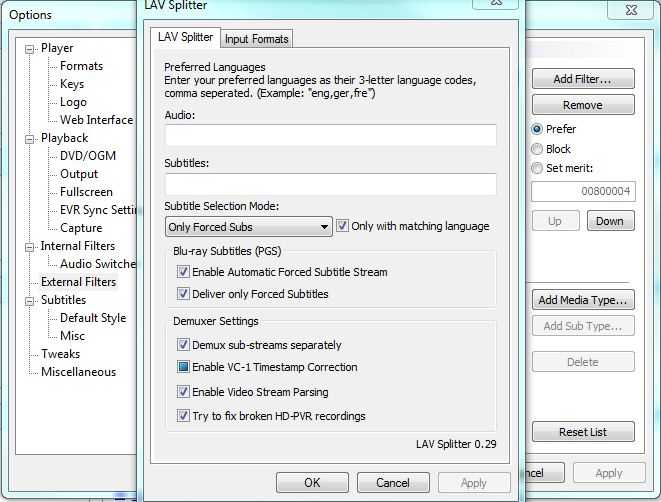
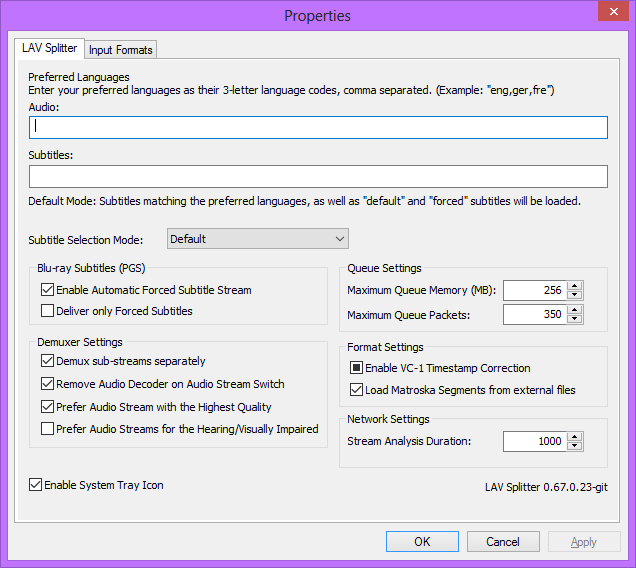
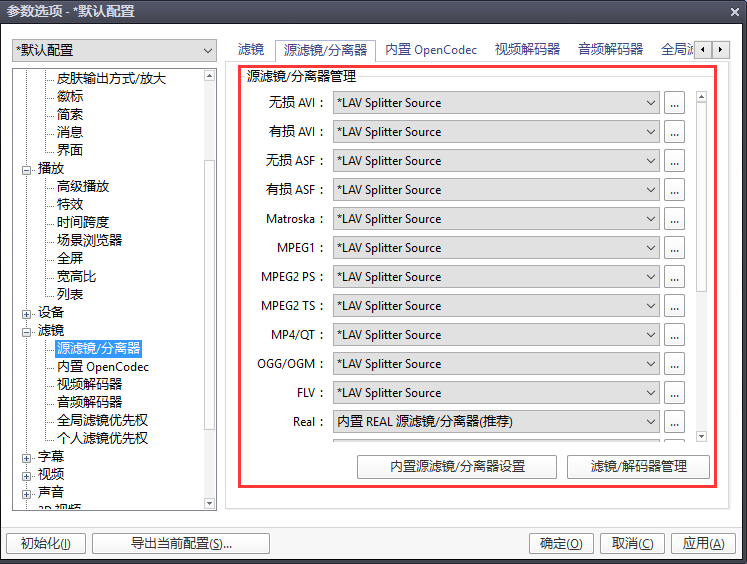
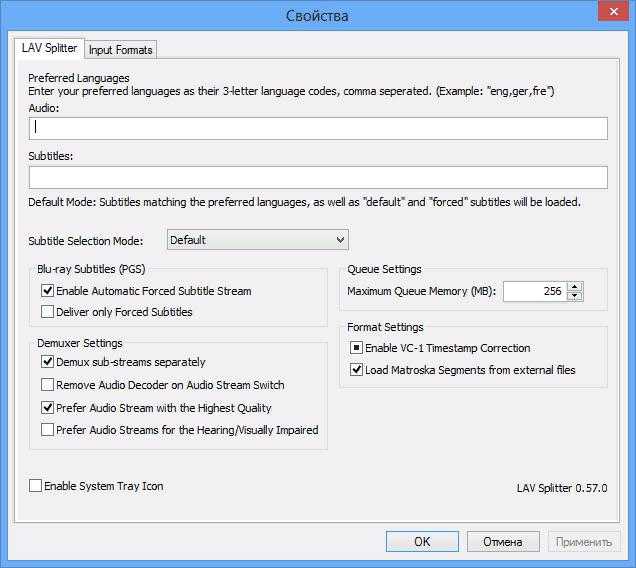
Вкладка Lav Splitter:
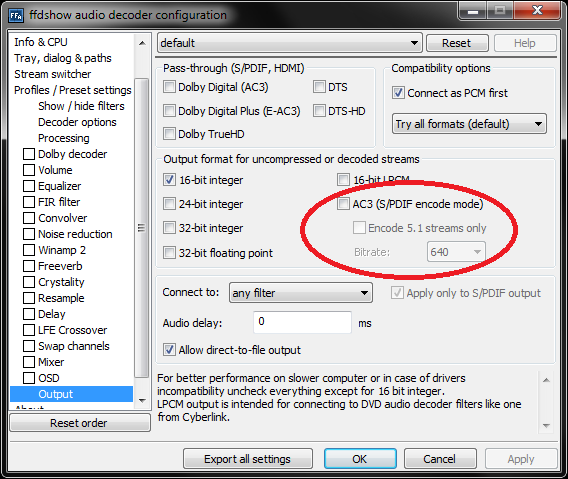
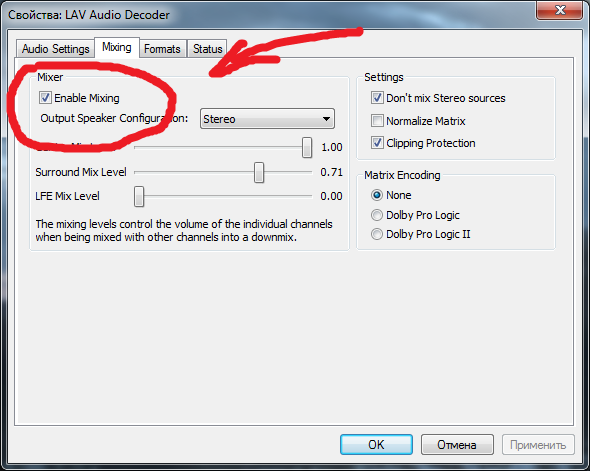
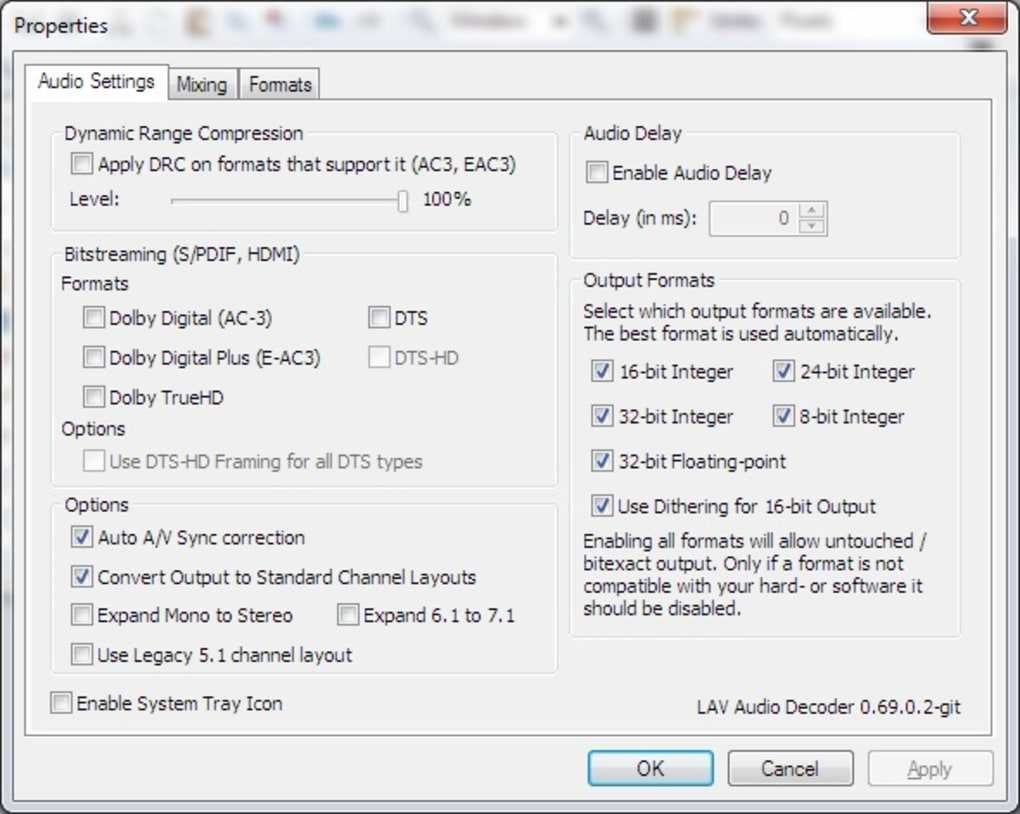
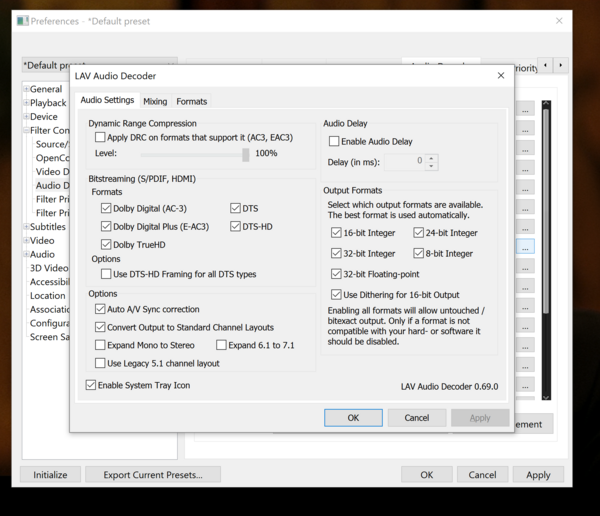
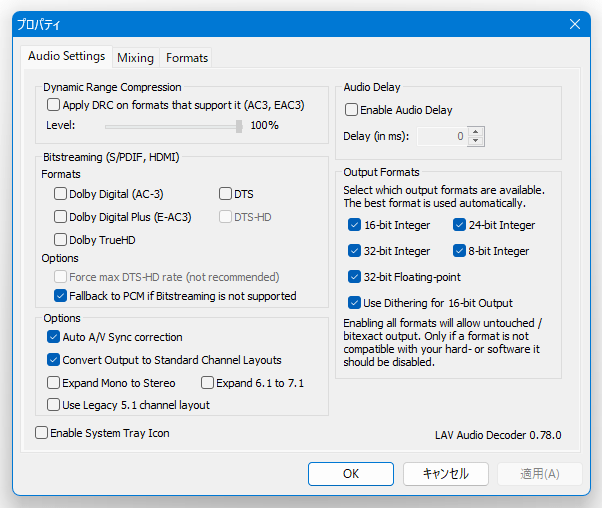
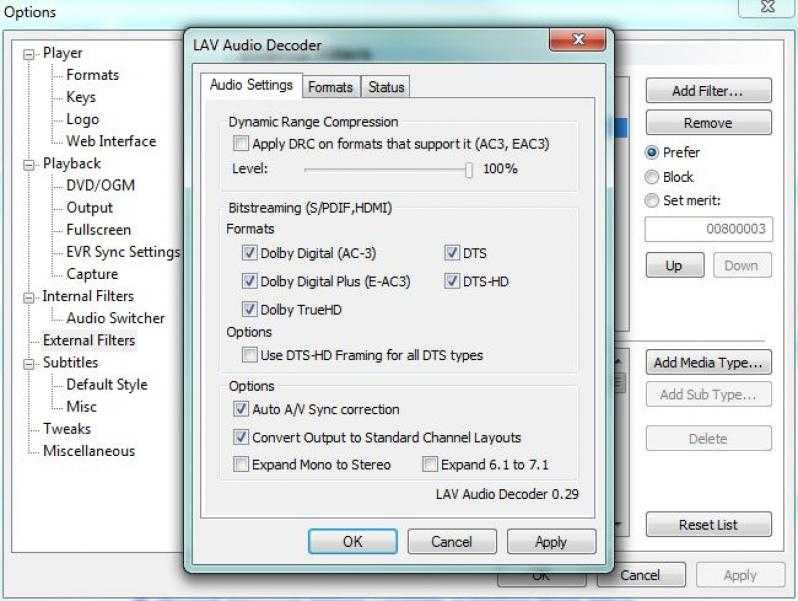
Настройки аудио — вкладка Audio Settings:
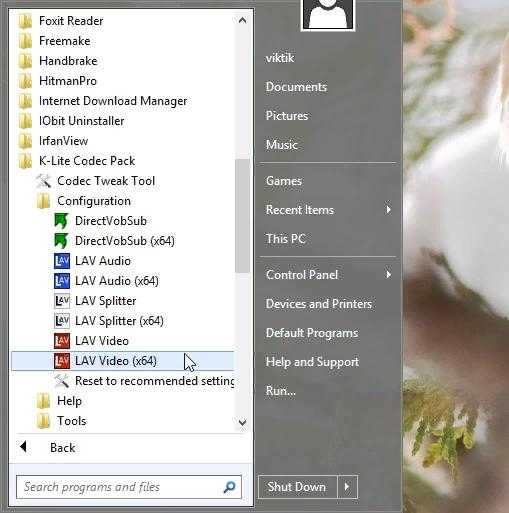
Такс, а что еще интересно, так это то.. что походу LAV Filters уже может быть включен в кодек пак K-Lite Codec Pack Full, собственно как и DirectVobSub (это фильтр, служащий для воспроизведения субтитров):
LAV Filters — удалять или нет?
- Как уже было сказано — если нет прямой необходимости то удалять не нужно.
- Либо можете удалить, но сперва создайте точку восстановления на всякий пожарный.
- Если у вас современное железо, и вы заметили, что некоторые фильмы подтормаживают, то вам совет: удалите LAV Filters, почистите систему CCleaner, после — установите бесплатный полный пак кодеков K-Lite Codec Pack Full. Это всевозможные кодеки, там все что нужно для проигрывания всевозможных форматов видео и аудио.
LAV Filters — как удалить?
- Зажмите Win + R, напишите команду appwiz.cpl, нажмите ОК.
- Откроется окошко со списком установленного софта.
- Найдите здесь LAV Filters, нажмите правой кнопкой, выберите Удалить.
- Следуйте подсказкам на экране. Обычно нужно нажимать Далее/Next/Удалить/Uninstall.
Если вы продвинутый юзер, то для удаления можете использовать специальные удаляторы — Revo Uninstaller или Uninstall Tool. Первый качественнее, второй попроще.
Заключение
- LAV Filters — компонент для воспроизведения видео. Что-то вроде пака кодеков. Может работать лучше чем другие или хуже, здесь нужно тестировать, экспериментировать.
- При необходимости можно удалить, но при этом нужно потом установить альтернативу, я рекомендую только K-Lite Codec Pack Full.
- Прога может быть включена в состав K-Lite Codec Pack Full, тогда ее удалять нет смысла. Ее наличие на ПК — нормально явление, так должно быть, чтобы удалить LAV Filters, придется удалить полностью K-Lite Codec Pack Full.
Удачи и добра, до новых встреч господа!
Access Special Symbols Quick
The Windows 10 on-screen keyboard. (Credit: PCMag)
Using 26 letters and 10 numerals and a few pieces of punctuation—that’s so old-school. We live in the emoji world now. So how do you put those fun little icons into your text when typing in Windows? The pop-up keyboard. It’s typically meant for use when in tablet mode, but it’s easy to access even when you’re using Windows 10 or 11 with a regular keyboard.
In Windows 10, right-click the Taskbar in a blank area, and select Show touch keyboard button. An icon of a little keyboard will appear next to the clock in the taskbar. Tap it anytime with the mouse cursor to bring up the on-screen keyboard; tap any key on your IRL keyboard to dismiss it from the screen. Click the extra keyboard icon at the top left to access various layout options, including a split keyboard and a stylus pad.
Recommended by Our Editors
PC on the Fritz? How to Factory Reset a Windows Computer
How to Free Up Disk Space in Windows
Go Away: 6 Easy Ways to Uninstall Programs in Windows
For Windows 11 users, right-click the taskbar to access Taskbar Settings. Toggle on the Touch Keyboard to get a permanent keyboard icon in the system tray.
You now have access to emoji and special characters like the em dash or degrees symbol (°). If you can’t find them, that’s because you first have to hit the &123 key to switch to symbols. Then, like on a smartphone, hold down your cursor on the main key to get some special symbols—hold down the hyphen to get em dash and en dash; hold down on equals (=) to get non-equals (≠), etc. Same goes for the letters to get variations, such as accent symbols over the letters. Voilà!
Click the smiley key to access the full suite of standard smartphone-style emoji, rendered in Microsoft’s extra-colorful design. You can scroll left/right to see even more in each category. Windows 11 users get access to even more, including animated GIFs.
This on-screen keyboard also offers quick access to the enhanced clipboard, which holds multiple items you’ve cut or copied, and speech-to-text typing (or you can just type Windows Key+V to access the scrollable list).
Adding Unified Write Filter Exclusions on Windows 10
If you need to force a modified file to be saved to disk while the UWF filter is enabled, you need to run the command:
Now the file won’t be deleted even if you restart Windows.
To completely remove a file with UWF enabled, use the command:
Similar UWF commands for the registry:
You can add certain files, directories or registry keys to the list of UWF exclusions. The changes you make to these items will be written directly to the disk, and not to the overlay.
To add a specific file or folder to exclusions, run the following command:
Or:
To add an exclusion for the registry key:
You must restart your computer to apply new exclusion list.
To list the exclusions of a UWF filter, run the command:
To remove a file from exclusions:
You cannot add exclusions for some system files or folders, like:
- Registry files in \Windows\System32\config\;
- Root of the volumes;
- \Windows, \Windows\System32, \Windows\System32\Drivers;
- Pagefile.sys, swapfile.sys;
- Etc.
Note. UWF cannot be used to protect data on flash drives and external USB devices. It seems enabling write filter for Removable disk types is not supported at the software level. However, you can bypass this restriction with the trick from article Removable USB drive as fixed disk in Windows.
![Lav filters 0.57 [2013, кодеки и декодеры]](https://vvk-yar.ru/wp-content/uploads/6/1/d/61d912a6713f7719f07c445aa82903c8.jpeg)

To make some services work correctly, you have to add paths to their directories, files and registry keys to the exclusion list. I’ve collected typical exclusions for some Windows subsystems below:
Exclusions for BITS:
- % ALLUSERSPROFILE%\Microsoft\Network\Downloader
- HKEY_LOCAL_MACHINE\Software\Microsoft\Windows\CurrentVersion\BITS\StateIndex
Exclusions for the correct work in wireless networks (these exceptions will allow you to connect to Wi-Fi networks and save WLAN profiles):
- HKEY_LOCAL_MACHINE\SOFTWARE\Policies\Microsoft\Windows\Wireless\GPTWirelessPolicy
- C:\Windows\wlansvc\Policies
- HKEY_LOCAL_MACHINE\SOFTWARE\Microsoft\wlansvc
- C:\ProgramData\Microsoft\wlansvc\Profiles\Interfaces\{<Interface GUID>}\{<Profile GUID>}.xml
- HKEY_LOCAL_MACHINE\SYSTEM\CurrentControlSet\services\Wlansvc
- HKEY_LOCAL_MACHINE\SYSTEM\CurrentControlSet\services\WwanSvc
Exclusions for the correct work in wired networks:
- HKEY_LOCAL_MACHINE\SOFTWARE\Policies\Microsoft\Windows\WiredL2\GP_Policy
- C:\Windows\dot2svc\Policies
- HKEY_LOCAL_MACHINE\SOFTWARE\Microsoft\dot3svc
- C:\ProgramData\Microsoft\dot3svc\Profiles\Interfaces\{<Interface GUID>}\{<Profile GUID>}.xml
- HKEY_LOCAL_MACHINE\SYSTEM\CurrentControlSet\services\dot3svc
Exclusions for Windows Defender
- C:\Program Files\Windows Defender
- C:\ProgramData\Microsoft\Windows Defender
- C:\Windows\WindowsUpdate.log
- C:\Windows\Temp\MpCmdRun.log
- HKEY_LOCAL_MACHINE\SOFTWARE\Microsoft\Windows Defender
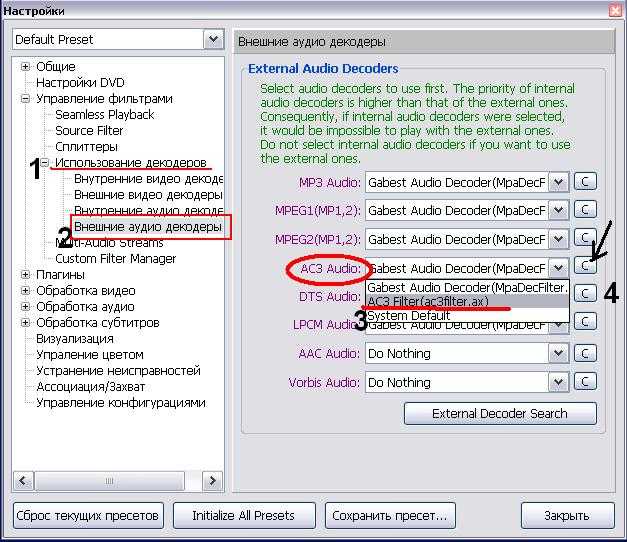
Как отключить аудиодекодер LAV?
LAV Filters (ранее LAVFSplitter) — это набор медиа-сплиттеров DirectShow и аудио/видео декодеры, позволяющие воспроизводить широкий спектр медиаформатов. . Пакет фильтров LAV содержит аудиодекодер, видеодекодер и мультиформатный разделитель мультимедиа, которые каждый раз работают вместе для беспроблемного воспроизведения.
Что такое Lav audio?
LAV Audio — это многоформатный аудиодекодер для DirectShow. Он основан на ffmpeg, и его основная цель — предложить качество звука без компромиссов. Это означает, что не использовались ярлыки, углы не срезались, все настроено для обеспечения наилучшего качества.
Что такое Lav на моем компьютере?
LAV Splitter — это мультиформатный разделитель мультимедиа для DirectShow. Он основан на ffmpeg и libbluray и призван предложить универсальное решение для идеального воспроизведения файловых мультимедиа, а также Blu-ray.
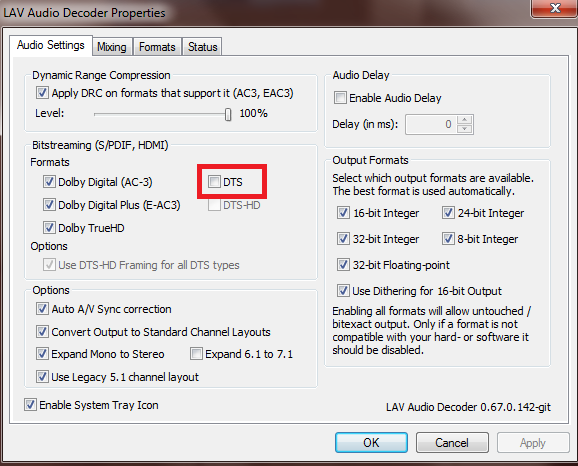
Как мне избавиться от звука LAV?
- Щелкните Пуск> Панель управления> Установка и удаление программ.
- Найдите в списке программ «Установка и удаление программ», нажмите кнопку «Удалить».
- Завершите процесс снятия с помощью направляющих.
Безопасны ли фильтры LAV?
Безопасны ли фильтры LAV? LAV Filters протестировали чистоту. Тестирование файла LAVFilters-0.75-Installer.exe было завершено 31 марта 2021 года. . Антивирусные программы, которые мы использовали для тестирования этого файла, показали, что он не содержит вредоносных программ, шпионского ПО, троянов, червей и других типов вирусов. .
LAV-видео — это вирус?
Лав фильтры не являются вредоносным ПО. Это пакет медиа-сплиттера / кодека, который, вероятно, был установлен с каким-либо приложением для медиаплеера.
Куда вы ставите фильтры LAV?
- Загрузите LAVFilters-x.y.z-Installer.exe в папку, созданную в (C: \ Downloads)
- Откройте командную строку с повышенными привилегиями, щелкнув правой кнопкой мыши командную строку и выбрав «Запуск от имени администратора».
- Перейдите в папку C: \ Downloads.
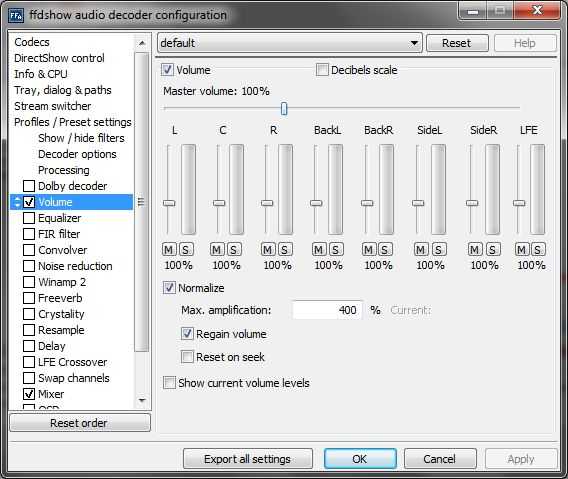
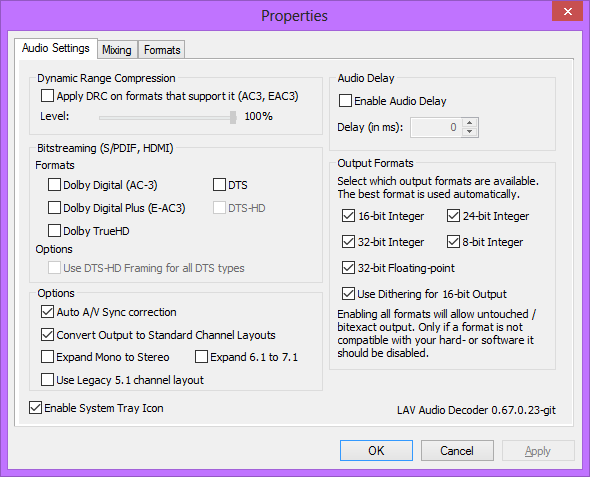
Что такое конфигурация аудио Lav?
Что такое конфигурация аудио Lav? Включенная вами настройка: для потоковой передачи. То есть отправить сжатый звук на внешнее устройство (приемник) для декодирования, а не декодировать его на компьютере. Вы можете найти ярлык в меню «Пуск» для доступа к настройкам LAV Audio decoder….
Откуда появились фильтры LAV?
В то время как около 35% пользователей фильтров LAV происходят из Соединенные Штаты, он также популярен в Германии и Нидерландах.
Что такое фильтры LAV?
Фильтры LAV набор фильтров DirectShow с открытым исходным кодом который выполняет этот перевод для всех популярных аудио- и видеоформатов и состоит из: LAV Splitter: фильтр источника / разделителя, необходимый для демультиплексирования видеофайлов в их отдельные элементарные потоки.
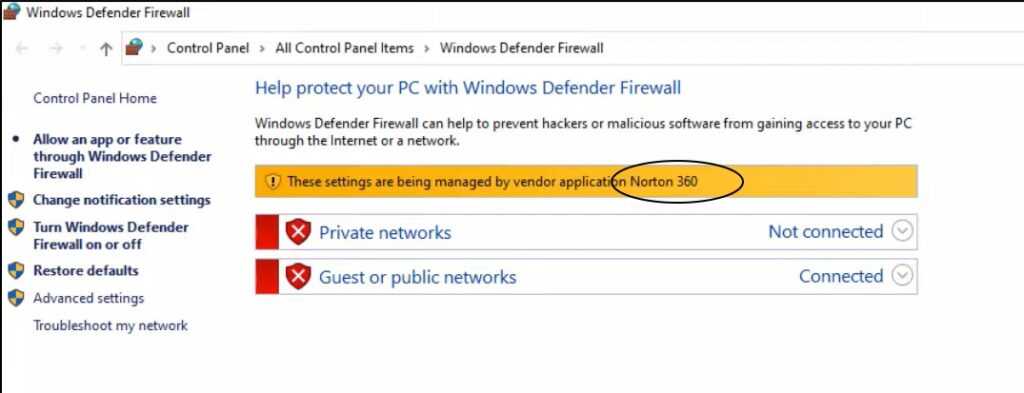
Why do I get “These settings are being managed by vendor application” Message?
As I said at the beginning of this guide, We saw bunch of users on forums complaining that they get this message when they try to turn on Windows firewall or Windows security (known as defender before).
So we did some check in to see why this error coming up.
The main reason for this error is having another antivirus/firewall software installed on the same computer.
Since Windows firewall and Windows security software are preinstalled with Windows, the third party firewall/antivirus software turn them off to avoid software conflicts.
You can see which firewall/antivirus software cause the issue by seeing the message (see the image below).