
How to deal with a Git merge conflict
When multiple people are working with the same files, you’re going to encounter merge conflicts. When a conflict occurs, Git modifies your local files and it is up to you to manually fix the files with the conflicts.
Tip
Use the git status command to see the status and merge conflict information.
Open the file with the conflict to start correcting the errors. In the example file below, we had a text file with one line of text and in the local repository we added the text «update1» to the file. However, during the same time, the remote repository file was modified and added «update2» to the file on the same line. Git marks conflicts with «<<<<<<< HEAD» for lines in the current branch and everything after «=======» as the remote changes followed by «>>>>>>> < hash >» to mark the end.
Another file that is uploaded in-between pulls.
<<<<<<< HEAD
update1
=======
update2
>>>>>>> 62ee0eeba2e5b94d10574c1a6a68216e9b392e4c
To resolve this merge conflict, we would need to decide what text we wanted to keep, update, or remove. In this example, we want to keep «update1» and «update2» in the order they’re listed so we would only need to remove the Git markings to make the file resemble the following example.
Another file that is uploaded in-between pulls.
update1
update2
Note
If you’re working with a big file, it’s a good idea to search the file for «HEAD» because there may be more than one conflict.
Once the changes are made in the file, we could save the file and then perform the following git commands to update the fixes.
git add .
git commit -m "Fixed the merge conflict"
git push origin master
The example given in this merge conflict is a basic example. When dealing with a file with more than a few lines of text or big sections of code, a merge conflict can get more confusing. To make it easier to deal with merge conflicts, you can use the command git mergetool to use a merge tool, such as WinMerge or another popular merge tool.
The Detached HEAD State
The HEAD pointer in Git determines your current working revision (and thereby the files that are placed in your project’s working directory). Normally, when checking out a branch, Git automatically moves the HEAD pointer along when you create new commits: you’re automatically and always on the newest commit of the chosen branch.
When you instead choose to check out a specific commit hash, Git will NOT do this for you. This means that when you make changes and commit them, these changes do NOT belong to any branch.
The consequence is that these changes can easily get lost once you check out a different revision or branch: not being recorded in the context of a branch, you lack the possibility to access that state easily.
To make a long story short: be very careful when checking out a specific commit instead of a branch (and make sure this is really what you want and need).
Тестирование и отладка функционала
После установки мед хелпер Аризона РП, рекомендуется выполнить тестирование и отладку функционала, чтобы убедиться в его правильной работе. Вот несколько шагов, которые помогут вам выполнить этот процесс:
1. Проверьте доступность мед хелпера.
Убедитесь, что мед хелпер Аризона РП доступен и запускается без ошибок. Если при запуске возникают проблемы, проверьте правильность установки и наличие необходимых зависимостей.
2. Проверьте работу основных функций.
Протестируйте основные функции мед хелпера, такие как создание нового пациента, поиск по базе данных, добавление новой записи и т. д. Убедитесь, что все функции работают правильно и соответствуют ожидаемому поведению.
3. Проверьте работу в разных сценариях.
Протестируйте работу мед хелпера в различных сценариях использования. Например, проверьте, как хорошо он работает при одновременном использовании несколькими пользователями, или при обработке больших объемов данных. Убедитесь, что функционал остается стабильным и эффективным во всех таких сценариях.
4. Отслеживайте и исправляйте ошибки.
В процессе тестирования могут быть обнаружены ошибки в функционале мед хелпера. Отслеживайте эти ошибки и исправляйте их как можно скорее
Также обратите внимание на сообщения об ошибках пользователей и проблемы с производительностью, и реагируйте на них незамедлительно
Тестирование и отладка функционала мед хелпера Аризона РП помогут убедиться в его правильной работе и готовности к использованию. Выполните эти шаги, чтобы убедиться в его надежности и стабильности.
Connecting to a Remote Repository
You need a GitHub username and password for this next step.
Create a Test Directory
Open a Windows PowerShell interface by pressing Windows Key + x, and then i once the menu appears.
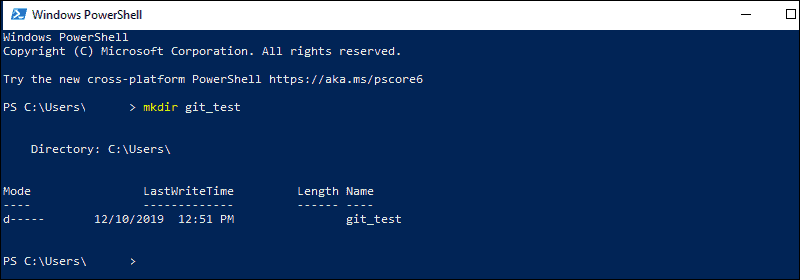
Create a new test directory (folder) by entering the following:
An example of the PowerShell output.
Change your location to the newly created directory:
Note: If you already have a GitHub repository, use the name of that project instead of git_test.
Clone a GitHub Repository
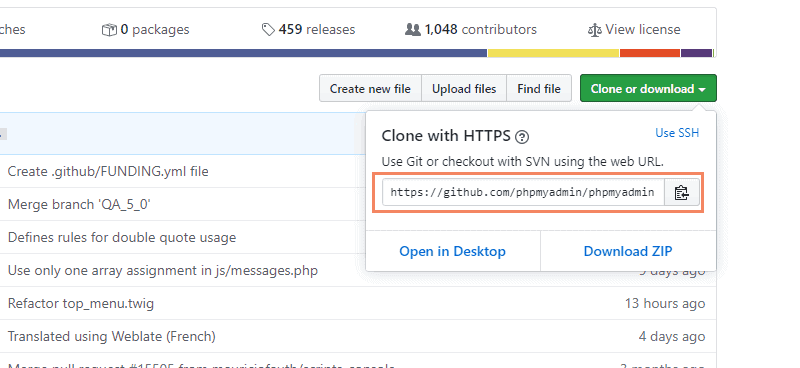
Go to your repository on GitHub. In the top right above the list of files, open the Clone or download drop-down menu. Copy the URL for cloning over HTTPS.
Switch to your PowerShell window, and enter the following:
Important: In the example above, the command will clone the repository over HTTPS. Another option is cloning with SSH URLs. For that option to work, you must generate an SSH key pair on your Windows workstation and assign the public key to your GitHub account.
List Remote Repositories
Your working directory should now have a copy of the repository from GitHub. It should contain a directory with the name of the project. Change to the directory:
Note: Replace git_project with the actual name of the repository you downloaded. If it’s not working, you can list the contents of the current directory with the command. This is helpful if you don’t know the exact name or need to check your spelling.
Once you’re in the sub-directory, list the remote repositories:
Pushing Local Files to the Remote Repository
Once you’ve done some work on the project, you may want to submit those changes to the remote project on GitHub.
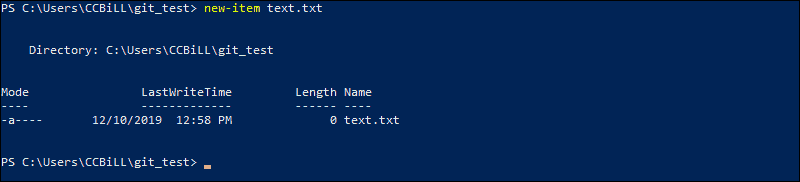
1. For example, create a new text file by entering the following into your PowerShell window:
2. Confirmation that the new file is created.
3. Now check the status of your new Git branch and untracked files:
4. Add your new file to the local project:
5. Run git status again to make sure the text.txt file has been added. Next, commit the changes to the local project:
6. Finally, push the changes to the remote GitHub repository:
You may need to enter your username and password for GitHub.
Note: You can remove a remote repository if the need for it no longer exists. To learn how, visit our guide How to Remove a Git Remote.


![Git pull command examples [5 methods] | golinuxcloud](https://vvk-yar.ru/wp-content/uploads/b/9/8/b9807a13b11c0bc56fc91325f6a2fd5c.jpeg)


Conclusion
You now have a working installation of Git on your Windows system. After installing Git on your Windows, you might find helpful how to update Git. Use Git’s features to coordinate work among programmers on a project.
For Linux and MacOS installation guides, check out our articles on installing Git on Ubuntu, CentOS and MacOS.
Step 7: Push a branch to GitHub
Now we’ll push the commit in your branch to your new GitHub repo. This allows other people to see the changes you’ve made. If they’re approved by the repository’s owner, the changes can then be merged into the primary branch.
To push changes onto a new branch on GitHub, you’ll want to run git push origin yourbranchname. GitHub will automatically create the branch for you on the remote repository:
You might be wondering what that «origin» word means in the command above. What happens is that when you clone a remote repository to your local machine, git creates an alias for you. In nearly all cases this alias is called «origin.» It’s essentially shorthand for the remote repository’s URL. So, to push your changes to the remote repository, you could’ve used either the command: git push git@github.com:git/git.git yourbranchname or git push origin yourbranchname
(If this is your first time using GitHub locally, it might prompt you to log in with your GitHub username and password.)
If you refresh the GitHub page, you’ll see note saying a branch with your name has just been pushed into the repository. You can also click the ‘branches’ link to see your branch listed there.

Now click the green button in the screenshot above. We’re going to make a pull request!
Creating a Git branch
Creating a branch lets you create a duplicate of the master (trunk) and make several updates without affecting the master. For example, when developing a program if a big fix was need that could take weeks or months, a branch could be created for that fix. Once you’ve fixed the bug, you could merge your branch back into the master.
To create a branch in your local repository, follow the steps below.
- In the Git master directory, type the following command, where «<New Branch>» is the name of the new branch name. For example, we could call the branch «examplebranch».
git branch <New Branch>
- Next, type the following command to switch to the branch.
git checkout <Branch Name>
- After entering the above command, the prompt (in Git Bash) changes from «master» to the branch name to indicate you’re working in a branch.
- From this point, you can continue to use Git and modify the files how you have in the past.
- To see all available branches, you can use the git branch command. For example, typing git branch displays your local repository branches. Typing git branch -a displays all local and remote repositories.
- If you need to push the branch to the remote repository, you can run the following command.
git push --set-upstream origin <Branch Name>
- Finally, if you need to switch back to the master branch, you can type the following command.
git checkout master
Управление базой данных в МВД хелпер
МВД хелпер для полиции Аризона РП предоставляет возможность управлять базой данных, что является важным инструментом для эффективной работы полицейских. В данной статье мы рассмотрим основные возможности управления базой данных в МВД хелпере.
1. Добавление записей в базу данных:
- Перейдите в раздел «Управление базой данных» в главном меню МВД хелпера.
- Выберите нужную таблицу, в которую необходимо добавить запись.
- Нажмите на кнопку «Добавить запись».
- Заполните необходимые поля.
- Нажмите на кнопку «Сохранить» для добавления записи в базу данных.
2. Редактирование записей в базе данных:
- Перейдите в раздел «Управление базой данных» в главном меню МВД хелпера.
- Выберите нужную таблицу, в которой необходимо отредактировать запись.
- Найдите запись, которую нужно отредактировать.
- Нажмите на кнопку «Редактировать» рядом с выбранной записью.
- Внесите необходимые изменения в поля записи.
- Нажмите на кнопку «Сохранить» для сохранения изменений в базе данных.
3. Удаление записей из базы данных:
- Перейдите в раздел «Управление базой данных» в главном меню МВД хелпера.
- Выберите нужную таблицу, из которой нужно удалить запись.
- Найдите запись, которую нужно удалить.
- Нажмите на кнопку «Удалить» рядом с выбранной записью.
- Подтвердите удаление записи в появившемся окне.
4. Поиск записей в базе данных:
- Перейдите в раздел «Управление базой данных» в главном меню МВД хелпера.
- Выберите нужную таблицу, в которой будет производиться поиск.
- Нажмите на кнопку «Поиск» или воспользуйтесь поиском по ключевому слову.
- Введите ключевое слово для поиска.
- Нажмите на кнопку «Найти» для выполнения поиска.
- Результаты поиска будут отображены в таблице.
5. Фильтрация записей в базе данных:
- Перейдите в раздел «Управление базой данных» в главном меню МВД хелпера.
- Выберите нужную таблицу, в которой будет производиться фильтрация.
- Выберите поле и условие фильтрации.
- Введите значение для фильтрации.
- Нажмите на кнопку «Применить фильтр» для отображения отфильтрованных записей в таблице.
Управление базой данных в МВД хелпере предоставляет широкие возможности для эффективной работы с информацией. Используя описанные выше функции, вы сможете управлять базой данных, добавлять, редактировать, удалять записи, а также выполнять поиск и фильтрацию данных.
Подготовка к установке МВД хелпер для полиции Аризона РП
Перед установкой МВД хелпера для полиции Аризона РП необходимо выполнить несколько предварительных шагов, чтобы гарантировать успешную установку и корректную работу плагина. В этом разделе руководства мы рассмотрим необходимые подготовительные меры.
-
Установка FiveM
Прежде чем установить МВД хелпер, вам потребуется установить клиент FiveM. FiveM — это модификация для популярной игры Grand Theft Auto V, которая позволяет запускать собственные игровые серверы с модами и плагинами, такими как МВД хелпер.
Вы можете найти официальный клиент FiveM на официальном сайте разработчиков. Следуйте инструкциям на сайте, чтобы скачать и установить клиент FiveM на свой компьютер.
-
Получение ресурсов МВД хелпера
После установки клиента FiveM вам нужно получить ресурсы МВД хелпера для полиции Аризона РП. Ресурсы — это файлы, необходимые для работы плагина.
Обычно ресурсы МВД хелпера предоставляются в виде архива. Скачайте архив с ресурсами МВД хелпера с официального сайта или другого источника.
После скачивания архива распакуйте его в удобное для вас место на компьютере.
-
Установка ресурсов МВД хелпера
Теперь, когда у вас есть ресурсы МВД хелпера, вы готовы установить их на свой сервер FiveM.
Откройте папку с установленным клиентом FiveM на вашем компьютере. Обычно она находится в папке с программами или на рабочем столе.
Найдите папку «resources», откройте ее и перенесите все файлы и папки из архива МВД хелпера в папку «resources».
-
Изменение конфигурации сервера
Для корректной работы МВД хелпера вам может потребоваться изменить некоторые настройки сервера FiveM.
Откройте файл конфигурации сервера FiveM. Обычно он называется «server.cfg» и находится в папке с клиентом FiveM или его подпапках.
Проверьте, что в файле конфигурации присутствуют следующие строки:
start chat
start mapmanager
start spawnmanager
Если эти строки отсутствуют, добавьте их в конец файла.
Сохраните файл конфигурации сервера.
-
Запуск сервера и проверка работы МВД хелпера
Теперь вы готовы запустить свой сервер FiveM и проверить работу МВД хелпера для полиции Аризона РП.
Запустите клиент FiveM на вашем компьютере.
В меню клиента выберите «Запустить сервер» и дождитесь загрузки.
После загрузки сервера откройте игру Grand Theft Auto V и подключитесь к вашему серверу.
В игре откройте окно чата и проверьте, появились ли команды и функционал МВД хелпера для полиции Аризона РП.
Вы успешно подготовились к установке МВД хелпера для полиции Аризона РП! Приступайте к следующему разделу, чтобы узнать, как настроить МВД хелпер для полиции Аризона РП.
GITHUB
GitHub — веб-сервис, который основан на системе Git. Это такая социальная сеть для разработчиков, которая помогает удобно вести коллективную разработку IT-проектов. Здесь можно публиковать и редактировать свой код, комментировать чужие наработки, следить за новостями других пользователей. Именно в GitHub работаем мы, команда Академии, и студенты интенсивов.


Чтобы начать работу с GitHub, нужно зарегистрироваться на сайте, если вы ещё этого не сделали.
После того как у вас будет создан аккаунт в Github можно будет начать полноценно работать с ним.
Копирование репозитория Git в локальную папку
Для начала определим, что такое репозиторий. Это рабочая директория с вашим проектом. По сути, это та же папка с HTML, CSS, JavaScript и прочими файлами, что хранится у вас на компьютере, но находится на сервере GitHub. Поэтому вы можете работать с проектом удалённо на любой машине, не переживая, что какие-то из ваших файлов потеряются — все данные будут в репозитории при условии, что вы их туда отправите. Но об этом позже.
Копировать или клонировать репу c GitHub можно по HTTPS или SSH.
Команда для копирования репозитория:
После клонирования переходим в папку репозитория:
Смотрим статус:
Добавление данных в Git или коммит (commit)
Создаем файл с текстом:
Смотрим статус:
Видим, что у нас есть файл готовый для загрузки в Git, добавляем его в репозиторий:
Снова смотрим статус, видим что у нас появился новый файл example.txt, добавляем данный файл в репозиторий используя git commit:
Отправка данных в онлайн Git репозиторий
Отправить данные в репу можно используя команду git push:
После ввода аутентификационных данных, произойдет отправка в онлайн репозиторий, после чего можно обновить страницу на GitHub дабы убедиться в том, что новый файл добавлен в него (репозиторий).
Check for existing SSH keys
To connect using the SSH protocol, you need an SSH key pair (one private and the other public). If you have never used SSH, you can safely skip this topic and move on to the next. If you have ever used SSH (for instance, to remotely access a server), probably you already have an SSH key pair, in which case you don’t need to generate a new key pair.
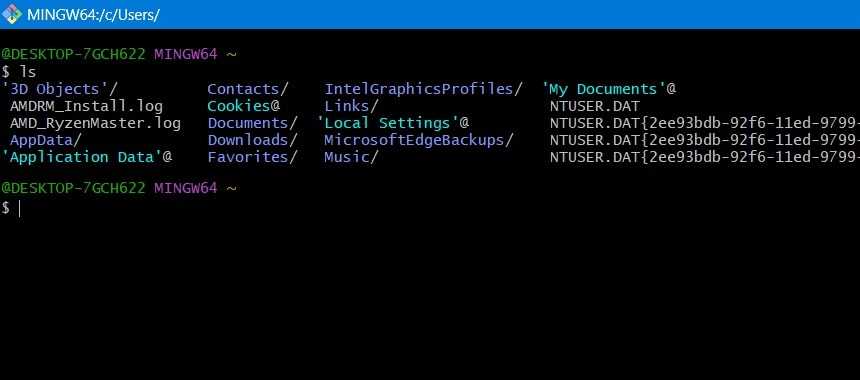
To see if existing SSH keys are present, run:
That command should list the contents of the folder, in which the SSH client stores its configuration files:
If you receive an error that there is no directory or there are no files in it, don’t worry: it means you haven’t created an SSH key pair yet. If that is the case, proceed to the next topic.
By default, public SSH keys are named:
- id_dsa.pub;
- id_ecdsa.pub;
- id_ed25519.pub; or
- id_rsa.pub.
Inside my folder, I have an SSH key pair ( is the public key and is the private key) created a year ago ().
For security reasons, it is recommended that you generate a new SSH key pair at least once a year. If you already have an SSH key pair that was created more than a year ago, it is recommended that you proceed to the next topic.
If you already have an SSH key pair and want to reuse it, you can skip the next topic.
Основные функции и возможности программы
Медикал Хелпер Аризона — это программное обеспечение, предназначенное для автоматизации деятельности медицинских учреждений в штате Аризона. Приложение обладает рядом полезных функций, которые облегчают работу врачей, медсестер и других медицинских специалистов.
- Учет пациентов: Медикал Хелпер Аризона позволяет вести учет пациентов, включая их личные данные, диагнозы, анализы, историю болезни и другую необходимую информацию. Благодаря данной функции врачи и медсестры могут легко найти нужную информацию о пациенте и вести эффективное лечение.
- Терминология и медицинская документация: Программа содержит полную базу терминологии и медицинских документов, что помогает унифицировать работу врачей и обеспечивает единый подход к документации. Это значительно сокращает время, затрачиваемое на составление и обработку медицинских документов.
- Управление лекарствами и назначениями: Врачи могут быстро и удобно создавать назначения пациентам в соответствии с их диагнозом. Система отслеживает все лекарства, назначенные пациенту, и предоставляет информацию о дозировке, сроках применения и возможных побочных эффектах. Это помогает предотвратить ошибки и повысить безопасность пациентов.
- Расписание приемов: Медикал Хелпер Аризона позволяет планировать рабочий график врачей, медсестер и других медицинских специалистов. Также можно записывать пациентов на приемы и вести учет занятости каждого специалиста. Это помогает избежать перегрузок и улучшает организацию работы в медицинском учреждении.
- Счета и платежи: Программа позволяет вести учет счетов и оплаты услуг. Врачи и администрация медицинских учреждений могут легко отслеживать финансовую сторону деятельности и вносить необходимые изменения для оптимизации процессов.
Это лишь некоторые из основных функций и возможностей программы Медикал Хелпер Аризона. Приложение помогает упростить и автоматизировать множество рутинных задач, связанных с оказанием медицинской помощи и выполнением административных процедур. Оно позволяет сэкономить время и усилия медицинского персонала, а также повысить качество обслуживания пациентов.
Регистрация в системе
Шаг 2: Заполнение формы регистрации
На главной странице сайта вы увидите кнопку «Зарегистрироваться». Нажмите на нее и перейдите на страницу регистрации. Заполните форму регистрации, в которую входят: имя, фамилия, адрес, электронная почта, пароль. Убедитесь, что введенная информация верна.
Шаг 3: Подтверждение электронной почты
После заполнения формы регистрации вы получите письмо на указанный вами электронный адрес. Откройте письмо и нажмите на ссылку для подтверждения электронной почты. Теперь вы можете войти в систему Medical Helper под своим логином и паролем.
Шаг 4: Завершение регистрации
Перейдите на главную страницу системы Medical Helper и войдите в свой аккаунт. Заполните необходимую информацию, чтобы система могла работать корректно. Поздравляем, вы успешно зарегистрировались в системе Medical Helper!
Установка GIT
Если вы ранее не работали с GIT, то для начала его нужно установить. В зависимости от системы нужно выбрать свой вариант
Установка GIT в Linux (Ubuntu)
В зависимости от вашего дистрибутива Linux требуется установить через консоль, например в убунту эта команда будет иметь следующий вид:
Команды для других дистрибутивов можно посмотреть здесь.
Установка на macOS
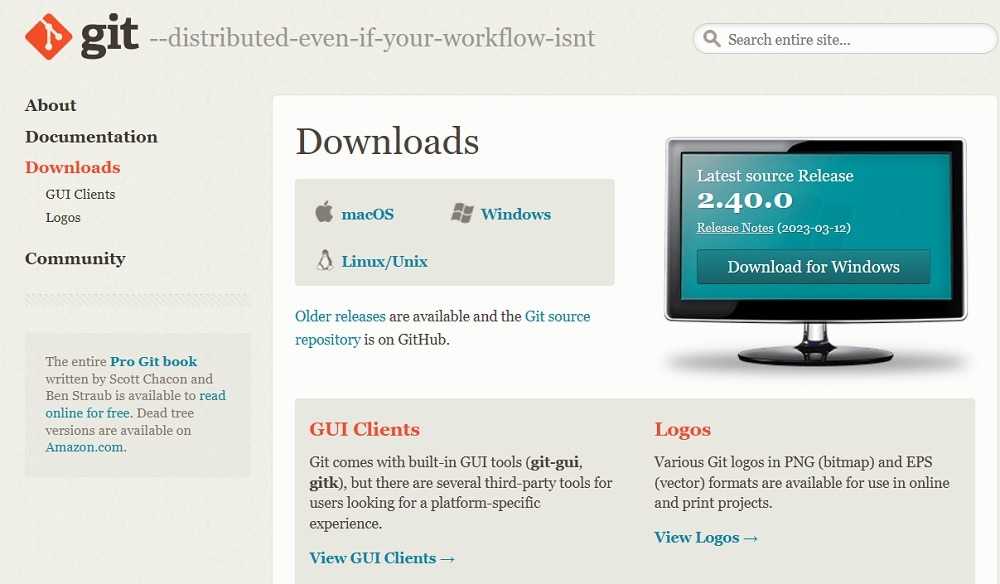
- Скачиваем Git со страницы проекта.
- Запускаем загруженный файл.
- Система может показать окно с ошибкой, где будет написано, что файл скачан с неавторизованного сайта и инсталлятор не может быть запущен. В таком случае нужно зайти в «Системные настройки» — «Безопасность» (Security and Privacy), в появившемся окне будет сообщение об ошибке и кнопка Open anyway (Всё равно открыть). Нажимаем.
- Система покажет окно, уточняющее хотите ли вы запустить установку. Подтверждаем действие.
- Установщик проведёт через все необходимые шаги.
Установка в Windows
Скачайте exe-файл инсталлятора с сайта Git и запустите его. Это Git для Windows, он называется msysGit. Установщик спросит добавлять ли в меню проводника возможность запуска файлов с помощью Git Bash (консольная версия) и GUI (графическая версия). Подтвердите действие, чтобы далее вести работу через консоль в Git Bash. Остальные пункты можно оставить по умолчанию.
Проверим, что Git установлен.
После того, как все действия по установке завершены, убедимся, что Git появился в системе компьютера. Откройте терминал и введите , должна появиться текущая версия программы на вашей машине. Эта проверка подходит для всех операционных систем.
Working in your local repository and pushing files
After following the above steps and cloning a remote repository, you can work on the files as you normally would. You can create new files or edit existing files from the command line or your favorite text editor. Below, are the steps of creating a new file, pushing that file, editing an existing file, and pushing the update.
Creating a new file and pushing to remote repository
- Create a new file in the Git directory by typing the following command from either the Bash or Windows command line. The following command opens and creates a file called example.txt in Notepad. In Git Bash, you could also use the touch command to create a blank new file and then type «start <name of file>» to open the file in your favorite text editor.
start notepad example.txt
- In the text editor, enter some text into the file and save and exit the file.
- Back at the command line type the following command to get the current status of your branch and untracked files.
git status
- Git displays a window similar to the example shown below, showing that the file we created is new and untracked by Git.

- We’ll now want to add this file to Git to be tracked by typing the following command. If your file is not named «example.txt,» you’d want to change the text to the name of your file.
git add example.txt
- After entering the above command, the file is added as a new file also known as staging. Typing git status again shows you in green that the file is a new file that is ready to be committed.
- Next, type the following command to commit the changes made in the local workspace to the local repository. In the example below, our notes «First example» should be notes that would make sense everyone working on your project.
git commit -m "First example"
Note
You can also type git commit with no additional tags or options. However, when doing this it opens a vim like editor that can be difficult for those not familiar with the vim to use. If you type this command press «i» to enter insert mode and type the notes for the commit on the first line, press Esc, and then type «:wq» to save, exit, and commit. We suggest using the above command because it’s easier for more people to use.
- Finally, now that changes are moved from your workspace into your local repository it’s ready to be pushed to the remote repository. Type the following command to push all changes to the remote repository.
Tip
To follow the progress, you can type git status again to see the current status. You can also type git log to see a log of changes.
git push
Note
You’ll be asked for your GitHub username and password if your computer has not logged in to Git from the command line.
Once the file is pushed, it appears in your GitHub remote repository and is available to everyone else who’re working with the same repository.
Modifying a file and pushing to remote repository
- Edit and modify one or more files in your Git.
- Type git status to see the status of all the files not yet committed from the workspace to the local repository.
- Type the following command to add all files. The single period indicates that you want all files to be added to the local repository. Some people may also use git add -A to add all.
Tip
You can also use wildcards instead of a period. For example, if you wanted to add all text files you could type *.txt instead of a single period to only add text files.
git add .
- Once the files are added, type the following command to commit. Change the notes to apply to your commit.
git commit -m "Second update"
- Finally, type git push to push the commit to the remote repository.
Tip
If you’re working with a lot of other people, we’d recommend you pull (explained below) before committing. If your local repository is not the same as the remote repository (excluding your new changes), the commit fails. For example, if someone has added new files to the remote repository while you’ve been working and you try commit, it fails until you pull.
Using Git Installer for Windows
Installing Git for Windows is a breeze, but you should carefully check the steps to avoid syncing errors later.
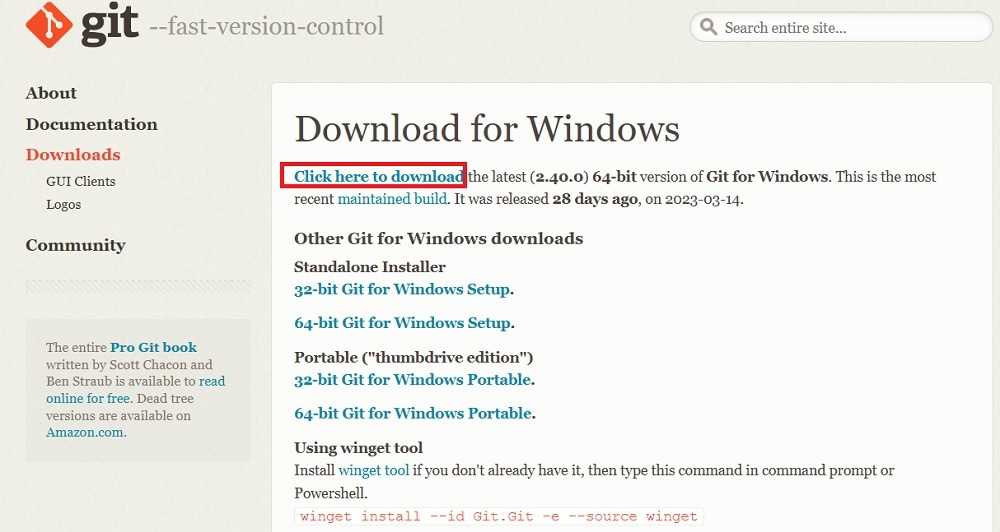
- Click the Windows link on the download page.
- You will see multiple download links. If you’re looking for a regular installer, choose the latest 64-bit version for Windows.
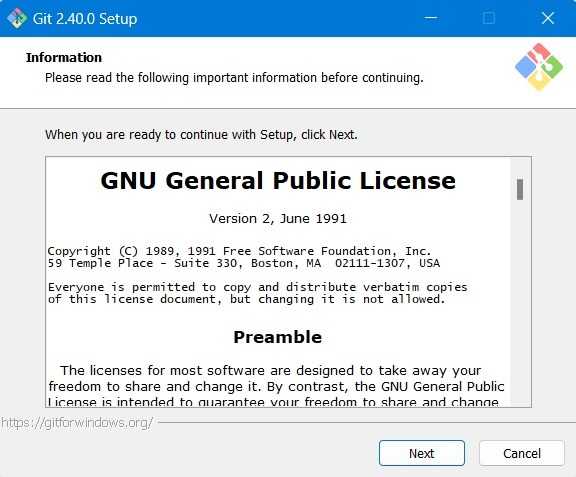
- Accept the GNU General Public License.
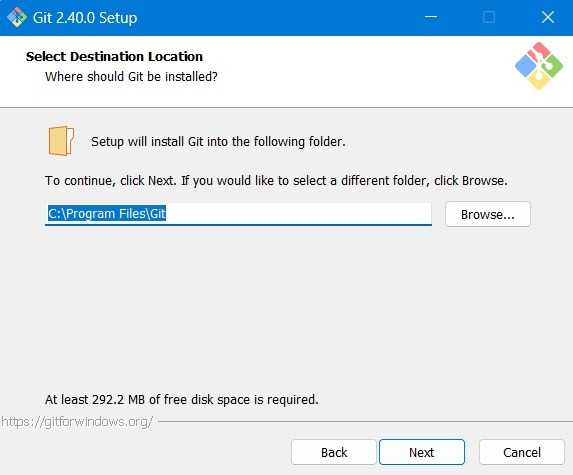
- Select a destination location on your Windows device.
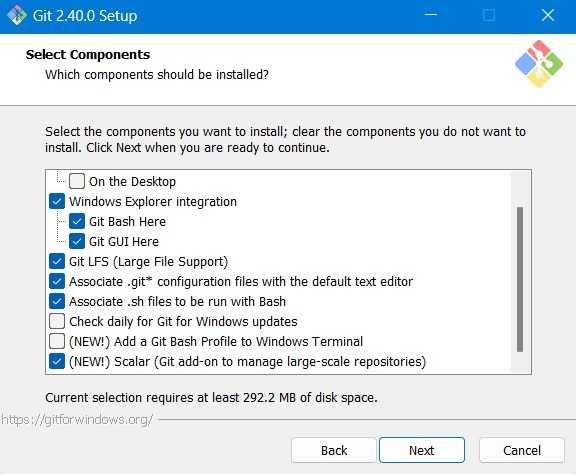
- Select the components you want to install and clear the ones you don’t. At the minimum, you will need to enable the options for «Git Bash,» «Git GUI,» «Git LFS (Large File Support),» «Associate .git configuration files with the default text editor,» and «Associate .sh files to be run with Bash.» In most cases, these required options should be enabled by default.
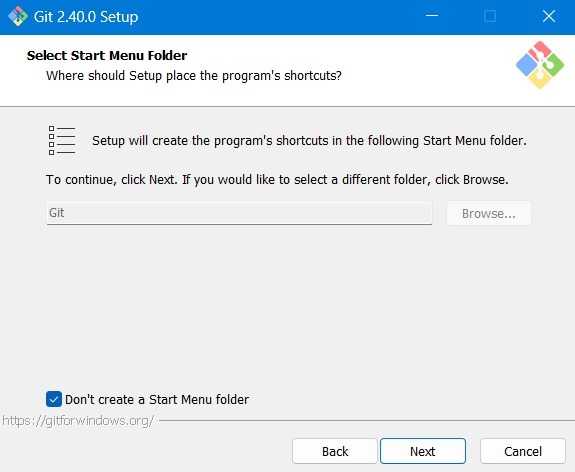
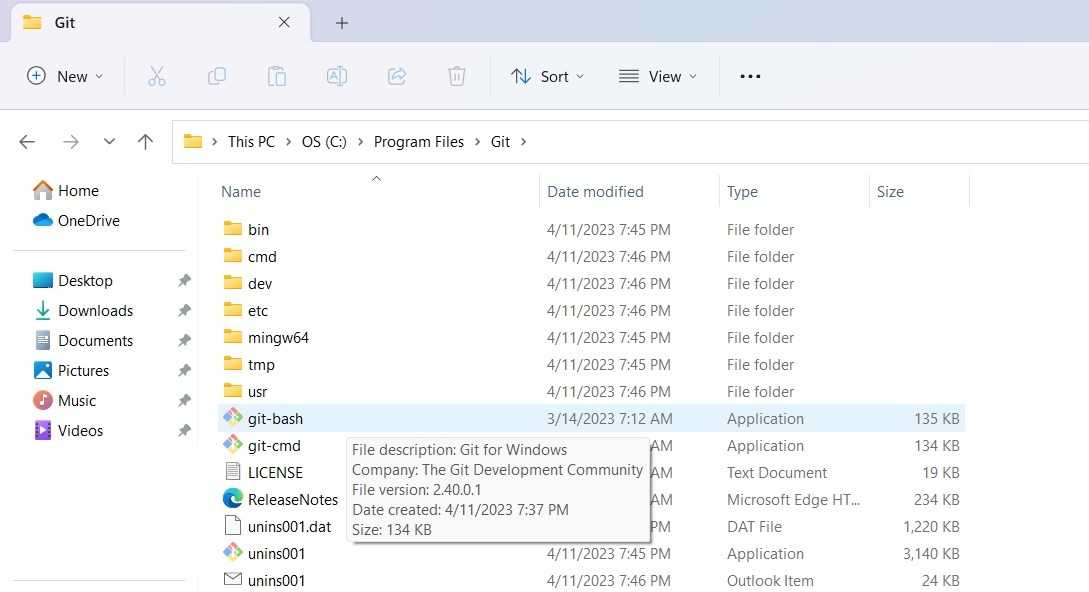
- A Git folder will be created as the default in Program Files. You can opt not to create a Start Menu folder.
Tip: check out these useful YouTube channels that can teach you how to code.
Customizing Your Installation
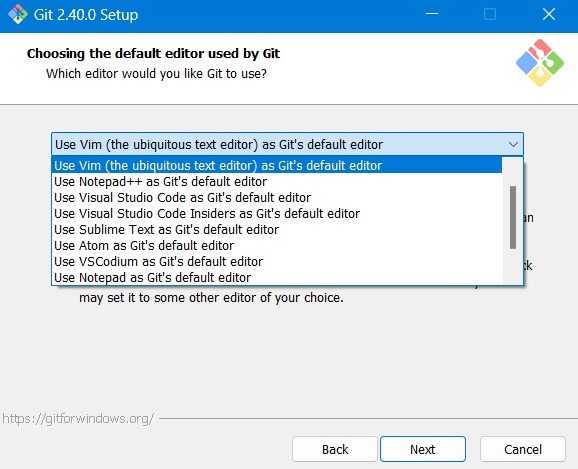
In the next step, you will have the option of choosing the default editor by Git.
- While Vim is the default editor, you will find many other options, such as Notepad++, Atom, Visual Studio Code, and Sublime Text. For this tutorial, we are using Vim.
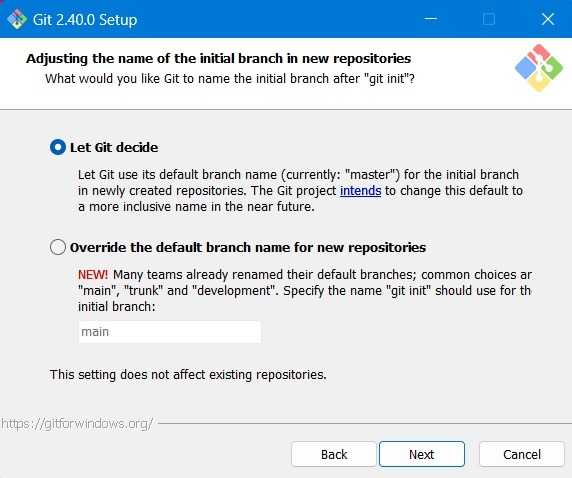
- Select the initial branch name or leave it up to Git. It’s safer to select «Let Git decide.»
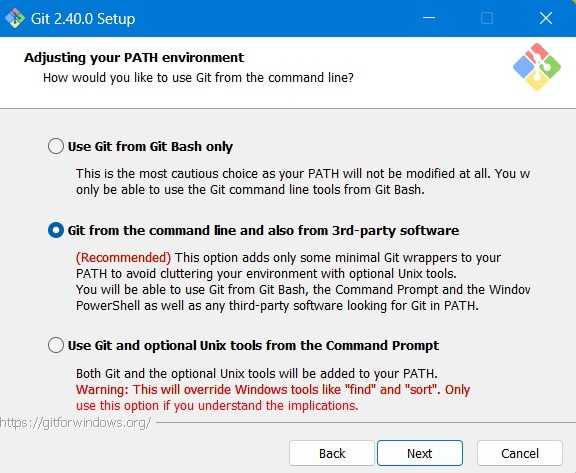
- Select the recommended PATH environment of «Git from the command line and also from 3rd-party software.»
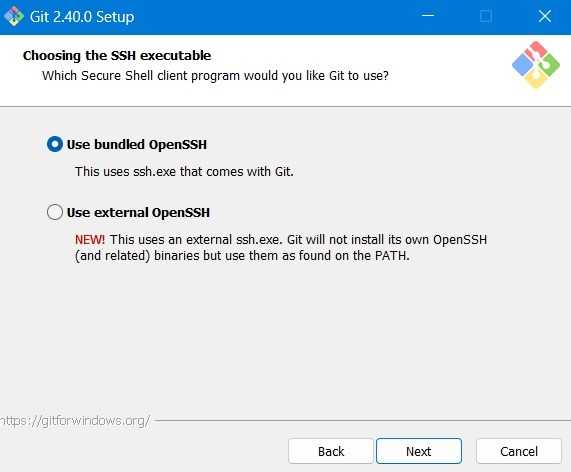
- Select «Use bundled OpenSSH» as your secure shell (SSH) client executable.
- Choose the HTTPS transport backend, «Use the OpenSSL library,» for superior authentication.

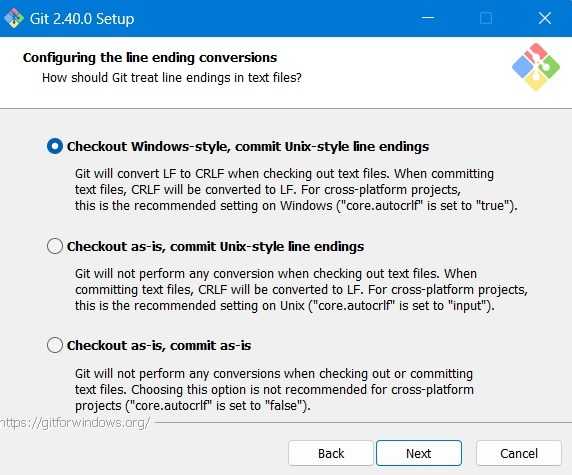
- Another Git convention is to configure line endings in text files. Select «Checkout Windows-style, commit Unix-style line endings.»
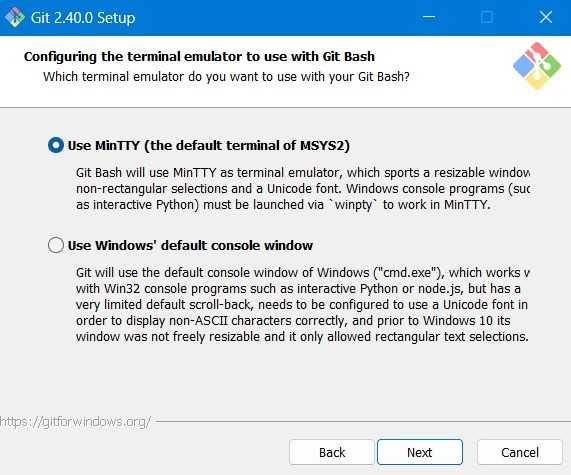
- You need a terminal emulator to use with Git Bash. Opt for MinTTY, the default terminal of MSYS2, instead of your Windows console window. This keeps Git programs separate from what you do in Command Prompt.
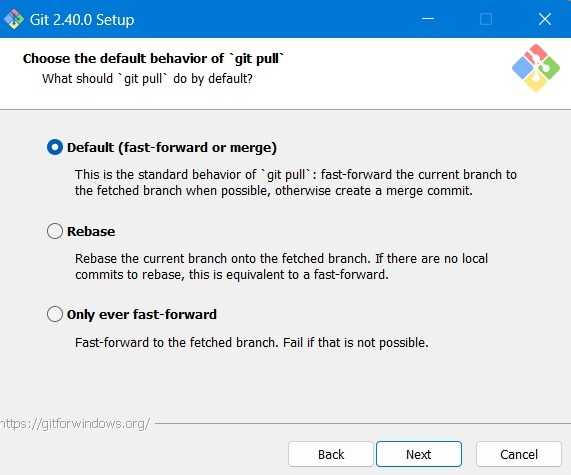
- Select the «Default» option for the behavior of «git pull» requests.
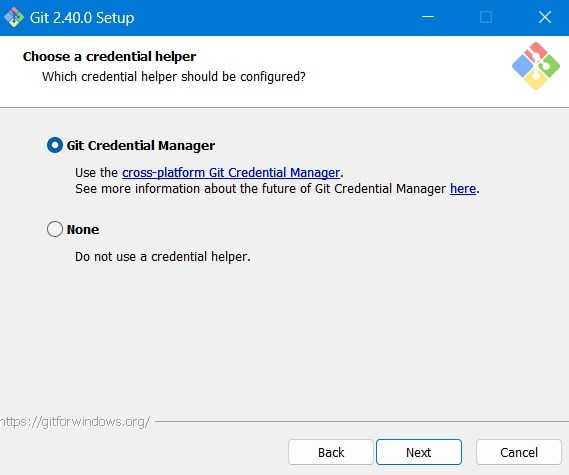
- To manage your GitHub and other third-party credentials, select «Git Credential Manager.»
Tip: if you’re new to Git, get up to speed with our full beginner’s guide.
Additional Options
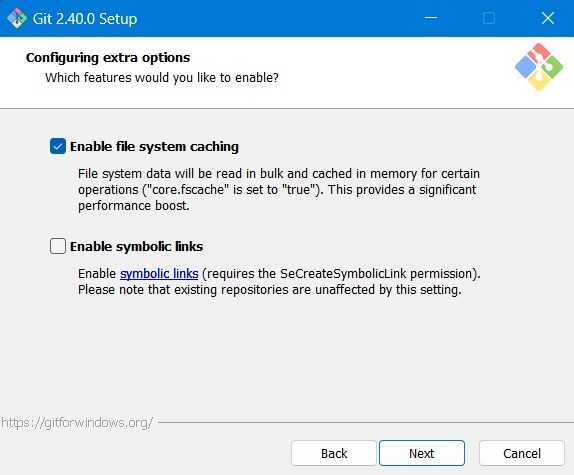
There are also some extra options that you need to configure in a regular installation of Git for Windows.
- Select «Enable file system caching» for enhanced performance boost.
- It’s safe to ignore the experimental options, such as pseudo consoles.
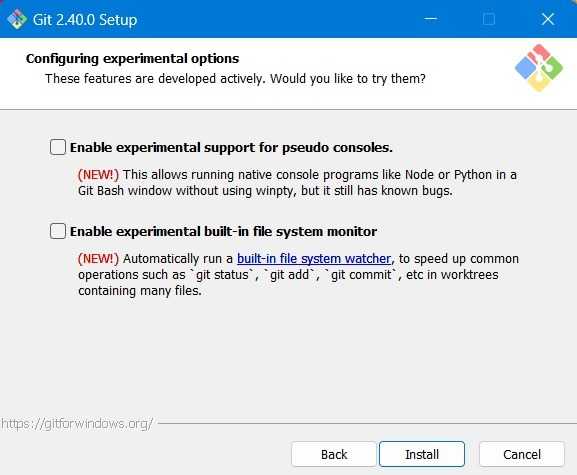
- It will take a few minutes for the Git installation to finish.

- You can launch Git Bash after the Git Setup Wizard is finished.
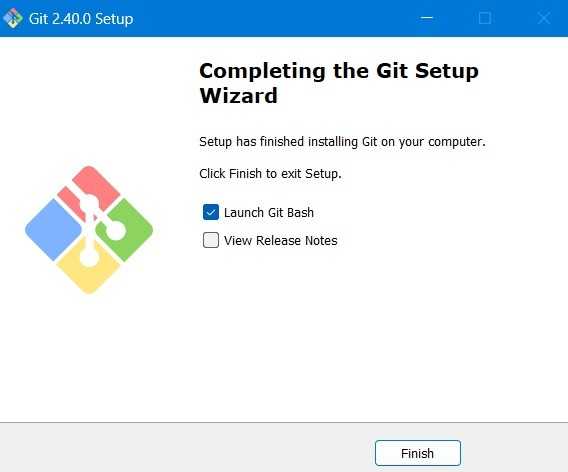
- Alternatively, locate the Git Bash application in Windows search or open the executable from the folder where it is installed.
- The MinTTY terminal emulator should be visible. This will help you keep your Git operations separate from the remaining PC functions. The MinTTY window feels the same as the command terminal.
Tip: did you know that you can add screenshots and animations to GitHub, pull requests and operate them from your Git Bash window?
Method 4: Reset Git credentials
To reset Git credentials, you can follow these steps:
- Open Git Bash or Command Prompt and navigate to your repository.
- Run the following command to remove the stored credentials:
- Run the following command to reset the credentials:
- Try to perform the Git operation again.
Here’s a breakdown of what each command does:
- : This command is used to set or get configuration variables. In this case, we’re using it to modify the variable.
- : This option tells Git to apply the configuration change globally, rather than just for the current repository.
- : This option removes the specified configuration variable.
- : This variable specifies the credential helper to use for storing Git credentials.
- : This credential helper stores the credentials in a plain-text file on disk.


![Git pull command examples [5 methods]](https://vvk-yar.ru/wp-content/uploads/3/2/a/32ad2d5f34ee33179397d76c5d8a2714.jpeg)