

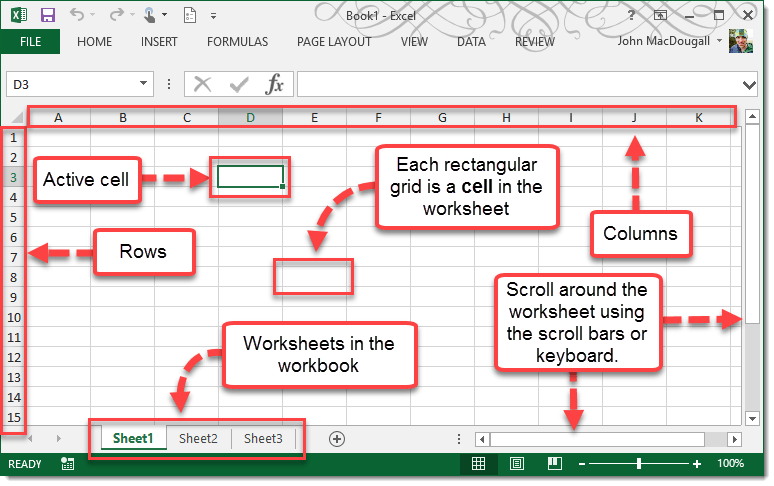
Создание новых листов
Создание новых рабочих листов осуществляется с помощью метода Sheets.Add.
Компоненты метода Sheets.Add
- Before* — необязательный параметр типа данных Variant, указывающий на лист, перед которым будет добавлен новый.
- After* — необязательный параметр типа данных Variant, указывающий на лист, после которого будет добавлен новый.
- Count — необязательный параметр типа данных Variant, указывающий, сколько листов будет добавлено (по умолчанию — 1).
- Type — необязательный параметр типа данных Variant, указывающий тип листа: xlWorksheet** (рабочий лист) или xlChart (диаграмма), по умолчанию — xlWorksheet.
*Если Before и After не указаны, новый лист, по умолчанию, будет добавлен перед активным листом.
**Для создания рабочего листа (xlWorksheet) можно использовать метод Worksheets.Add, который для создания диаграмм уже не подойдет.
Примеры создания листов
|
1 2 3 4 5 6 7 8 9 10 11 12 13 14 15 16 17 18 19 20 |
‘Создание рабочего листа: Sheets.Add Worksheets.Add ThisWorkbook.Sheets.Add After=ActiveSheet,Count=2 Workbooks(«Книга1.xlsm»).Sheets.Add After=Лист1 Workbooks(«Книга1.xlsm»).Sheets.Add After=Worksheets(1) Workbooks(«Книга1.xlsm»).Sheets.Add After=Worksheets(«Лист1») ‘Создание нового листа с заданным именем: Workbooks(«Книга1.xlsm»).Sheets.Add.Name=«Мой новый лист» ‘Создание диаграммы: Sheets.Add Type=xlChart ‘Добавление нового листа перед ‘последним листом рабочей книги Sheets.Add Before=Sheets(Sheets.Count) ‘Добавление нового листа в конец Sheets.Add After=Sheets(Sheets.Count) |
- Лист1 в After:=Лист1 — это уникальное имя листа, указанное в проводнике редактора VBA без скобок.
- Лист1 в After:=Worksheets(«Лист1») — это имя на ярлыке листа, указанное в проводнике редактора VBA в скобках.
Создаваемый лист можно присвоить объектной переменной:
|
DimmyList AsObject ‘В активной книге SetmyList=Worksheets.Add ‘В книге «Книга1.xlsm» SetmyList=Workbooks(«Книга1.xlsm»).Worksheets.Add ‘Работаем с переменной myList.Name=«Listok1» myList.Cells(1,1)=myList.Name ‘Очищаем переменную SetmyList=Nothing |
Если создаваемый лист присваивается объектной переменной, он будет помещен перед активным листом. Указать дополнительные параметры невозможно.
5: Reference workbooks by index
Perhaps the least stable method for referencing a workbook is to use its index value. Excel assigns index values to workbooks as you open them. The first workbook opened has an index value of 1, the second workbook opened has an index value of 2, and so on.
Index values pose a special problem because they change when you delete a Workbook object from the collection; index values slip down a notch, accordingly. For example, suppose you have three open workbooks with the following index values:
ExcelStatisticalFunctions — 3
0908002.xls – 2
HumanResources.xls – 1
If a particular task depends on all three workbooks always being open, using the index values can generate mistakes. For instance, the statement
Workbooks(1).Activate
activates HumanResources.xls as long as it’s open. If you close HumanResources.xls, ExcelStatisticalFunctions and 0908002.xls both move down a notch: ExcelStatisticalFunctions becomes 2 and 0908002.xls becomes 1. As a result, the above statement activates 0908002.xls, not HumanResources. That may or may not be what you want. Using index values to reference workbooks isn’t wrong, but you must understand its inherent behaviors to avoid errors that can be difficult to troubleshoot.


VBA Worksheets Cheatsheet
VBA worksheets Cheatsheet
| Description | Code Example |
|---|---|
| Referencing and Activating Sheets | |
| Tab Name | Sheets(«Input»).Activate |
| VBA Code Name | Sheet1.Activate |
| Index Position | Sheets(1).Activate |
| Select Sheet | |
| Select Sheet | Sheets(«Input»).Select |
| Set to Variable | Dim ws as Worksheet Set ws = ActiveSheet |
| Name / Rename | ActiveSheet.Name = «NewName» |
| Next Sheet | ActiveSheet.Next.Activate |
| Loop Through all Sheets | Dim ws as Worksheet For each ws in Worksheets Msgbox ws.name Next ws |
| Loop Through Selected Sheets | Dim ws As Worksheet For Each ws In ActiveWindow.SelectedSheets MsgBox ws.Name Next ws |
| Get ActiveSheet | MsgBox ActiveSheet.Name |
| Add Sheet | Sheets.Add |
| Add Sheet and Name | Sheets.Add.Name = «NewSheet» |
| Add Sheet With Name From Cell | Sheets.Add.Name = range(«a3»).value |
| Add Sheet After Another | Sheets.Add After:=Sheets(«Input») |
| Add Sheet After and Name | Sheets.Add(After:=Sheets(«Input»)).Name = «NewSheet» |
| Add Sheet Before and Name | Sheets.Add(Before:=Sheets(«Input»)).Name = «NewSheet» |
| Add Sheet to End of Workbook | Sheets.Add After:=Sheets(Sheets.Count) |
| Add Sheet to Beginning of Workbook | Sheets.Add(Before:=Sheets(1)).Name = «FirstSheet» |
| Add Sheet to Variable | Dim ws As Worksheet Set ws = Sheets.Add |
| Copy Worksheets | |
| Move Sheet to End of Workbook | Sheets(«Sheet1»).Move After:=Sheets(Sheets.Count) |
| To New Workbook | Sheets(«Sheet1»).Copy |
| Selected Sheets To New Workbook | ActiveWindow.SelectedSheets.Copy |
| Before Another Sheet | Sheets(«Sheet1»).Copy Before:=Sheets(«Sheet2») |
| Before First Sheet | Sheets(«Sheet1»).Copy Before:=Sheets(1) |
| After Last Sheet | Sheets(«Sheet1»).Copy After:=Sheets(Sheets.Count) |
| Copy and Name | Sheets(«Sheet1»).Copy After:=Sheets(Sheets.Count) ActiveSheet.Name = «LastSheet» |
| Copy and Name From Cell Value | Sheets(«Sheet1»).Copy After:=Sheets(Sheets.Count) ActiveSheet.Name = Range(«A1»).Value |
| To Another Workbook | Sheets(«Sheet1»).Copy Before:=Workbooks(«Example.xlsm»).Sheets(1) |
| Hide / Unhide Sheets | |
| Hide Sheet | Sheets(«Sheet1»).visible = False or Sheets(«Sheet1»).visible = xlSheetHidden |
| Unhide Sheet | Sheets(«Sheet1»).Visible = True or Sheets(«Sheet1»).Visible = xlSheetVisible |
| Very Hide Sheet | Sheets(Sheet1).Visible = xlSheetVeryHidden |
| Delete or Clear Sheets | |
| Delete Sheet | Sheets(«Sheet1»).Delete |
| Delete Sheet (Error Handling) | On Error Resume Next Sheets(«Sheet1»).Delete On Error GoTo 0 |
| Delete Sheet (No Prompt) | Application.DisplayAlerts = False Sheets(«Sheet1»).Delete Application.DisplayAlerts = True |
| Clear Sheet | Sheets(«Sheet1»).Cells.Clear |
| Clear Sheet Contents Only | Sheets(«Sheet1»).Cells.ClearContents |
| Clear Sheet UsedRange | Sheets(«Sheet1»).UsedRange.Clear |
| Protect or Unprotect Sheets | |
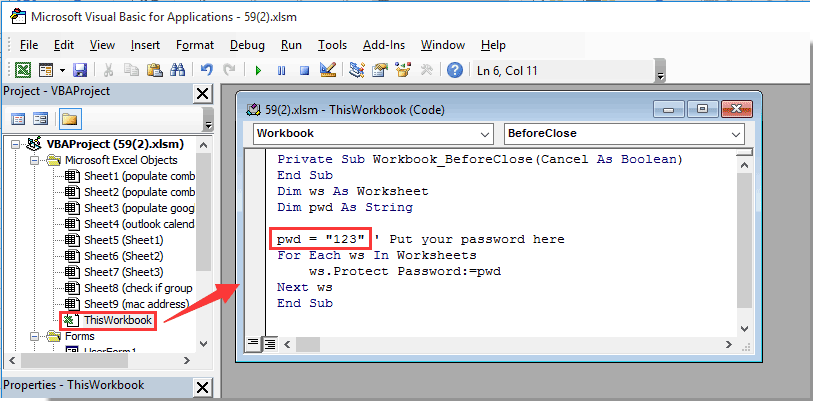
| Unprotect (No Password) | Sheets(«Sheet1»).Unprotect |
| Unprotect (Password) | Sheets(«Sheet1»).Unprotect «Password» |
| Protect (No Password) | Sheets(«Sheet1»).Protect |
| Protect (Password) | Sheets(«Sheet1»).Protect «Password» |
| Protect but Allow VBA Access | Sheets(«Sheet1»).Protect UserInterfaceOnly:=True |
| Unprotect All Sheets | Dim ws As Worksheet For Each ws In Worksheets ws.Unprotect «password» Next ws |
9: Reference sheets by index
Index values come in handy when you don’t care about specific sheets, but only their number or order. Granted, that’s not going to be a common task, but occasionally, referencing by index values can come in handy. The following procedure adds and deletes sheets based on the number of sheets you want:
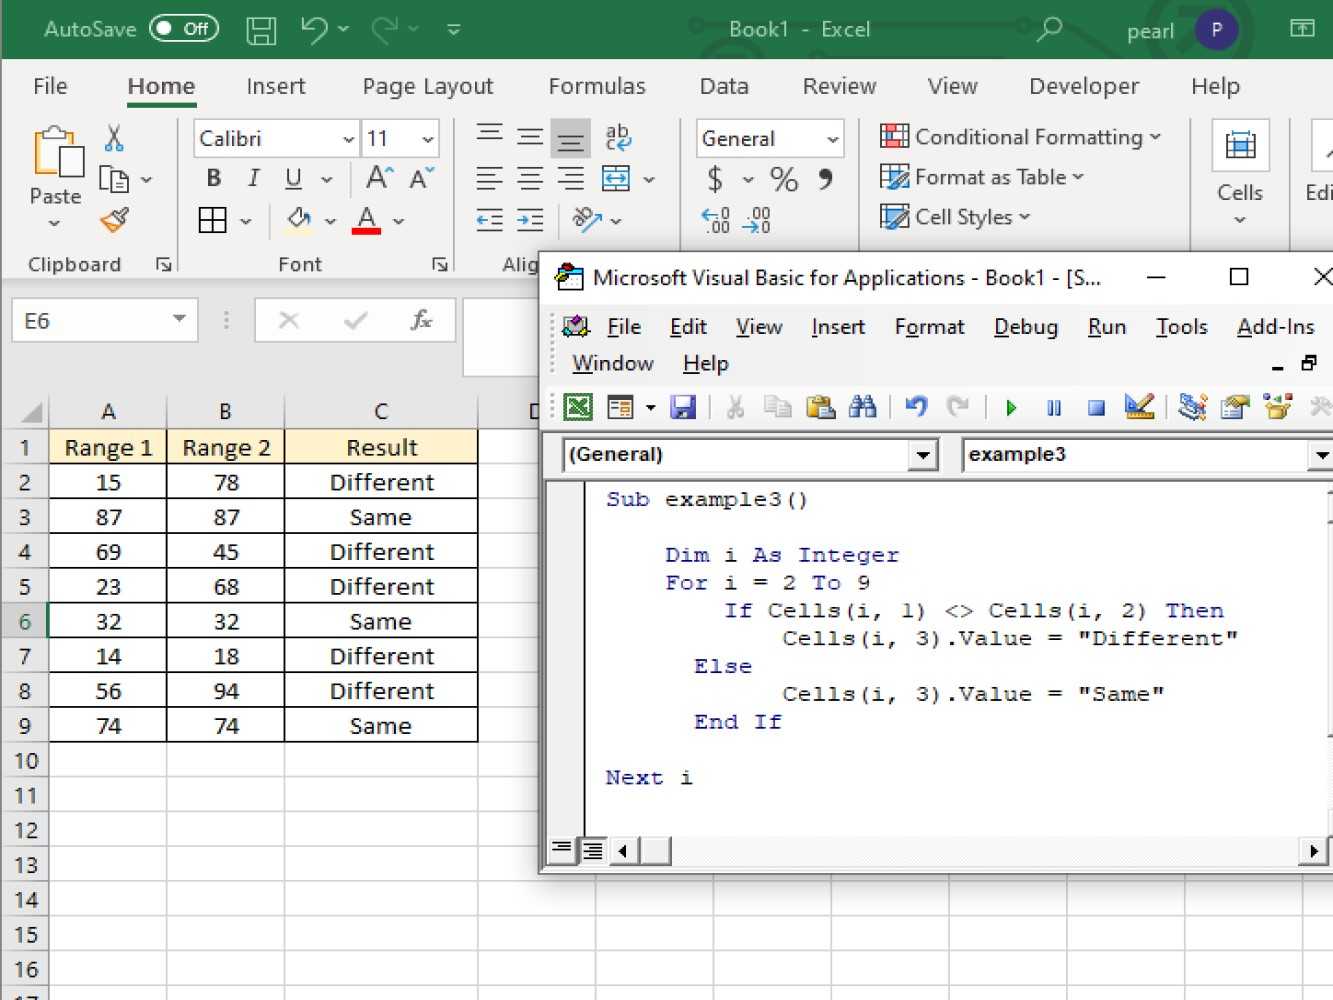
Function ControlSheetNumber(intSheets As Integer) <p> 'Add or delete sheets to equal intSheets.</p> <p> Application.DisplayAlerts = False</p> <p> 'Delete sheets if necessary</p> <p> While Worksheets.Count > intSheets</p> <p> Worksheets(1).Delete</p> <p> Wend</p> <p> 'Add sheets if necessary</p> <p> While Worksheets.Count < intSheets</p> <p> Worksheets.Add</p> <p> Wend</p> <p> Application.DisplayAlerts = True</p> End Function
Use caution when executing this function because it deletes the first Sheet object in the collection, even if that sheet contains content. It simply adds and deletes sheets, depending on the value you pass. This function is useful when creating new workbooks programmatically.
Как добавить лист в книгу
В коллекции листов также есть возможность добавлять свои листы, для этого существует метод Add. Этот метод имеет 4 параметра Add (Before, After, Count, Type). Все эти параметры необязательны. Первые два отвечают за место вставки листа. Далее, количество листов, вставляемых Count и тип листа Type . Типы могут быть, например, такие xlWorkSheet для расчетного листа и xlChart для диаграммы. Если местоположение не указывать, то лист будет вставляться относительно текущего листа.
Таким образом мы вставили 4 листа (Count: = 4) после листа «Лист3» .
Также можно вставить лист в самый конец книги:
Пример
Используйте свойство Sheets объекта Workbook , чтобы вернуть коллекцию Sheets . В следующем примере печатаются все листы активной книги.
Используйте метод Add , чтобы создать новый лист и добавить его в коллекцию. В следующем примере два листа диаграммы добавляются в активную книгу, помещая их после двух листов в книге.
Используйте листы (индекс), где индекс — это имя листа или номер индекса, чтобы вернуть один объект Chart или Worksheet . В следующем примере активируется лист с именем Sheet1.
Используйте листы (массив), чтобы указать несколько листов. В следующем примере листы с именами Sheet4 и Sheet5 перемещаются в начало книги.
Sheets и Worksheets: взаимодействие и совместное использование
В VBA Excel два основных объекта, которые позволяют работать с листами и рабочими страницами, это Sheets и Worksheets. Они предоставляют сходный функционал, но имеют некоторые различия в поведении и взаимодействии с объектами.
Оба объекта позволяют обращаться к листам и рабочим страницам и выполнять с ними различные операции. Однако разница между ними заключается в том, что Worksheets является подклассом Sheets. Это означает, что объект Worksheets может обращаться только к листам, а объект Sheets может обращаться и к листам, и к рабочим страницам.
Когда вы создаете новый лист или рабочую страницу в книге Excel, они автоматически индексируются в коллекцию Sheets. Это означает, что вы можете обращаться к ним, используя индекс, например:
| Sheets(1) | или | Sheets(«Sheet1») |
Однако, если вы хотите обратиться к рабочей странице, вы должны использовать объект Sheets, например:
| Sheets(1) | Sheets(«Sheet1») | или | Sheets(«Sheet1»).Worksheets(1) |
Также, Sheets и Worksheets имеют разные методы и свойства. Например, Sheets имеет методы и свойства для работы с листами и рабочими страницами, а Worksheets имеет только методы и свойства для работы с рабочими страницами.
Однако, эти объекты могут совместно использоваться для более гибкой работы с листами и рабочими страницами. Например, вы можете использовать объект Worksheets для работы с рабочими страницами, а объект Sheets для работы с листами и рабочими страницами одновременно.
В целом, разница между Sheets и Worksheets заключается в их функциональности и взаимодействии с листами и рабочими страницами в VBA Excel. Sheets имеет более широкие возможности обращения к объектам, в то время как Worksheets специализируется только на рабочих страницах.
Sheets: область применения и особенности
Объект Sheets в VBA Excel широко используется для работы с листами в книге. Он предоставляет возможность управления не только рабочими листами Excel, но и другими типами листов, такими как листы диаграмм или листы модулей.
Основное отличие между объектами Sheets и Worksheets заключается в том, что Sheets предоставляет доступ к всем типам листов в книге, в то время как Worksheets позволяет работать только с рабочими листами.
С помощью объекта Sheets можно выполнять такие действия, как создание новых листов, удаление существующих листов, копирование листов из одной книги в другую и переименование листов.
Особенность объекта Sheets заключается в том, что он дает возможность обращаться к листам не только по их имени, но и по их индексу. Индексация начинается с единицы и определяется порядком, в котором листы были добавлены в книгу.
Еще одной особенностью объекта Sheets является возможность работы с скрытыми листами. С его помощью можно удалить или переименовать скрытые листы, а также узнать количество скрытых листов в книге.
Использование объекта Sheets в VBA Excel позволяет программистам создавать мощные макросы для автоматизации работы с листами в книге. Он предоставляет широкие возможности для манипуляции данными и управления листами.
| Особенности | Объект Sheets | Объект Worksheets |
|---|---|---|
| Типы листов | Все типы листов (рабочие, диаграммы, модули и т. д.) | Только рабочие листы |
| Доступ к листам | По имени и индексу | Только по имени |
| Работа с скрытыми листами | Возможно | Невозможно |
Worksheets — ключевая роль в работе с Excel
В программировании на VBA для работы с листами Excel существует два основных объекта: Sheets и Worksheets. Они оба предоставляют доступ к листам книги, но различаются в некоторых аспектах.
Объект Worksheets играет важную роль в работе с данными в Excel. Он представляет собой коллекцию листов в книге и позволяет выполнять операции с каждым листом отдельно.
При использовании объекта Worksheets вы можете обращаться к каждому листу по индексу или по его имени. Это полезно, когда вам нужно выполнить операцию на нескольких листах или в отдельном листе, даже если вы не знаете его позиции в книге.
Объект Worksheets также предоставляет ряд свойств и методов для управления листами. Вы можете переименовывать листы, создавать новые листы, удалять или скрывать существующие листы. Это особенно полезно, когда вам нужно динамически управлять структурой книги во время выполнения макроса.
Благодаря объекту Worksheets вы можете легко циклически обрабатывать все листы в книге. Вы можете использовать конструкцию For Each для перебора каждого листа в коллекции и выполнять определенные операции для каждого листа.
Например, вы можете копировать данные с каждого листа в отдельную область, а затем выполнять анализ или обработку этих данных.
Также, объект Worksheets позволяет устанавливать листы в качестве активного листа — активный лист видим пользователю и на него будут влиять все операции, такие как чтение, запись или форматирование данных.
В целом, объект Worksheets является мощным инструментом для работы с данными в Excel. Он облегчает множество операций, связанных с листами и позволяет управлять структурой книги динамически. Использование объекта Worksheets открывает широкие возможности для автоматизации обработки данных в Excel с использованием VBA.
3: Reference workbooks in the Workbooks collection
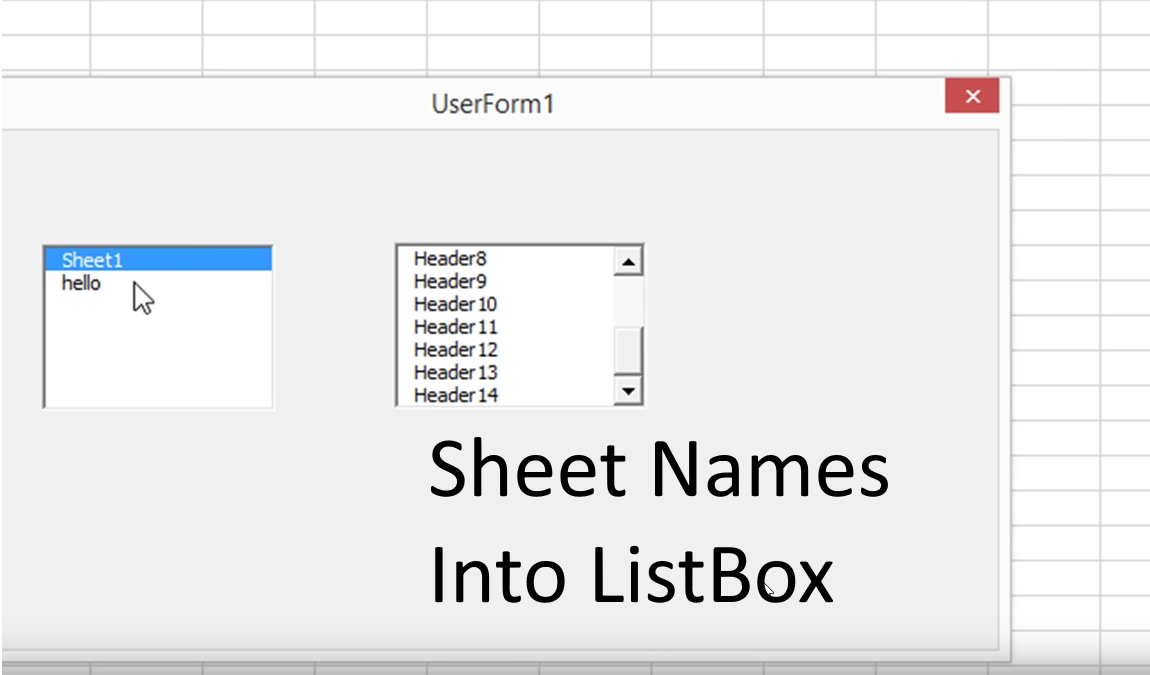
The Workbooks collection contains all the open Workbook objects. Using the Workbooks property, you can refer to open workbooks. For instance, the following subprocedure populates a list box in a user form with the names of all open workbooks:
Private Sub UserForm_Activate() <p> 'Populate list box with names of open workbooks.</p> <p> Dim wb As Workbook</p> <p> For Each wb In Workbooks</p> <p> ListBox1.AddItem wb.Name</p> <p> Next wb</p> End Sub
The resulting user form, shown in Figure C, displays a list of open workbooks. By referencing the Workbooks collection, you can reference all the open workbooks without hard-coding a single workbook name.
Figure C
Use the Workbooks collection to reference open workbooks.
Listing all the open workbooks is an easy enough task, thanks to the Workbooks collection. However, opening all of the workbooks in a specified folder is a bit harder, as you can see in the following subprocedure:
Sub OpenAllWB() <p> 'Open all workbooks in specified folder.</p> <p> Dim i As Integer</p> <p> With Application.FileSearch</p> <p> .LookIn = "C:\Examples"</p> <p> .FileType = msoFileTypeExcelWorkbooks</p> <p> 'There are wb's</p> <p> If .Execute > 0 Then</p> <p> For i = 1 To .FoundFiles.Count</p> <p> Workbooks.Open (.FoundFiles(i))</p> <p> Next i</p> <p> 'There are no wb's</p> <p> Else</p> <p> MsgBox "There are no workbooks to open", vbOKOnly</p> <p> End If</p> <p> End With</p> End Sub
This task isn’t a referencing one in the true sense, but it shows the power of the Workbooks collection. In this case, the code doesn’t cycle through the Workbooks collection; it just takes advantage of one of the collection’s methods — specifically, the Open method. Closing all the open workbooks is a bit easier than opening them, as the following procedure shows:
Sub CloseAllWB() <p> 'Close all open workbooks.</p> <p> Workbooks.Close</p> End Sub
To see a collection’s many methods and properties, press F2 in the VBE to launch the Object Browser.
4: Explicitly reference a workbook
If you know the name of the workbook you want to reference, an explicit reference might be the most efficient method. Although an explicit reference is easy, it does require a stable situation. If the name of the workbook changes, but the possibilities are known, you can still use an explicit reference by passing the workbook’s name. For example, the following subprocedure activates an open workbook, as determined by the passed argument, wbname:
Function ActivateWB(wbname As String) <p> 'Open wbname.</p> <p> Workbooks(wbname).Activate</p> End Function
To execute it, you simply pass the name of the workbook you want to activate as follows:
ActivateWB("HumanResources.xls")
(You must include the .xls extension.)
The following function also uses the Workbooks property to determine whether a specific workbook is currently open:
Function IsWBOpen(wbname As String) As Boolean <p> 'Open workbook.</p> <p> Dim wb As Workbook</p> <p> On Error Resume Next</p> <p> Set wb = Workbooks(wbname)</p> <p> IsWBOpen = Not wb Is Nothing</p> End Function
If wbname is open, the function returns True. When not open, the function returns False. These procedures also rely on the Workbooks property, but instead of cycling through the collection, they specify a workbook by name.
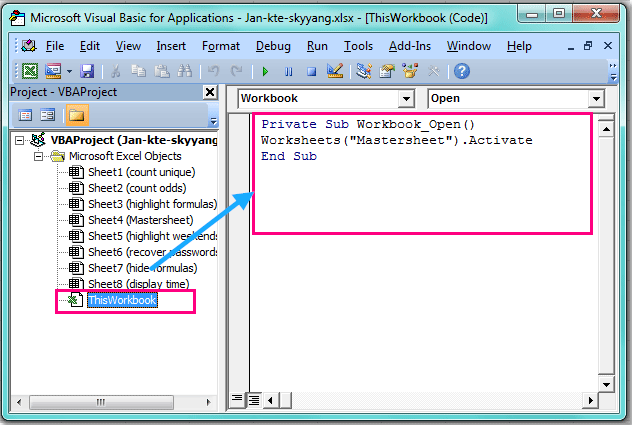
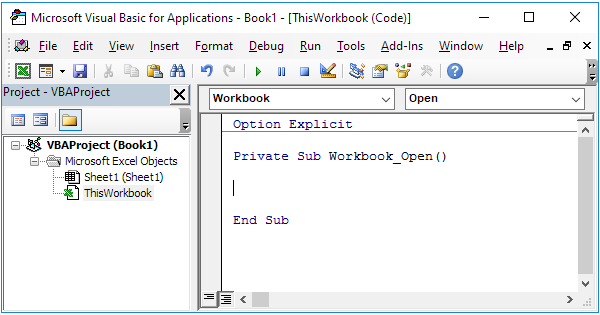
2: Reference the workbook that’s currently running code
VBA’s ThisWorkbook property is similar to the ActiveWorkbook property, but whereas ActiveWorkbook evaluates the workbook with the focus, ThisWorkbook refers to the workbook that’s running the current code. This added flexibility is great because the active workbook isn’t always the workbook that’s running code.
Figure B
Function GetThisWB() As String <p> GetThisWB = ThisWorkbook.Path & "\" & ThisWorkbook.Name</p> End Function
As you can see, HumanResources.xls is the active workbook, but the function is in a workbook named 0908002.xls.
Figure B
Take advantage of ThisWorkbook’s flexibility when you need to refer to the workbook running code when the active workbook isn’t the workbook running code.
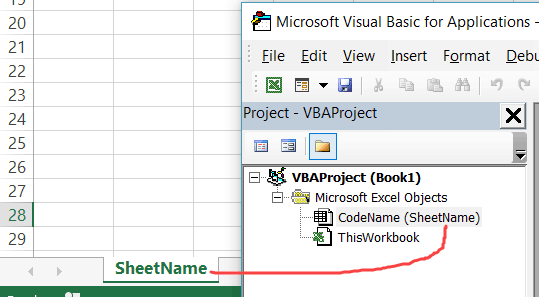
10: Refer to a sheet’s code name property
Code that refers to a Worksheet object by the name on the sheet’s tab runs the risk of generating an error. That’s because you must remember to update the code when you change the sheet’s name. Not only is that a lot of trouble, users are apt to change a sheet’s name. One way to safeguard code that refers to specific sheets by name is to use the CodeName property.
The code name is the sheet’s default name , which Excel assigns when you create it — Sheet1, Sheet2, and so on. Changing the sheet’s name, as displayed on the sheet’s tab, does not change its code name, as you can see in Figure D. The names in parentheses are the sheet names (as shown on the sheet tabs). Notice that the default names, the code names, remain the same even if you change the sheet’s name.
Figure D
A sheet’s code name property is stable; its sheet name is subject to change.
To change a sheet’s code name, use the (Name) property, as shown in Figure E. You must use the Visual Basic Editor (VBE), as you can’t change this property programmatically. There are two similar properties, so don’t confuse them. The Name property (without parentheses) toward the bottom of the properties list represents the name Excel displays on the sheet tab. (Code name values must start with a letter character.)
Also see
- How to add a drop-down list to an Excel cell (TechRepublic)
- How to become a cloud engineer: A cheat sheet (TechRepublic)
- 50 time-saving tips to speed your work in Microsoft Office (free PDF) (TechRepublic download)
- Cost comparison calculator: G Suite vs. Office 365 (Tech Pro Research)
- Microsoft Office has changed, how you use it should too (ZDNet)
- Best cloud services for small businesses (CNET)
- Best to-do list apps for managing tasks on any platform (Download.com)
- More must-read Microsoft-related coverage (TechRepublic on Flipboard)
Affiliate disclosure: TechRepublic may earn a commission from the products and services featured on this page.
Subscribe to the Daily Tech Insider Newsletter
Stay up to date on the latest in technology with Daily Tech Insider. We bring you news on industry-leading companies, products, and people, as well as highlighted articles, downloads, and top resources. You’ll receive primers on hot tech topics that will help you stay ahead of the game.
Delivered Weekdays
Sign up today
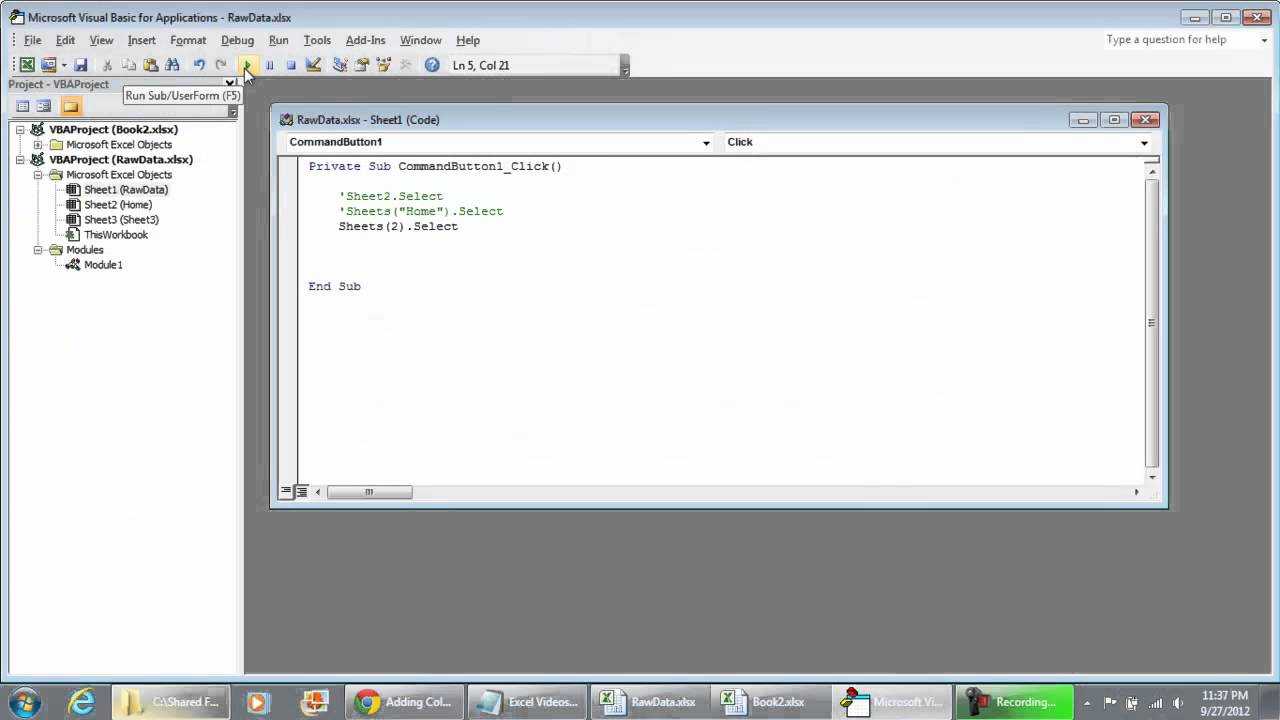
7: Reference Worksheet objects
The Worksheets collection contains all the sheet objects in a workbook. Using a simple For Each loop, you can cycle through the collection. For example, the following code populates a list box control with the names of all the sheets in the active workbook:
Private Sub UserForm_Activate() <p> 'Populate list box with names of sheets</p> <p> 'in active workbook.</p> <p> Dim ws As Worksheet</p> <p> For Each ws In Worksheets</p> <p> ws.Select</p> <p> ListBox1.AddItem ws.Name</p> <p> Next ws</p> End Sub
The Sheets and Worksheets collections both contain Worksheet objects, but the Sheets collection contains both worksheets and chart sheets.
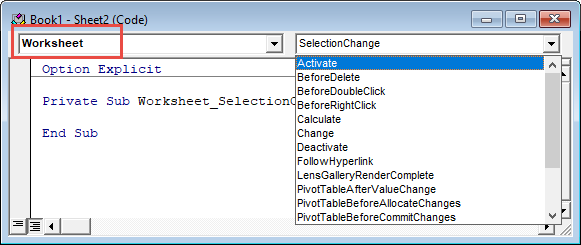
Worksheet-Level Events
Events are triggers that can cause “Event Procedures” to run. For example, you can cause code to run every time any cell on a worksheet is changed or when a worksheet is activated.
Worksheet event procedures must be placed in a worksheet module:
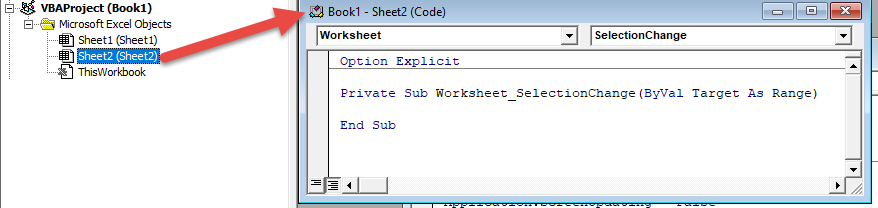
There are numerous worksheet events. To see a complete list, go to a worksheet module, select “Worksheet” from the first drop-down. Then selecting an event procedure from the second drop-down to insert it into the module.
Worksheet Activate Event
Worksheet activate events run each time the worksheet is opened.
This code will select cell A1 (resetting the view area to the top-left of the worksheet) each time the worksheet is opened.
Worksheet Change Event
Worksheet change events run whenever a cell value is changed on the worksheet. Read our tutorial about Worksheet Change Events for more information.
Count All Sheets in the Workbook
There are multiple ways I can use VBA to give me the total count of sheets in a workbook.
In the following sections, I will show you three different methods, and you can choose which one to use:
- Using the VBA code in a module (to get sheet count as a message box)
- Using Immediate window
- Using a Custom Formula (which will give you the sheet count in a cell in the worksheet)
VBA Code to Show Sheet Count in a Message Box
Below is the VBA code to get the total number of sheets in the current workbook shown in a message box:
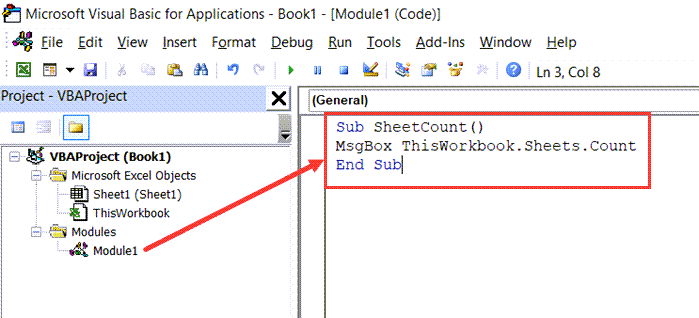
Sub SheetCount()
MsgBox ThisWorkbook.Sheets.Count
End Sub
In the above code, I have used Sheets, which will count all the sheets (be it worksheets or chart sheets). In case you only want to count the total number of worksheets, use Worksheets instead of Sheets. In most cases, people only use worksheets, using Sheets works fine. In layman terms, Sheets = Worksheets + Chart Sheets
Below are the steps to put this code in the VBA Backend:
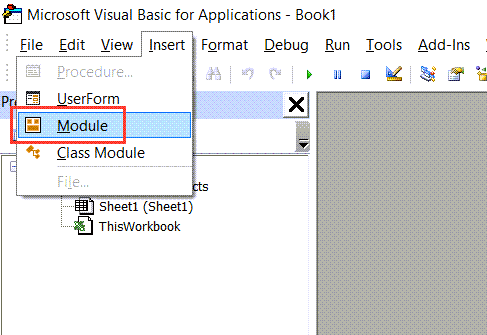
- Click the Develope tab in the ribbon (don’t see the Developer tab – click here to know how to get it)
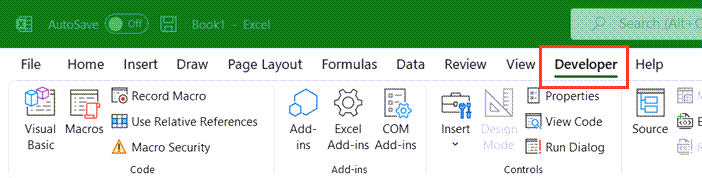
- Click on Visual Basic icon

- In the Visual Basic Editor that opens, click on ‘Insert’ option in the menu
- Click on Module. This will insert a new module for the workbook
- Copy and Paste the above VBA code in the code window of the module
- Place the cursor anywhere in the code and press the F5 key (or click the green play button in the toolbar)
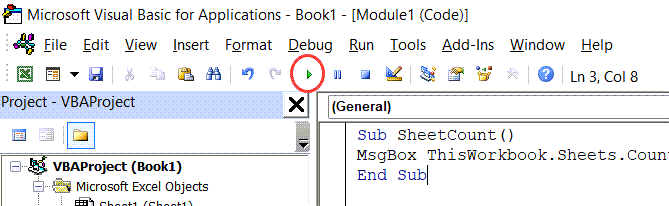
The above steps would run the code and you will see a message box that shows the total number of worksheets in the workbook.
Note: If you want to keep this code and reuse it in the future in the same workbook, you need to save the Excel file as a macro-enabled file (with a .XLSM extension). You will see this option when you try to save this file.
Getting Sheet Count Result in Immediate Window
The Immediate window gives you the result right there with a single line of code.
Below are the steps to get the count of sheets in the workbook using the immediate window:
- Click the Develope tab in the ribbon (don’t see the Developer tab – click here to know how to get it)
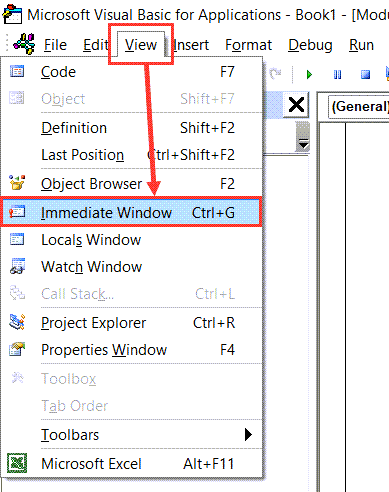
- Click on Visual Basic icon
- In the VB Editor that opens, you might see the Immediate Window already. If you don’t, click the ‘View’ option in the menu and then click on Immediate Window (or use the keyboard shortcut – Control + G)
- Copy and paste the following line of code: ? ThisWorkbook.Sheets.Count

- Place the cursor at the end of the code line and hit enter.
When you hit enter in Step 5, it executes the code and you get the result in the next line in the immediate window itself.
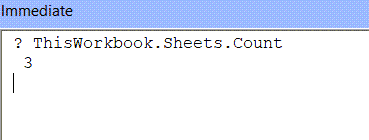
The number in the second line means there are three sheets in the workbook
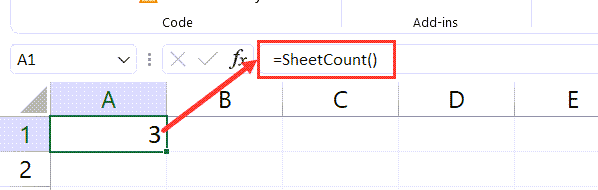
Formula to Get Sheet Count in the Worksheet
If you want to get the sheet count in a cell in any worksheet, using the formula method is the best way.
In this method, I will create a custom formula that will give me the total number of sheets in the workbook.
Below is the code that will do this:
Function SheetCount()SheetCount = ThisWorkbook.Sheets.CountEnd Function
You need to place this code in the module (just like the way I showed in the ” VBA Code to Show Sheet Count in a Message Box” section)
Once you have the code in the module, you can get the sheet count by using the below formula in any cell in the workbook:
=SheetCount()
Pro Tip: If you need to get the sheet count value often, I would recommend copying and pasting this formula VBA code in the Personal Macro Workbook. When you save a VBA code in the Personal Macro Workbook, it can be used on any Excel file on your system. In short, VBA codes in PMW are always available to you on your system.
Referencing Sheets
There are several different ways to reference Sheets:
- ActiveSheet
- Sheet Tab Name
- Sheet Index Number
- Sheet Code Name
ActiveSheet
The ActiveSheet is the Sheet that’s currently active. In other words, if you paused your code and looked at Excel, it’s the sheet that is visible. The below code example will display a MessageBox with the ActiveSheet name.
Sheet Name
You are probably most familiar with referencing Sheets by their Tab Name:
This is the sheet name that’s visible to Excel users. Enter it into the sheets object, as a string of text, surrounded by quotations.
Sheet Index Number
The Sheet Index number is the sheet position in the workbook. 1 is the first sheet. 2 is the second sheet etc.:
Sheet Index Number – Last Sheet in Workbook
To reference the last Sheet in the workbook, use Sheets.Count to get the last Index Number and activate that sheet:
The Sheet Code Name is it’s Object name in VBA:
Referencing Sheets in Other Workbooks
It’s also easy to reference Sheets in other Workbooks. To do so, you need to use the Workbooks Object:
Important: The Workbook must be open before you can reference its Sheets.
Activate vs. Select Sheet
In another article we discuss everything about activating and selecting sheets. The short version is this:
When you Activate a Sheet it becomes the ActiveSheet. This is the sheet you would see if you looked at your Excel program. Only one sheet may be activate at a time.
Activate a Sheet
When you select a Sheet, it also becomes the ActiveSheet. However, you can select multiple sheets at once. When multiple sheets are selected at once, the “top” sheet is the ActiveSheet. However, you can toggle the ActiveSheet within selected sheets.
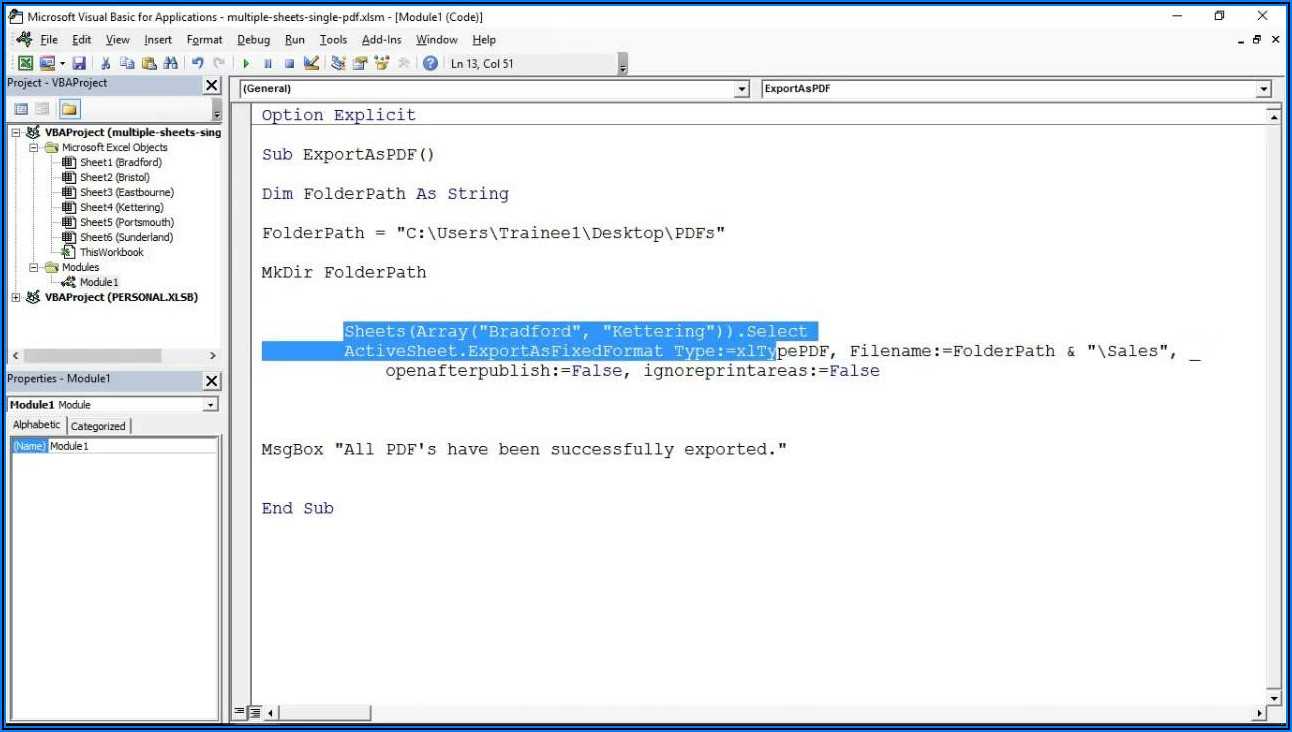
Select Multiple Sheets
Use an array to select multiple sheets at once:
Worksheet Variable
Assigning a worksheet to an object variable allows you to reference the worksheet by it’s variable name. This can save a lot of typing and make your code easier to read. There are also many other reasons you might want to use variables.
To declare a worksheet variable:
Assign a worksheet to a variable:
Now you can reference the worksheet variable in your code:
Loop Through All Sheets in Workbook
Worksheet variables are useful when you want to loop through all the worksheets in a workbook. The easiest way to do this is:
This code will loop through all worksheets in the workbook, displaying each worksheet name in a message box. Looping through all the sheets in a workbook is very useful when locking / unlocking or hiding / unhiding multiple worksheets at once.

Workbook Protection
Workbook protection locks the workbook from structural changes like adding, deleting, moving, or hiding worksheets.
You can turn on workbook protection using VBA:
or disable workbook protection:
Note: You can also protect / unprotect without a password by omitting the Password argument:
There are a variety of options when protecting worksheets (allow formatting changes, allow user to insert rows, etc.) We recommend using the Macro Recorder to record your desired settings.
We discuss worksheet protection in more detail here.
Worksheet Visible Property
You might already know that worksheets can be hidden:
There are actually three worksheet visibility settings: Visible, Hidden, and VeryHidden. Hidden sheets can be unhidden by any regular Excel user – by right-clicking in the worksheet tab area (shown above). VeryHidden sheets can only be unhidden with VBA code or from within the VBA Editor. Use the following code examples to hide / unhide worksheets:
Worksheet-Level Events
Events are triggers that can cause “Event Procedures” to run. For example, you can cause code to run every time any cell on a worksheet is changed or when a worksheet is activated.
Worksheet event procedures must be placed in a worksheet module:
There are numerous worksheet events. To see a complete list, go to a worksheet module, select “Worksheet” from the first drop-down. Then selecting an event procedure from the second drop-down to insert it into the module.
Worksheet Activate Event
Worksheet activate events run each time the worksheet is opened.
This code will select cell A1 (resetting the view area to the top-left of the worksheet) each time the worksheet is opened.
Worksheet Change Event
Worksheet change events run whenever a cell value is changed on the worksheet. Read our tutorial about Worksheet Change Events for more information.
VBA worksheets Cheatsheet
Count All Sheets in Another Workbook (Open or Closed)
In the above example, I showed you how to count the number of sheets in the active workbook (the one where you’re working and where you added the VBA codes).
You can also tweak the code a little to get the sheet count in other workbooks (whether open or closed).
Sheet Count in Another Open Workbook
Suppose I want to know the sheet count of an already open workbook – Example.xlsx
The below VBA code with do this:
And in case you want to get the result in the immediate window, you can use the below code.
Sheet Count from a Closed Workbook
In case you need to get the sheet count of a file that’s closed, you either need to open it and then use the above codes, or you can use VBA to first open the file, then count the sheets in it, and then close it.
The first step would be to get the full file location of the Excel file. In this example, my file location is “C:UserssumitOneDriveDesktopTestExample File.xlsx”
You can get the full file path by right-clicking on the file and then clicking on the Copy Path option (or click on the Properties option).
Below are the VBA codes to get the sheet count from the closed workbook:
The above code first opens the workbook, then counts the total number of sheets in it, and then closes the workbook.
Since the code needs to do some additional tasks (apart from counting the sheets), it has some extra lines of code in it.
The Application.DisplayAlerts = False part of the code makes sure that the process of opening a file, counting the sheets, and then closing the file is not visible to the user. This line stops the alerts of the Excel application. And at the end of the code, we set it back to True, so things get back to normal and we see the alerts from thereon.