Презентация на тему: » Модель объектов Excel В модели объектов Excel имеется более 100 объектов. Наиболее часто используемыми объектами Excel являются объекты Application, Workbooks.» — Транскрипт:
1
Модель объектов Excel В модели объектов Excel имеется более 100 объектов. Наиболее часто используемыми объектами Excel являются объекты Application, Workbooks и Workbook, Worksheets и Worksheet, Range, Selection.
2
Коллекция объектов Коллекция представляет собой объект, содержащий несколько других объектов, как правило, одного и того же типа. Модель объектов Excel П Объект Workbooks содержит все открытые объекты Workbook (рабочая книга).
3
Коллекция объектов Доступ к заданному элементу коллекции осуществляется либо по номеру, либо по имени. Модель объектов Excel П Например, Worksheets(1) обозначает первый рабочий лист активной книги, а Worksheets(Лист1) — рабочий лист с именем Лист1.
4
Методы и Свойства Модель объектов Excel С Объект.Метод П Application.Quit С Объект.Свойство = ЗначениеСвойства П 1.Application.Caption = Пример 2.MsgBox Worksheets.Count
5
Полная и неявная ссылка на объект Полная ссылка на объект состоит из ряда имен вложенных последовательно друг в друга объектов. Их имена в этом ряду разделяются точками. Ряд начинается с объекта Application и заканчивается именем самого объекта. Модель объектов Excel П Application.Workbooks(Архив). Worksheets(Продажа).Range(A1)
6
Полная и неявная ссылка на объект В неявной ссылке, в отличие от полной, активный в данный момент объект, как правило, можно опускать. Модель объектов Excel П Если программа выполняется в Excel, то Workbooks(Архив).Worksheets(Продажа).Range(A1) Если рабочая книга Архив является активной, то ссылку можно сократить: Worksheets(Продажа).Range(A1) Если рабочий лист Продажа активен, то Range(A1)
7
Объект Application Объект Application – это главный (корневой) объект в иерархии объектов Excel, представляет само приложение Excel. Он имеет огромное число свойств и методов, позволяющих установить общие параметры приложения Excel. Модель объектов Excel
8
Свойства объекта Application ActiveWorkbook (активная рабочая книга) ActiveSheet (активный рабочий лист) ActiveCell (активная ячейка) ActiveChart (активная диаграмма) Объект Application П With ActiveCell.Font.Bold = True.Value = Отчет за Май End With
9
Свойства и методы объекта Application Caption – Возвращает или устанавливает текст из заголовка главного окна Excel. Установка значения свойства равным Empty возвращает заголовок, используемый по умолчанию. П 1.Application.Caption = Отчет за 2000 год 2.Application.Caption = Empty Метод Quit – Закрывает приложение. П Application.Quit Объект Application
10
Коллекция Workbooks и объект Workbook Модель объектов Excel После объекта Application в иерархии объектов Excel следует коллекция Workbooks, которая содержит объекты Workbook. Объект Workbook представляет собой рабочую книгу Excel. Все открытые в Excel рабочие книги включены в коллекцию Workbooks.
11
Свойства коллекции Workbooks и объекта Workbook Коллекция Workbooks и объект Workbook Count — возвращает число объектов коллекции Workbooks. Worksheets – возвращает коллекцию всех рабочих листов книги. Charts – возвращает коллекцию всех диаграмм книги (которые не внедрены в рабочие листы)
12
Методы коллекции Workbooks и объекта Workbook Activate — активизирует рабочую книгу. Add – создает новый объект в коллекции Workbooks. Close –закрывает книги. П 1.MsgBox Workbooks.Count 2.Workbooks(Отдел кадров).Activate 3.Workbooks(1).Close 4.Workbooks.Close Коллекция Workbooks и объект Workbook
13
Обработка событий объекта Workbook 1.Перейти в редактор VBA; 2.В окошке Project Explorer выбрать объект ЭтаКнига и перейти в окошко кода для этого объекта; 3.В верхнем левом списке выбрать объект Workbook; 4.В верхнем правом списке выбрать необходимое событие. Коллекция Workbooks и объект Workbook
14
События объекта Workbook BeforeClose – при закрытии рабочей книги. Deactivate – когда рабочая книга теряет фокус. NewSheet –при добавлении нового листа. Open – при открытии рабочей книги. SheetActivate – при активизации любого рабочего листа. SheetBeforeDoubleClick – при двойном щелчке по любому листу рабочей книги. SheetChange – при изменении содержимого ячейки пользователем. SheetSelectionChange – при изменении выделенного диапазона ячеек. Коллекция Workbooks и объект Workbook
Where to Put the VBA Code#
Wondering where the VBA code goes in your Excel workbook?
Excel has a VBA backend called the VBA editor. You need to copy and paste the code into the VB Editor module code window.
Here are the steps to do this:
Working with Workbooks using VBA. Using IF Then Else Statements in VBA. For Next Loop in VBA. Creating a User-Defined Function in Excel. How to Record a Macro in Excel. How to Run a Macro in Excel. Excel VBA Events – An Easy (and Complete) Guide. How to Create an Add-in in Excel. How to Save and Reuse Macro using Excel Personal Macro Workbook. Using Active Cell in VBA in Excel (Examples) How to Open Excel Files Using VBA (Examples)
What Are Some Examples of Event Handlers?
There are a bunch of Event Handlers available to you and they fall into two categories: Workbook and Worksheet Events. What the handlers capture is fairly evident by their names, so I won’t go into detail on what each on does. But I will go ahead and list some of them out so you can have an idea of what is available to you.
Workbook Events
- Open
- SheetChange
- SheetActivate
- BeforeClose
- BeforeSave
- NewChart
Worksheet Events
- Change
- Activate
- BeforeDelete
- BeforeDoubleClick
- BeforeRightClick
- SelectionChange
Where Are Event Handlers Located?
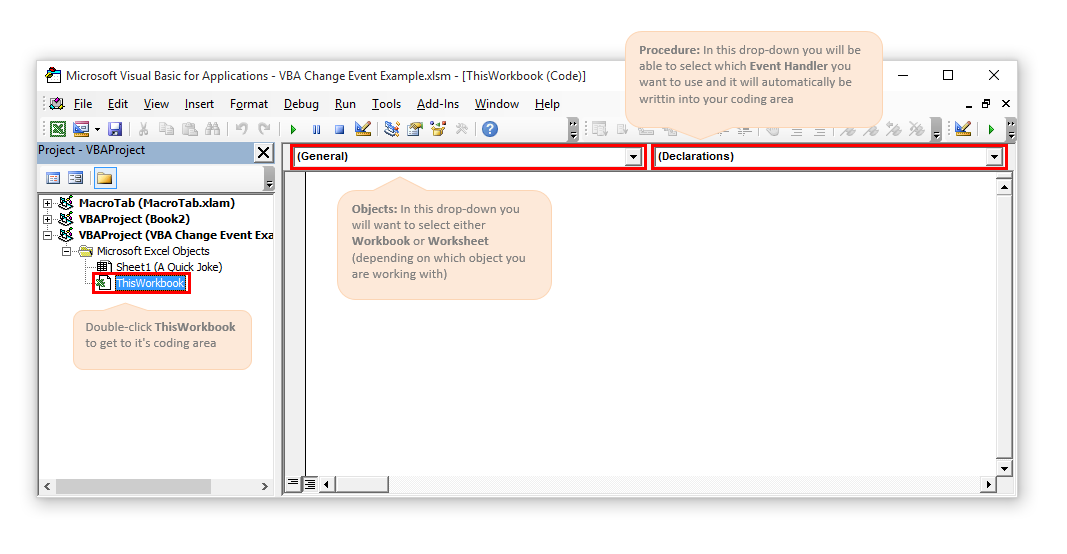
Event Handlers are not stored in your typical module location. They are actually stored inside either your Workbook or Worksheet object. To get to the “coding area” of either your workbook or worksheet, you simply double-click ThisWorkbook or the sheet name (respectively) within your desired VBA Project hierarchy tree (within the Project Window of your Visual Basic Editor).
How Do I Add An Event Handler?
Event Handlers have very specific subroutine names and variables. It is very important not to have any typos within the sub name or the variables it declares. To guarantee avoidance of any typos, I always recommend having the Visual Basic Editor set up the Event Handler code for you. To do this, select either Worksheet or Workbook from the Object drop-down box and then select the Event Handler you wish to use from the Procedure drop-down box.
Let’s Walk Through An Example!
Hopefully, you now have some sort of conceptual understanding of Event Handlers, but how do you use them in the real world? Let’s walk through a very simple example that will allow us to run some VBA code whenever the Cell G7 contains the word “yes” on our spreadsheet.
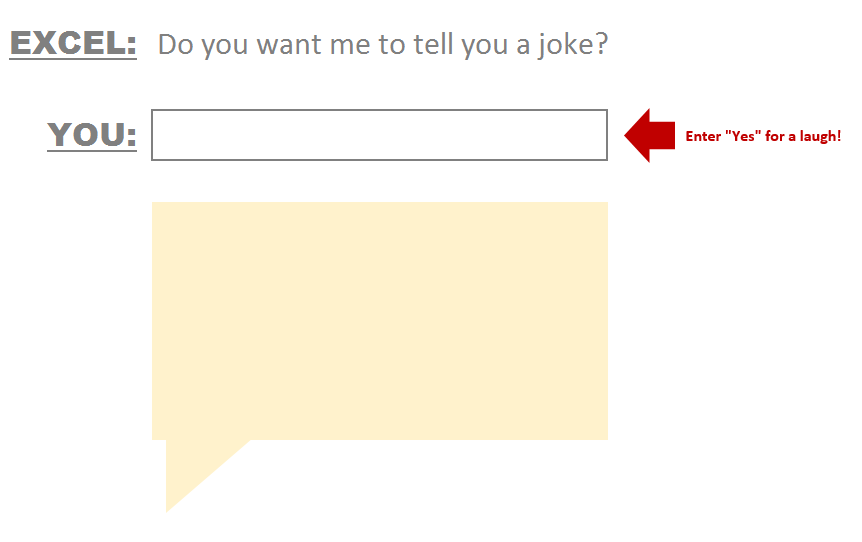
Below is going to be our interface where Excel will reveal a joke if you type the word “Yes” into the blank box (Cell G7).
The Example in Action
You can see through the following diagram, immediately after I type in “Yes, tell me a joke!”, a super-funny joke magically appears!

The VBA Behind The Spreadsheet
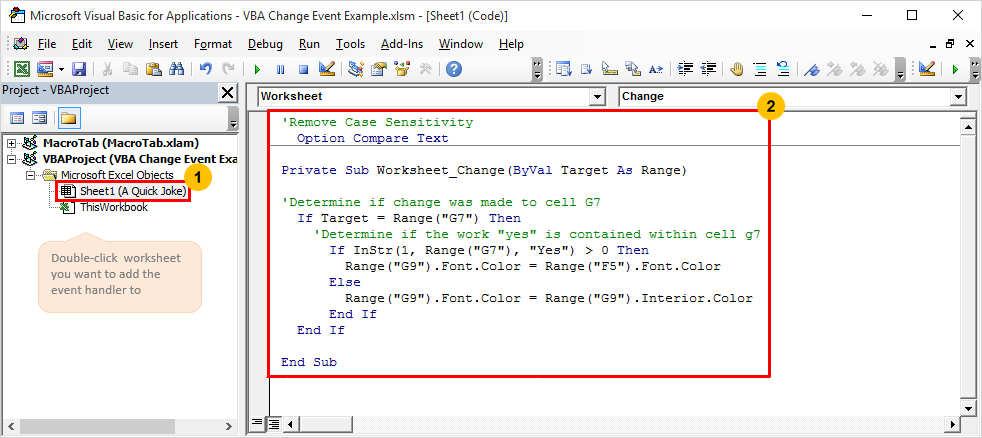
To get this spreadsheet working as intended, I needed to add an Event handler, to capture anytime there was a change to the cell G7. I choose to use the Change Event Handler to make this happen.
What the Change event captures is any change made to your spreadsheet (excluding formatting changes). You’ll notice that the Worksheet_Change subroutine has a variable named Target that gets fed into it. This variable is a Range-type and will be the cell that was last changed by the user. So if I changed the value in Cell A1, the Worksheet_Change subroutine would kick off and pass Cell A1 into the Target variable.
With this in mind, we are going to want to test the cell that was changed to see if it matches the cell we are concerned with. We can do this by starting our code off with a very simple IF Statement that acts as a door to the rest of the code. The IF statement checks to see if the cell(s) that was last changed intersects (or matches) cell G7.
If the Target cell does not have access to get past the door, then the code ends and it will happen so fast, that your user won’t know anything has happened.
Below is the code in full that will test if the word “Yes” was entered into cell G7 anytime a change happens within Sheet1:
And here is a diagram of where you would place the code within your VBA Project:
Why Aren’t My Events Getting Captured?
Many people will turn off the tracking of Event to speed up their VBA code. If you are relying on capturing events within your spreadsheet and they don’t seem to be working, you can run the following command in the Immediate Window (use the shortcut Ctrl + g to make this window visible) within the Visual Basic Editor.
Just hit your enter key after typing the below phrase into the Immediate Window:
Run Macro When a Cell Changes (Method 2)
(Read the Method 1 example for a full explanation of the setup for the macro. This section covers only the code for the second method.)
The second way to check if the desired cell was changed is a little bit more complicated, but it’s not difficult.
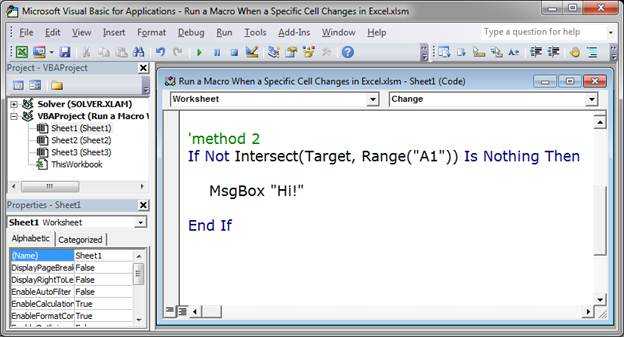
This method uses Intersect(Target, Range(«A1»)) to find out if the desired cell is being changed.
Just change A1 to the cell that you want to check. For this method, you do not need to include dollar signs around the range reference like you did for method 1.
This method uses the Intersect() function in VBA which determines if the cell that was edited «intersects» with the cell that we are checking.
Reference the value of the cell the same way as the first example.
Синтаксис события Worksheet.SelectionChange
Синтаксис процедуры, выполнение которой инициируется событием Worksheet.SelectionChange:
|
1 |
PrivateSubWorksheet_SelectionChange(ByValTarget AsRange) ‘Операторы процедуры EndSub |
Эта процедура VBA Excel запускается при смене на рабочем листе выделенного диапазона (SelectionChange). Она должна быть размещена в модуле рабочего листа Excel, смена выбранного диапазона ячеек которого будет инициировать ее запуск.
Аргумент Target — это новый выбранный диапазон на рабочем листе.
Шаблон процедуры можно скопировать и вставить в модуль рабочего листа, но не обязательно. Если открыть модуль нужного листа, выбрать в левом верхнем поле объект , шаблон процедуры будет добавлен автоматически:
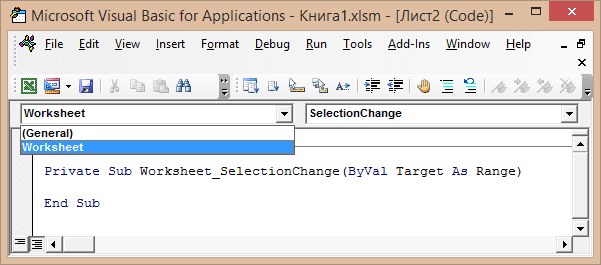
У объекта есть и другие события, которые можно выбрать в правом верхнем поле модуля рабочего листа. Процедура с событием SelectionChange добавляется по умолчанию.
Using the Index to Access the Worksheet
So far we have been using the sheet name to access the sheet. The index refers to the sheet tab position in the workbook. As the position can easily be changed by the user it is not a good idea to use this.
The following code shows examples of using the index
' https://excelmacromastery.com/
' Using this code is a bad idea as
' sheet positions changes all the time
Public Sub UseSheetIdx()

    With ThisWorkbook
        ' Left most sheet
        Debug.Print .Worksheets(1).Name
        ' The third sheet from the left
        Debug.Print .Worksheets(3).Name
        ' Right most sheet
        Debug.Print .Worksheets(.Worksheets.Count).Name
    End With

End Sub
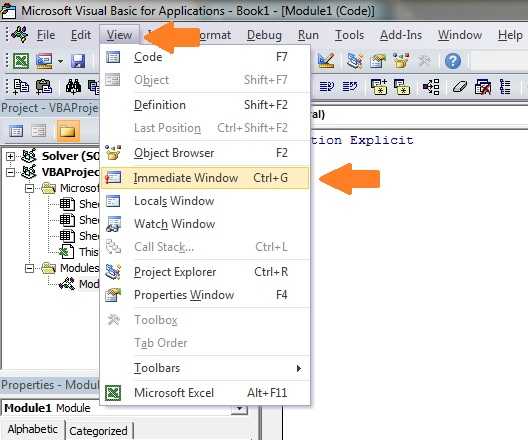
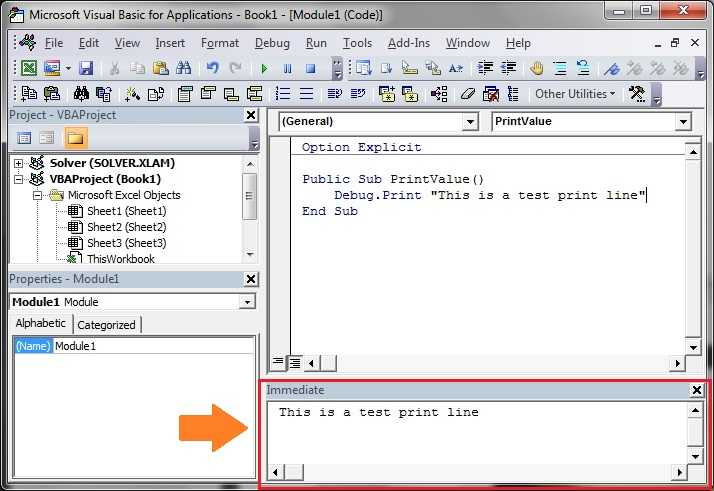
In the example above, I used Debug.Print to print to the Immediate Window. To view this window select View->Immediate Window(or Ctrl G)
Макрос Excel: пример 6
На примере этой процедуры показано использование операторов On Error
и Resume
для обработки ошибок. В данном коде также показан пример открытия и чтения данных из файла.
«Процедура Sub присваивает аргументам Val1 и Val2 значения ячеек A1 и B1
«из рабочей книги Data.xlsx, находящейся в папке C:\Documents and Settings
Sub Set_Values(Val1 As Double, Val2 As Double)
Dim DataWorkbook As Workbook
On Error GoTo ErrorHandling
«Открываем рабочую книгу с данными
Set DataWorkbook = Workbooks.Open(«C:\Documents and Settings\Data»)
«Присваиваем переменным Val1 и Val2 значения из заданной рабочей книги
Val1 = Sheets(«Лист1»).Cells(1, 1)
Val2 = Sheets(«Лист1»).Cells(1, 2)
DataWorkbook.Close
Exit Sub
ErrorHandling:
«Если файл не найден, пользователю будет предложено поместить искомый файл
«в нужную папку и после этого продолжить выполнение макроса
MsgBox «Файл Data.xlsx не найден! » & _
«Пожалуйста добавьте рабочую книгу в папку C:\Documents and Settings и нажмите OK»
Resume
End Sub
Цель
работы –
Изучение
основных операторов и реализации
основных конструкций программирования
в языке VBA.
Understanding the Role of Arguments in VBA Events
Before we jump to Event examples and the awesome things you can do with it, there is one important concept I need to cover.
In VBA events, there would be two types of codes:
- Without any arguments
- With arguments
And in this section, I want to quickly cover the role of arguments.
Below is a code that has no argument in it (the parenthesis are empty):
Private Sub Workbook_Open()
MsgBox "Remember to Fill the Timesheet"
End Sub
With the above code, when you open a workbook, it simply shows a message box with the message – “Remember to fill the Timesheet”.
Now let’s have a look at a code that has an argument.
Private Sub Workbook_NewSheet(ByVal Sh As Object)
Sh.Range("A1") = Sh.Name
End Sub
The above code uses the Sh argument which is defined as an object type. The Sh argument could be a worksheet or a chart sheet, as the above event is triggered when a new sheet is added.
By assigning the new sheet that is added to the workbook to the object variable Sh, VBA has enabled us to use it in the code. So to refer to the new sheet name, I can use Sh.Name.
The concept of arguments will be useful when you go through the VBA events examples in the next sections.
Excel VBA OnTime Event
The events that we have seen so far in this article were associated with one of the Excel objects, be it the workbook, worksheet, chart sheet, or UserForms, etc.
OnTime event is different than other events as it can be stored in the regular VBA module (while the others were to be placed in the code window of objects such as ThisWorkbook or Worksheets or UserForms).
Within the regular VBA module, it is used as a method of the application object.
The reason this is considered an event is that it can be triggered based on the time you specify. For example, if I want the sheet to recalculate every 5 minutes, I can use the OnTime event for it.
Or, if I want to show a message/reminder at a specific time of the day, I can use the OnTime event.
Below is a code that will show a message at 2 pm every day.
Sub MessageTime()
Application.OnTime TimeValue("14:00:00"), "ShowMessage"
End Sub

Sub ShowMessage()
MsgBox "It's Lunch Time"
End Sub
Remember you need to place this code in the regular VBA module,
Also, while the OnTime event would be triggered at the specified time, you need to run the macro manually at any time.
Once you run the macro, it will wait till it’s 2 PM and then call the ‘ShowMessage’ macro.
The ShowMessage macro would then display the message.
The OnTime event takes four arguments:
Application.OnTime(EarliestTime, Procedure, LatestTime, Schedule)
- EarliestTime: The time when you want to run the procedure.
- Procedure: The name of the procedure that should be run.
- LatestTime (Optional): In case another code is running and your specified code can’t be run at the specified time, you can specify the LatestTime for which it should wait. For example, it could be EarliestTime + 45 (which means it will wait for 45 seconds for the other procedure to get completed). If even after 45 seconds the procedure is not able to run, it gets abandoned. If you don’t specify this, Excel would wait until the code can be run, and then run it.
- Schedule (Optional): If set to True, it schedules new time procedure. If False, then it cancels the previously set procedure. By default, this is True.
In the above example, we only used the first two arguments.
Let’s look at another example.
The below code would refresh the worksheet every 5 min.
Dim NextRefresh as Date

Sub RefreshSheet()
ThisWorkbook.Worksheets("Sheet1").Calculate
NextRefresh = Now + TimeValue("00:05:00")
Application.OnTime NextRefresh, "RefreshSheet"
End Sub

Sub StopRefresh()
On Error Resume Next
Application.OnTime NextRefresh, "RefreshSheet", , False
End Sub
The above code would refresh the worksheet every 5 minutes.
It uses the Now function to determine the current time and then adds 5 minutes to the current time.
The OnTime event would continue to run until you stop it. If you close the workbook and Excel application is still running (other workbooks are open), the workbook that has the OnTime event running in it would reopen itself.
This is better handled by specifically stopping the OnTime event.
In the above code, I have the StopRefresh code, but you need to execute it to stop the OnTime event. You can do this manually, assign it to a button and do this by pressing the button or call it from the Workbook Close event.
Private Sub Workbook_BeforeClose(Cancel As Boolean)
Call StopRefresh
End Sub
The above ‘BeforeClose’ event code goes in ThisWorkbook code window.
Also read: Make VBA Code Pause or Delay
Worksheet_SelectionChange event procedure
The Worksheet_SelectionChange event procedure executes when a cell is selected. The following code highlights the active cell with a red color every time a different cell is selected:
The first statement removes the background color for all cells in the worksheet. Next, the the active cell is shaded with red color.
Take some action when specific cells or ranges selected
In many cases, you need to execute a piece of code when certain cells or ranges selected. To accomplish this, we use the Intersect method on the Target (selected cell or range) and the range containing the specific cell to verify the Target is one of the specific cells or ranges. If the Target is in the range containing the specific cells, you can execute the code.
The following code highlights the active cell with a red color every time a different cell is selected:
Источник
Loop Through the Worksheets
The Worksheets member of Workbooks is a collection of worksheets belonging to a workbook. You can go through each sheet in the worksheets collection using a Loop or a Loop.
The following example uses a For Each loop.
' https://excelmacromastery.com/
Public Sub LoopForEach()

    ' Writes "Hello World" into cell A1 for each worksheet
    Dim sht As Worksheet
    For Each sht In ThisWorkbook.Worksheets
         sht.Range("A1") = "Hello World"
    Next sht

End Sub
The next example uses the standard For loop
' https://excelmacromastery.com/
Public Sub LoopFor()

    ' Writes "Hello World" into cell A1 for each worksheet
    Dim i As Long
    For i = 1 To ThisWorkbook.Worksheets.Count
         ThisWorkbook.Worksheets(i).Range("A1") = "Hello World"
    Next sht

End Sub
You have seen how to access all open workbooks and how to access all worksheets in ThisWorkbook. Lets take it one step further. Lets access all worksheets in all open workbooks.
Note: If you use code like this to write to worksheets then back everything up first as you could end up writing the incorrect data to all the sheets.
' https://excelmacromastery.com/
Public Sub AllSheetNames()

    ' Prints the workbook and sheet names for
    ' all sheets in open workbooks
    Dim wrk As Workbook
    Dim sht As Worksheet
    For Each wrk In Workbooks
        For Each sht In wrk.Worksheets
            Debug.Print wrk.Name + ":" + sht.Name
        Next sht
    Next wrk

End Sub
VBA-Урок 11.2. События рабочего листа (Worksheet Events)
На предыдущем уроке мы рассматривали события, относящиеся к целой книги. Сейчас мы сфокусируемся на событиях связанных с отдельным листом.
Worksheet_SelectionChange (Открытие книги)
Чтобы выполнить инструкции, основанные на событиях для отдельного листа, выберите лист в редакторе, а затем Worksheet :
Событие SelectionChange будет добавлено по умолчанию. Это событие выполняется когда бы не изменялось содержание диапазона:
Например, следующий код добавляет цвета заливки одного или более выбранных ячеек и автоматически удаляет цвет заливки от предыдущего выбранного диапазона, когда данный диапазон меняется:
Dangers of Using Code in Events
When you write code to do something when the user takes a certain action, you need to bear in mind that your code could be triggering other events, which could put your code into a continuous loop.
For example, suppose that you use the ‘Change’ event on a worksheet so that when the user puts a value into a cell, a calculation based on that cell is placed into the cell immediately to the right of it.
The problem here is that the placing of the calculated value into the cell triggers another ‘Change’ event, which then in turn triggers yet another ‘Change’ event, and so on until your code has run out of columns to use, and throws up an error message.
You need to think carefully when writing the code for the event to ensure that other events will not be triggered inadvertently
Примеры кода с Worksheet.SelectionChange
Пример разработчика
Замечательный пример дан на сайте разработчика:
|
1 |
PrivateSubWorksheet_SelectionChange(ByValTarget AsRange) WithActiveWindow .ScrollRow=Target.Row .ScrollColumn=Target.Column EndWith EndSub |
При выборе на листе любого диапазона, в том числе отдельной ячейки, лист автоматически прокручивается по горизонтали и вертикали, пока выделенный диапазон не окажется в верхнем левом углу экрана.
Эта процедура работает и при выборе ячейки через адресную строку (слева над обозначениями столбцов), и при выборе из кода VBA Excel, например:
| 1 | Range(«F5»).Select |
Выбор одной отдельной ячейки
Инициируем выполнение основных операторов процедуры с событием Worksheet.SelectionChange выбором одной отдельной ячейки:
|
1 |
PrivateSubWorksheet_SelectionChange(ByValTarget AsRange) IfTarget.Address=»$E$5″Then MsgBox»Выбрана ячейка E5″ EndIf EndSub |
Основной оператор будет выполнен при выборе ячейки E5.
Примечание:
В условии примера используется свойство переменной , так как в прямом выражении по умолчанию сравниваются значения диапазонов. В результате этого, при выборе другой ячейки со значением, совпадающим со значением ячейки E5, равенство будет истинным и основные операторы будут выполнены, а при выборе более одной ячейки, будет сгенерирована ошибка.
Выбор диапазона с заданной ячейкой
Выполнение основных операторов процедуры при вхождении заданной ячейки в выбранный диапазон:
|
1 |
PrivateSubWorksheet_SelectionChange(ByValTarget AsRange) IfNotIntersect(Target,Range(«B3»))IsNothingThen MsgBox»Ячейка B3 входит в выбранный диапазон» EndIf EndSub |
Основной оператор будет выполнен при выделении диапазона, в который входит ячейка B3, в том числе и при выделении одной этой ячейки.
Выбор ячейки в заданной строке
Инициируем выполнение основных операторов процедуры с событием Worksheet.SelectionChange выбором любой отдельной ячейки во второй строке:
|
1 |
PrivateSubWorksheet_SelectionChange(ByValTarget AsRange) IfTarget.Count>1ThenExitSub IfTarget.Row=2Then MsgBox»Выбрана ячейка во второй строке» EndIf EndSub |
Дополнительный оператор необходим для выхода из процедуры при выделении более одной ячейки. Причина: при выделении произвольного диапазона, ограниченного сверху второй строкой, выражение будет возвращать значение , и операторы в блоке будут выполнены.
Ввод даты в ячейку первого столбца
Автоматическое добавление текущей даты в выбранную ячейку первого столбца при условии, что предыдущая ячейка сверху не пустая, а ячейка снизу – пустая:
|
1 |
PrivateSubWorksheet_SelectionChange(ByValTarget AsRange) IfTarget.Count>1OrTarget.Row=1OrTarget.Row=ActiveSheet.Rows.Count ThenExitSub IfTarget.Column=1AndTarget.Offset(-1,)<>»»AndTarget.Offset(1,)=»»Then Target=Format(Now,»DD.MM.YYYY») EndIf EndSub |
Этот код VBA может быть полезен при ведении реестра, базы данных на листе Excel с записью текущей даты в первой колонке.
Условие завершает процедуру при выборе более одной ячейки, при выборе ячейки A1 и при выборе последней ячейки первого столбца.
Выбор ячейки A1 приводит к ошибке при проверке условия , так как происходит выход за границы диапазона рабочего листа.
Ошибка выхода за пределы рабочего листа происходит и при проверке условия , если выбрать последнюю ячейку первой колонки.
Примечание:
Текущая дата будет введена в следующую пустую ячейку первого столбца при переходе к ней от заполненной в том числе нажатием клавиши «Enter».
Пример без отслеживания Target
Если необходимо, чтобы процедура запускалась при любой смене выделенного диапазона, аргумент Target можно не отслеживать:
|
1 |
PrivateSubWorksheet_SelectionChange(ByValTarget AsRange) IfB1>100Then A1.Interior.Color=vbGreen Else A1.Interior.Color=vbBlue EndIf EndSub |
После ввода значения в ячейку , можно нажать или кликнуть по любой другой ячейке рабочего листа, и событие Worksheet.SelectionChange сработает.
OnKey Events
Use the OnKey method to assign shortcut keys to your macros.
Application.OnKey(Key, Procedure)
OnKey Parameters
| Name | Required/Optional | Data Type | Description |
|---|---|---|---|
| Key | Required | String | A string indicating the key to be pressed. |
| Procedure | Optional | Variant | The name of the procedure to be run. If Procedure is «» (empty text), nothing happens when Key is pressed. If Procedure is omitted, Key reverts to its normal result in Microsoft Excel. |
Refer to specific keys using the codes shown below.
| Key | Code |
|---|---|
| BACKSPACE | {BACKSPACE} or {BS} |
| BREAK | {BREAK} |
| CAPS LOCK | {CAPSLOCK} |
| CLEAR | {CLEAR} |
| DELETE or DEL | {DELETE} or {DEL} |
| DOWN ARROW | {DOWN} |
| END | {END} |
| ENTER (numeric keypad) | {ENTER} |
| ENTER | ~ (tilde) |
| ESC | {ESCAPE} or {ESC} |
| HELP | {HELP} |
| HOME | {HOME} |
| INS | {INSERT} |
| LEFT ARROW | {LEFT} |
| NUM LOCK | {NUMLOCK} |
| PAGE DOWN | {PGDN} |
| PAGE UP | {PGUP} |
| RETURN | {RETURN} |
| RIGHT ARROW | {RIGHT} |
| SCROLL LOCK | {SCROLLLOCK} |
| TAB | {TAB} |
| UP ARROW | {UP} |
| F1 through F15 | {F1} through {F15} |
| Combine with | Precede the key code by |
|---|---|
| SHIFT | + (plus sign) |
| CTRL | ^ (caret) |
| ALT | % (percent sign) |
Assign a Custom Keystroke
To assign the shortcut keys automatically when the workbook opens, place the OnKey statements in the ThisWorkbook module in the Workbook Open event procedure.
Private Sub Workbook_Open()
'Setup OnKeys
Application.OnKey "+{F1}", "SHIFTF1"
End Sub
The procedure the shortcut key calls can be placed in a normal module.
Sub SHIFTF1()
Dim User As String
User = Application.Username
ActiveCell = "Created by " & User & " on " & Now
End Sub
Please note that the OnKey assignment applies to all open workbooks.
Get 30% Discount on Simple Sheets Templates and Courses Use Discount Code BLUE
All enrolments and purchases help this blog(a commission is received at no extra cost to you)
To unassign a custom keystoke, omit the Procedure parameter in the OnKey statement. Place this code in the ThisWorkbook module using the Before Close event procedure.
Private Sub Workbook_BeforeClose(Cancel As Boolean)
'UnAssign OnKeys
Application.OnKey "+{F1}"
End Sub
Disable Built In Excel Keystokes
If you want to disable built in keystokes return an empty text string in the Procedure argument. The following OnKey statement disables ALT F4 which would normally close Excel.
Application.OnKey "%{F4}", ""
Main Worksheet Events
Some common worksheet events ():
| Event | Description |
|---|---|
| Worksheet_SelectionChange | Executes a statement every time the selection changes |
| Worksheet_Activate | Executes a statement every time the worksheet becomes active |
| Worksheet_Deactivate | Executes a statement every time the worksheet becomes deactivated |
| Worksheet_BeforeDoubleClick | Executes a statement when a cell in the worksheet is double-clicked |
| Worksheet_BeforeRightClick | Executes a statement when a cell in the worksheet is right-clicked |
| Worksheet_Calculate | Executes a statement every time a value in the worksheet is calculated or recalculated |
| Worksheet_Change | Executes a statement every time the content of a cell in the worksheet is changed |
| Worksheet_FollowHyperlink | Execute a statement every time a hyperlink is clicked on the worksheet |
Note that some events exist for both Workbook and Worksheet locations. The difference is only in the scope: while Workbook applies to the whole file independent of worksheet, Worksheet applies only for a specific worksheet.
- Previous page
- Next page
FIRST STEPS
VBA Excel’s VBA
VBA Configuring
VBA VBE Editor
VBA The Macro Recorder
VBA First Macro
VBA Comments
VBA Buttons with Macro
FUNDAMENTALS
VBA Variables
VBA Operators
VBA If Then…Else
VBA Select Case
VBA For…Next
VBA Do Loop
VBA Sub And Function
VBA Strings
VBA Events
VBA Array
VBA For Each


